14.采用protobuf序列化传输前后端websocket通信的数据
采用protobuf序列化传输前后端websocket通信的数据
在许多时候我们需要websocket来实现前后端的长连接通信,springboot原生支持的数据格式是string字符串类型的,所以通常需要将对象转为json格式传输;针对某些场景,为了减少网络传输的字节数常常采用序列化未二进制格式的数据进行传输。
目前我采用的是protobuf框架来序列化和反序列化
除了protobuf以外还有哪些跨语言的二进制序列化框架?
- Apache Thrift: 由Facebook开发,并由Apache Software Foundation维护。Thrift包括一个二进制序列化协议和一个RPC系统,支持多种语言,能生成那些语言的数据访问类。
- Apache Avro: Avro是Apache的一个子项目,侧重于数据序列化,并提供丰富的数据结构表示,压缩以及便捷的动态语言集成。
- MessagePack: 它是一个高效的二进制序列化格式,可以像JSON一样使用,但是更快更小。它同样支持多种语言,适用于数据存储和socket数据交换。
- FlatBuffers: 由Google开发,与Protocol Buffers有些相似,但它支持对序列化数据读取而无需解包/解码整个对象,从而能提供更快的速度。
- Cap’n Proto: 类似于FlatBuffers,Cap’n Proto也是一个高效的数据交换格式,并可以零拷贝读取二进制数据。
- CBOR (Concise Binary Object Representation): 是一个针对JSON数据模型的二进制格式,目标是提供更小的消息大小和更快的处理速度。
定义通信协议
-
2个字节的魔数 (必要)
-
1个字节的版本号(必要)
-
1字节序列化方式(必要)
-
4字节指令类型(必要)
-
四个字节 clientType(非必要)
-
4个字节 appId(非必要)
-
8字节请求id(非必要)
-
消息体字节长度 (必要)
-
消息体二进制数组 (必要)
-
消息体json字符串 (非必要)
前端实现protobuf序列化
前端技术栈:vue3 + typescript;所以我采用protobuf-ts库将proto文件转为ts文件
pnpm i -D @protobuf-ts/plugin编写 webSocketProtocol.proto 文件
syntax = "proto3";

message TcpProtocol{

  bytes magic = 1;

  bytes version = 2;

  uint32 serializerType = 3;

  uint32 messageType = 4;

  uint32 clientType = 5;

  uint32 appId = 6;

  uint64 SequenceId = 7;

  uint32 bodyLength = 8;

  bytes body = 9;

  string jsonBody = 10;

}
注意这里的字段顺序需要和后端的proto文件定义的顺序一致,否则后导致序列化/反序列化失败
采用命令生成ts文件
npx protoc --ts_out ./src/protos -I. ./src/net/webSocketProtocol.proto--ts_out:生成的ts文件输出目录-I.:需要生成的proto文件
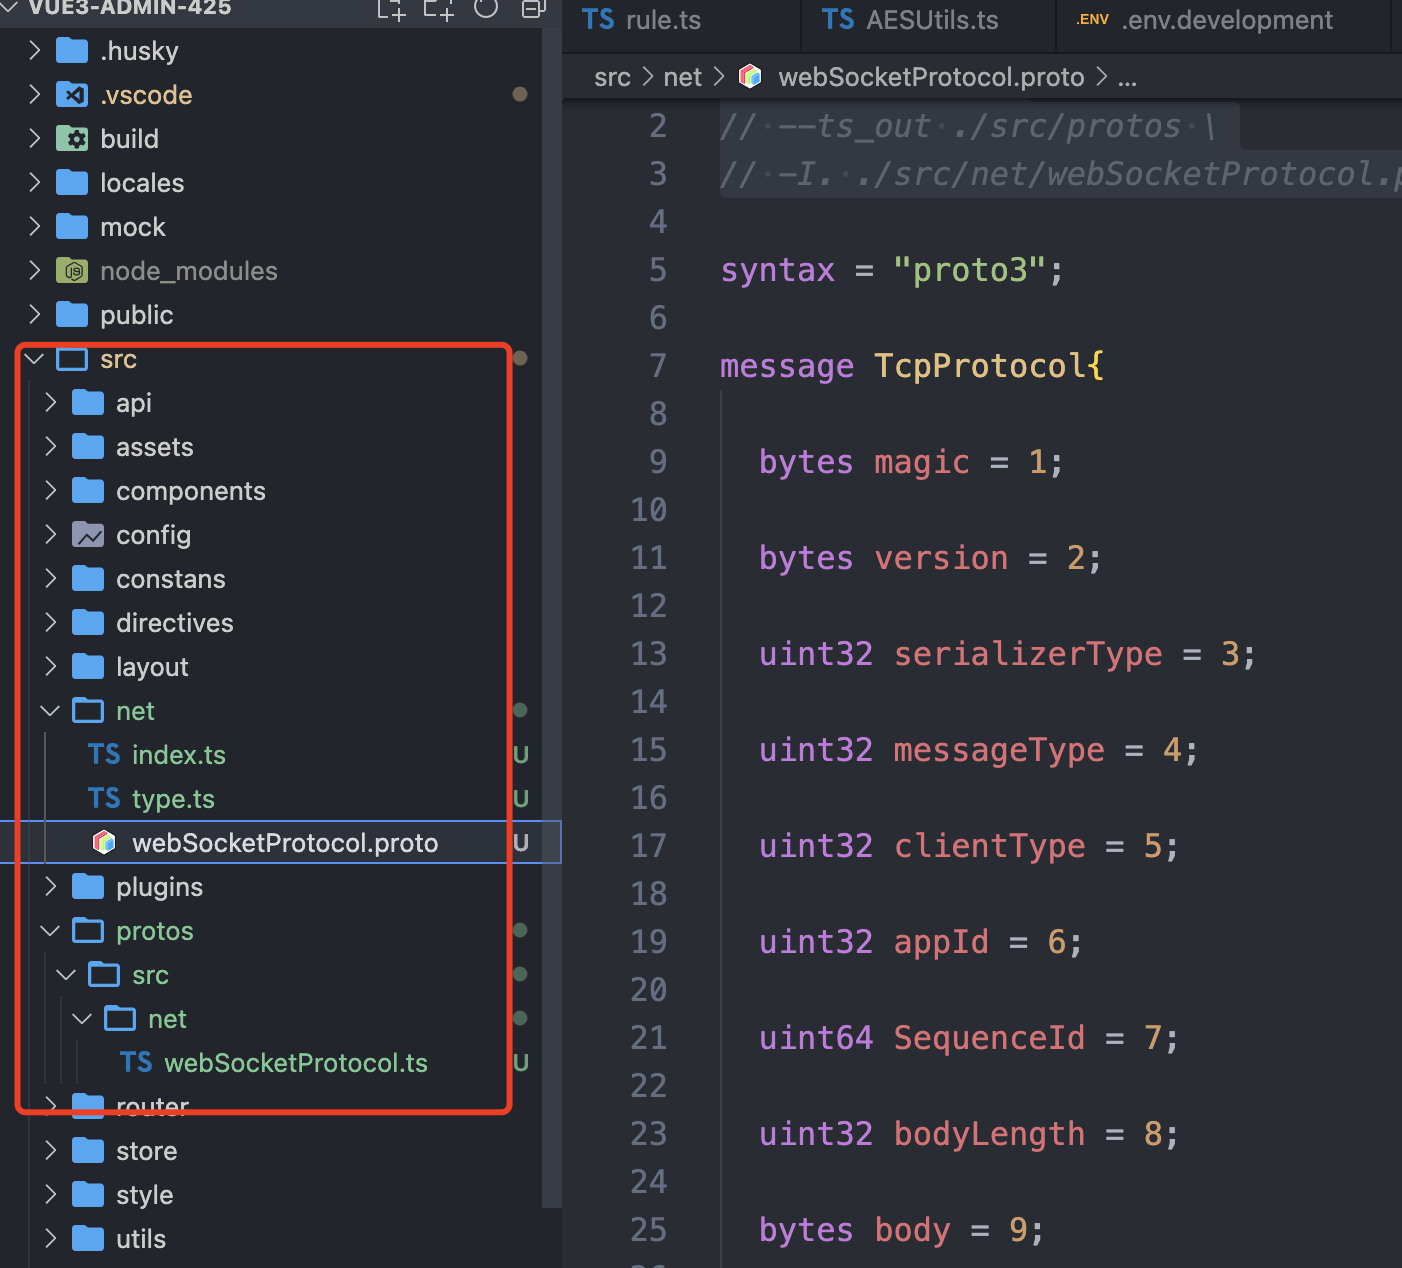
文件目录如下图所示:
编写前端ws发送数据测试类 net/index.ts
import { ImMessage, TcpProtocol } from "@/protos/src/net/webSocketProtocol"

export interface PingImMessage extends ImMessage{
  msg: string;
}


const ws = new WebSocket("ws://localhost:8083/api/v1/im/ws/1")

const pingMsg: PingImMessage = {
  msg: "ping message",
  messageType: 1,
  sequenceId: 1023n,
  appId: 1001,
  clientType: 1
}

let prot = TcpProtocol.create({
  magic: new Uint8Array([0xda, 0xd6]),
  version: new Uint8Array([1]),
  serializerType: 32,
  messageType: 1,
  clientType: 1,
  appId: 1001,
  sequenceId: 1023n,
});


const pingData = ImMessage.toBinary(pingMsg);
prot.bodyLength = pingData.length
prot.body = pingData;
prot.jsonBody = JSON.stringify(pingMsg, (_, v) =>
  typeof v === "bigint" ? v.toString() : v
);

const ptodData = TcpProtocol.toBinary(prot);

const onOpen = (event: Event) => {
  // WebSocket已经连接
  console.log("WebSocket connection opened", event);
  console.log(ptodData.buffer);
  const fromProto = TcpProtocol.fromBinary(ptodData);
  console.log(fromProto);
  console.log(ImMessage.fromBinary(fromProto.body))

  ws.send(ptodData.buffer);

  ws.send(JSON.stringify(prot, (_, v) =>
      typeof v === "bigint" ? v.toString() : v
    )
  );
  console.log("send success");
};

const onMessage = (event: MessageEvent) => {
  // WebSocket收到消息
  console.log('WebSocket message received', event.data);
};

const onClose = (event: CloseEvent) => {
  // WebSocket关闭
  console.log('WebSocket connection closed', event);
};

ws.addEventListener("open", onOpen);
ws.addEventListener("message", onMessage);
ws.addEventListener("close", onClose);
后端实现protobuf序列化
添加依赖
<dependency>
    <groupId>com.google.protobuf</groupId>
    <artifactId>protobuf-java</artifactId>
    <version>3.25.3</version>
</dependency>
<dependency>
    <groupId>com.google.protobuf</groupId>
    <artifactId>protobuf-java-util</artifactId>
    <version>3.25.3</version>
</dependency>
添加protobuf文件编译器
<build>
    <extensions>
        <extension>
            <!--这个扩展可以读取操作系统信息并提供给Maven-->
            <groupId>kr.motd.maven</groupId>
            <artifactId>os-maven-plugin</artifactId>
            <version>1.7.1</version>
        </extension>
    </extensions>
    <plugins>
        <plugin>
            <groupId>org.xolstice.maven.plugins</groupId>
            <artifactId>protobuf-maven-plugin</artifactId>
            <version>0.6.1</version>
            <extensions>true</extensions>
            <configuration>
                <!--
                ${os.detected.classifier}是一个占位符,它是经过os-maven-plugin插件设置的一个系统属性。
                os-maven-plugin插件是用来检测你的操作系统类型和架构的,比如是否是Windows、Linux或Mac,以及是否是x86、amd64等。
                然后它会将这些信息设置到几个系统属性中,${os.detected.classifier}就是其中一个。
                -->
                <protocArtifact>com.google.protobuf:protoc:3.20.3:exe:${os.detected.classifier}</protocArtifact>
                <!--资源目录-->
                <!--                    <protoSourceRoot>${project.basedir}/src/main/proto</protoSourceRoot>-->
                <!--编译后输出的目录-->
                <outputDirectory>build/generated/source/proto/main/java</outputDirectory>
                <!--编译前是否清空目录-->
                <clearOutputDirectory>true</clearOutputDirectory>
            </configuration>
            <executions>
                <execution>
                    <goals>
                        <goal>compile</goal>
                        <goal>test-compile</goal>
                    </goals>
                </execution>
            </executions>
        </plugin>
        <plugin>
            <!--
            这个插件在构建过程中提供了一些辅助功能,如添加源代码路径、资源路径,添加到classpath等。
            其中在<executions>标签内,插件被配置在generate-sources阶段(也就是源代码生成阶段)。它的<goals>设置了add-source,也就是添加源文件目录的目标。
            同时在<configuration>标签中,设置了<source>为build/generated/source/proto/main/java,表示将这个目录加入到源代码目录中。
            这样,Maven就能在后续构建阶段,比如编译、打包等阶段找到这里生成的Java源代码文件。-->
            <groupId>org.codehaus.mojo</groupId>
            <artifactId>build-helper-maven-plugin</artifactId>
            <executions>
                <execution>
                    <phase>generate-sources</phase>
                    <goals>
                        <goal>add-source</goal>
                    </goals>
                    <configuration>
                        <sources>
                            <source>build/generated/source/proto/main/java</source>
                        </sources>
                    </configuration>
                </execution>
            </executions>
        </plugin>
    </plugins>
</build>
==注意 protobuf-maven-plugin 插件默认的proto文件源目录是:src/main/proto==
创建 WebSocketProtocol.proto 文件
syntax = "proto3";

package cn.com.accumulate.common.netty.base.serializer.impl.protobuf;
//import "AbstractMessage.proto";

option java_package = "cn.com.accumulate.common.netty.base.serializer.impl.protobuf";
option java_multiple_files = false;

message WebSocketProtocol{

  bytes magic = 1;

  bytes version = 2;

  uint32 serializerType = 3;

  uint32 messageType = 4;

  uint32 clientType = 5;

  uint32 appId = 6;

  uint64 SequenceId = 7;

  uint32 bodyLength = 8;

  bytes body = 9;

  string jsonBody = 10;

}
通过 maven 插件 compile 命令编译转换为java文件
会在 根目录下的 build/generated/source/proto/main/java 目录下生成一个包名为 cn.com.accumulate.common.netty.base.serializer.impl.protobuf 的 WebSocketProtocolOuterClass 类
编写 ProtobufSerializerImpl 类
@Slf4j
@LoadLevel(name = "protobuf")
public class ProtobufSerializerImpl implements Serializer {

    @Override
    public <T> byte[] serialize(T t) {
        return ProtobufFactory.getInstance().serialize(t);
    }

    @Override
    public <T> T deserialize(byte[] bytes) {
        return ProtobufFactory.getInstance().deserialize(bytes);
    }
}
ProtobufFactory
public class ProtobufFactory {

    private final static ProtobufFactory INSTANCE = new ProtobufFactory();

    private ProtobufFactory() {
    }

    public static ProtobufFactory getInstance() {
        return INSTANCE;
    }

    public <T> byte[] serialize(T t) {
        if (!(t instanceof WebSocketProtocolOuterClass.WebSocketProtocol)) {
            throw new IllegalArgumentException("Parameter t must be subclass of " + WebSocketProtocolOuterClass.WebSocketProtocol.class.getName());
        }
        return ((WebSocketProtocolOuterClass.WebSocketProtocol) t).toByteArray();

    }

    public <T> T deserialize(byte[] bytes) {
        try {
            Parser<WebSocketProtocolOuterClass.WebSocketProtocol> parser = WebSocketProtocolOuterClass.WebSocketProtocol.getDefaultInstance().getParserForType();
            return (T) parser.parseFrom(bytes);
        } catch (InvalidProtocolBufferException e) {
            throw new IllegalArgumentException("Failed to deserialize data", e);
        }
    }

}
后端集成websocket并实现自定义序列化和反序列化类
引入依赖:
<dependency>
    <groupId>org.springframework.boot</groupId>
    <artifactId>spring-boot-starter-websocket</artifactId>
</dependency>
WebSocketServerConfiguration 配置类
@Slf4j
@Configuration
public class WebSocketServerConfiguration {

    @Bean
    public ServerEndpointExporter serverEndpointExporter() {
        return new ServerEndpointExporter();
    }

}
WebSocketService
@Slf4j
@Component
@ServerEndpoint(
        value = "/ws/{userId}",
        encoders = WebSocketEncode.class,
        decoders = WebSocketDecode.class
)
public class WebSocketService {

    @OnOpen
    public void onOpen(Session session, @PathParam("userId") String userId) {
        log.info("有连接加入,sessionId={}, userId={}", session.getId(), userId);
    }

    /**
     * 连接关闭调用的方法
     */
    @OnClose
    public void onClose(Session session) {
        log.info("有连接关闭,sessionId={}", session.getId());
    }

    /**
     * 收到客户端消息后调用的方法
     *
     * @param message 客户端发送过来的消息
     */
    @OnMessage
    public void onMessage(String message, Session session) throws IOException {
        log.info("来自客户端的String消息:{}", message);
    }

    @OnMessage
    public void onMessage(Session session, WebSocketProtocolOuterClass.WebSocketProtocol msg) {
        log.info("来自客户端的Binary消息:{}", msg);
        PingMessage pingMessage = JSON.parseObject(msg.getJsonBody(), PingMessage.class);
        log.info("消息体: {}", JSON.toJSONString(pingMessage));
        log.info("magic: {},{}", msg.getMagic().byteAt(0) == ProtocolConstants.MAGIC_CODE_BYTES[0], (int) msg.getMagic().byteAt(1));
    }

    @OnError
    public void onError(Session session, Throwable throwable) {
        log.error("An error occured: " + throwable.getMessage());
    }
}
在 36行 我直接讲jsonBody字符串解析为 PingMessage 对象了,后续可以根据messageType 来确定具体需要序列化的类对象。
WebSocketDecode
@Slf4j
public class WebSocketDecode implements Decoder.Binary<WebSocketProtocolOuterClass.WebSocketProtocol> {

    @Override
    public WebSocketProtocolOuterClass.WebSocketProtocol decode(ByteBuffer byteBuffer) throws DecodeException {
        log.debug("start decode.");
        Serializer serializer = new ProtobufSerializerImpl();
        return serializer.deserialize(byteBuffer.array());
    }

    /**
     * 判断前端的数据是否需要解码器解码: 目前我在这里写死
     *
     * @param byteBuffer
     * @return
     */
    @Override
    public boolean willDecode(ByteBuffer byteBuffer) {
        return true;
    }
}
WebSocketEncode
public class WebSocketEncode implements Encoder.Binary<WebSocketProtocolOuterClass.WebSocketProtocol> {
    @Override
    public ByteBuffer encode(WebSocketProtocolOuterClass.WebSocketProtocol protocol) throws EncodeException {
        Serializer serializer = new ProtobufSerializerImpl();
        byte[] serialize = serializer.serialize(protocol);
        return ByteBuffer.wrap(serialize);
    }
}
启动前后端项目测试
前端控制台
WebSocket connection opened Event index.ts:56
ArrayBuffer(121) index.ts:58
Object index.ts:59
Object index.ts:99
send success
查看网络控制台
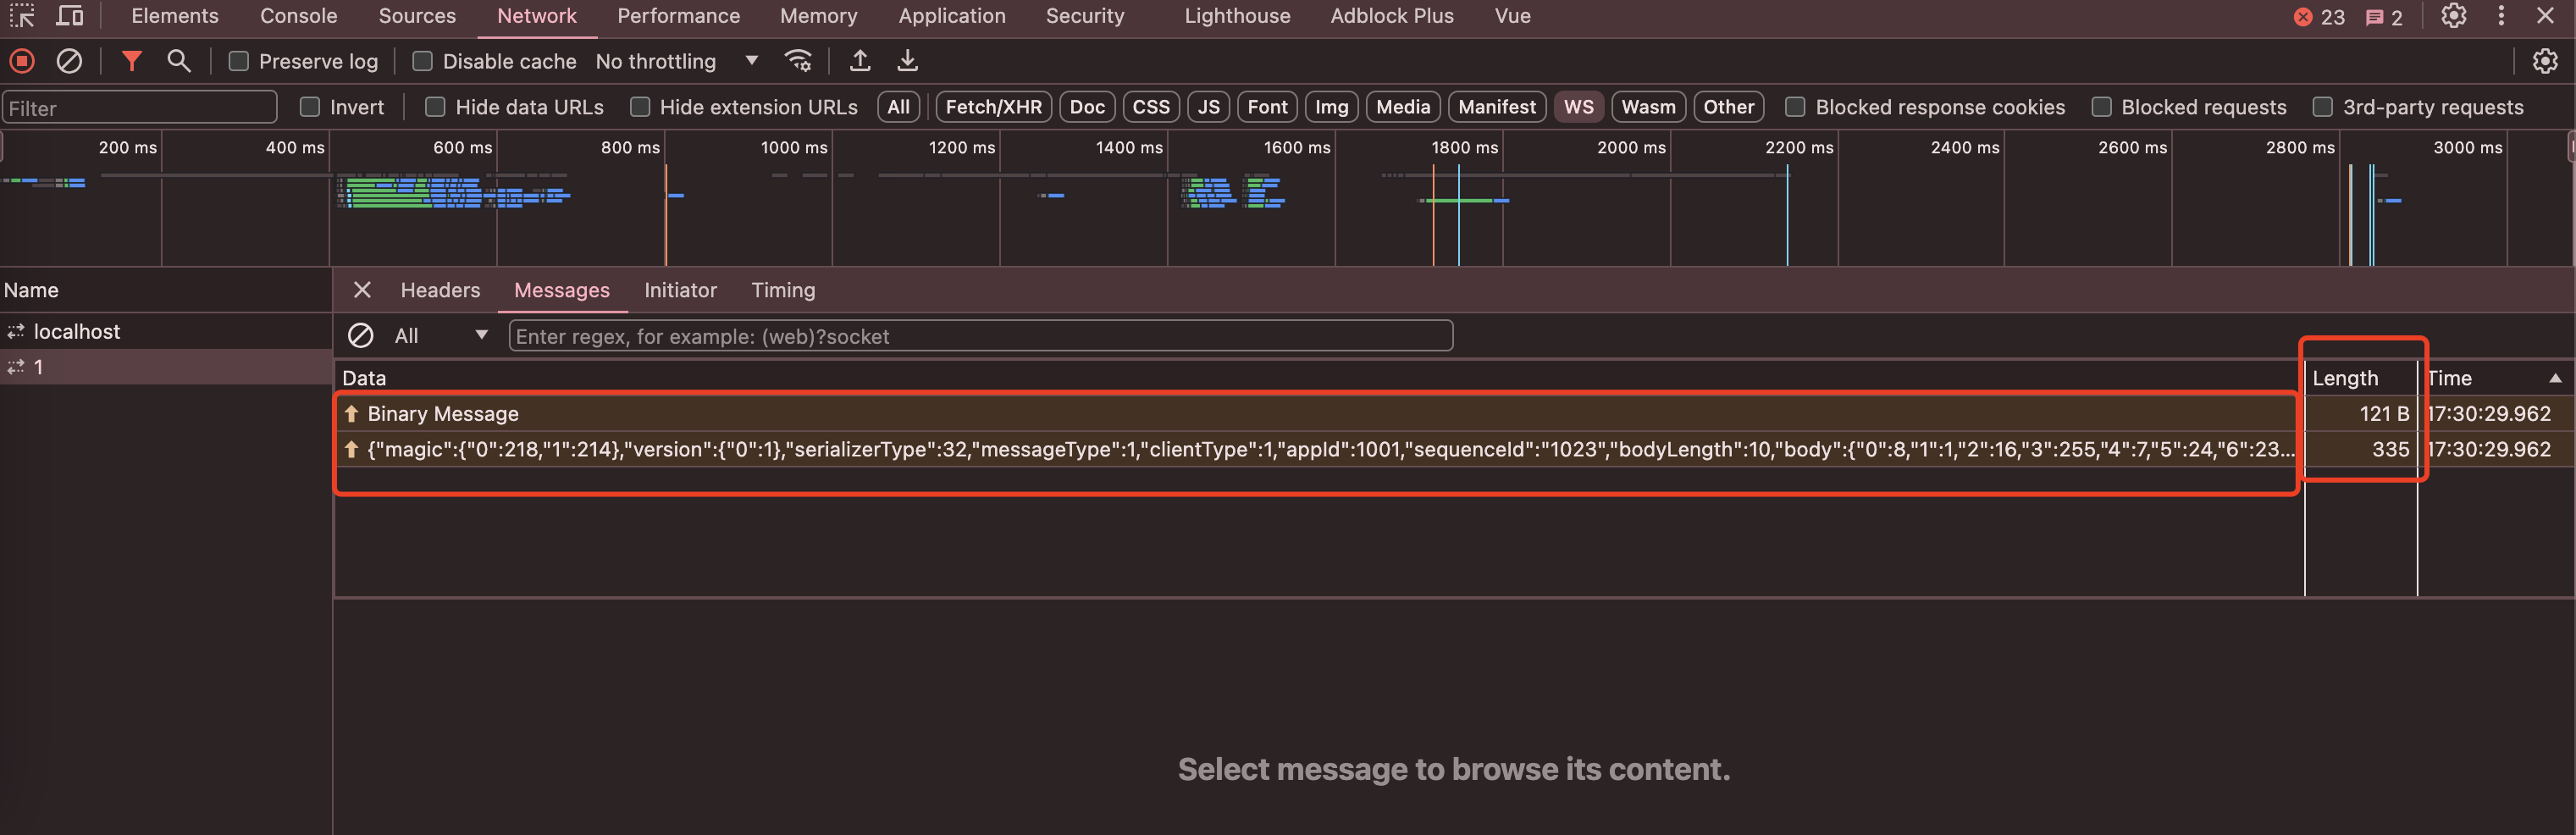
可以看出二进制和string文本数据大小差异。
后端控制台
2024-05-07 17:28:04.383  INFO 62636 --- [nio-8083-exec-1] c.c.a.im.server.chat.WebSocketService    onOpen 37  : 有连接加入,sessionId=0, userId=1
2024-05-07 17:28:04.391 DEBUG 62636 --- [nio-8083-exec-1] c.c.a.i.s.chat.protocol.WebSocketDecode  decode 26  : start decode.
2024-05-07 17:28:04.588  INFO 62636 --- [nio-8083-exec-1] c.c.a.im.server.chat.WebSocketService    onMessage 60  : 来自客户端的Binary消息:magic: "\332\326"
version: "\001"
serializerType: 32
messageType: 1
clientType: 1
appId: 1001
SequenceId: 1023
bodyLength: 10
body: "\b\001\020\377\a\030\351\a \001"
jsonBody: "{\"msg\":\"ping message\",\"messageType\":1,\"sequenceId\":\"1023\",\"appId\":1001,\"clientType\":1}"

2024-05-07 17:28:05.955  INFO 62636 --- [nio-8083-exec-1] c.c.a.im.server.chat.WebSocketService    onMessage 62  : 消息体: {"appId":1001,"className":"cn.com.accumulate.im.server.chat.protocol.domain.ping.PingMessage","clientType":1,"createId":"-1","messageType":1,"msg":"ping message","sequenceId":1023,"write":false}
2024-05-07 17:28:05.957  INFO 62636 --- [nio-8083-exec-1] c.c.a.im.server.chat.WebSocketService    onMessage 63  : magic: true,-42
2024-05-07 17:28:05.958  INFO 62636 --- [nio-8083-exec-1] c.c.a.im.server.chat.WebSocketService    onMessage 55  : 来自客户端的String消息:{"magic":{"0":218,"1":214},"version":{"0":1},"serializerType":32,"messageType":1,"clientType":1,"appId":1001,"sequenceId":"1023","bodyLength":10,"body":{"0":8,"1":1,"2":16,"3":255,"4":7,"5":24,"6":233,"7":7,"8":32,"9":1},"jsonBody":"{\"msg\":\"ping message\",\"messageType\":1,\"sequenceId\":\"1023\",\"appId\":1001,\"clientType\":1}"}
这里只演示了前段序列化后端反序列化的流程,没有测试和演示后端序列化,前端反序列化的过程。
附录文件代码
PingMessage
@Data
public class PingMessage extends ImMessage {

    private String msg;

    public PingMessage() {
        this.msg = "ping: " + DateUtil.formatDate(new Date(), Constants.INPUT_TIME_FORMAT);
    }

    @Override
    public Integer getMessageType() {
        return ImMessageTypeConstants.PING_MESSAGE;
    }
}
ImMessage
@Data
public abstract class ImMessage extends AbstractMessage implements Serializable {

    private Integer appId;

    public abstract Integer getMessageType();

}
AbstractMessage
@Data
@NoArgsConstructor
@AllArgsConstructor
public class AbstractMessage extends AbstractRequest implements Serializable {

    /**
     * 消息类型
     */
    private Integer messageType;

    /**
     * 消息序列id
     */
    private Long sequenceId;

    @Override
    public boolean isWrite() {
        return false;
    }
}
ImMessageTypeConstants
public interface ImMessageTypeConstants {

    Integer PING_MESSAGE = 1;

    /**
     * 登录指令
     */
    Integer LOGIN = 2;

    /**
     * 登出指令
     */
    Integer LOGOUT = 3;

    /**
     * 单聊
     */
    Integer SINGLE_CHAT_MESSAGE = 4;
}
前后端采用原生的方法传输二进制数据实现自定义协议
(在序列化消息的时候一直没有好的序列化方案,所以没有测试成功)
前端写入二进制数据
let msg = ImMessage.create({
   messageType: 1,
   appId: 12,
   sequenceId: 1023n,
   clientType: 1
});

let binaryData: Uint8Array = ImMessage.toBinary(msg);

// 创建一个ArrayBuffer对象
  // 获取数据长度
  const dataSize = binaryData.length;
  let buffer = new ArrayBuffer(dataSize + 24 + 4); // 创建一个8字节的buffer
  let view = new DataView(buffer); // 创建一个用于操作buffer的DataView

  // 向buffer中填充数据
  view.setInt8(0, 0xda);
  view.setInt8(1, 0xd6);
  // 版本号
  view.setInt8(2, 1);
  // 序列化方式 protobuf
  view.setInt8(3, 32);

  // messageType
  view.setUint32(4, 1);
  // clientType
  view.setUint32(8, 2);
  // appid
  view.setUint32(12, 12345);

  view.setBigInt64(16, 1024n);

  // 数据大小
  view.setUint32(24, dataSize);

  // 直接将 binaryData 置入 buffer
  let uint8View = new Uint8Array(buffer);
  uint8View.set(binaryData, 28);

  // 将buffer发送到服务器
  ws.send(buffer);
后端解析数据:
public WebSocketProtocolOuterClass.WebSocketProtocol decode(ByteBuffer byteBuffer) throws DecodeException {
        log.debug("start decode.");
        byte b0 = byteBuffer.get();
        byte b1 = byteBuffer.get();
        // 判断请求头魔法数是否匹配:保证数据的安全性
        if (ProtocolConstants.MAGIC_CODE_BYTES[0] != b0
                || ProtocolConstants.MAGIC_CODE_BYTES[1] != b1) {
            throw new IllegalArgumentException("Unknown magic code: " + b0 + ", " + b1);
        }

        // 协议版本号
        byte version = byteBuffer.get();
        log.debug("版本号:{}", version);
        byte serializerType = byteBuffer.get();
        log.debug("序列化方式:{}", SerializerTypeEnum.getNameByCode(serializerType));
        int messageType = byteBuffer.getInt();
        log.debug("消息类型:{}", messageType);
        int clientType = byteBuffer.getInt();
        log.debug("客户端类型:{}", clientType);
        int appId = byteBuffer.getInt();
        log.debug("appId:{}", appId);
        Long sequenceId = byteBuffer.getLong();
        log.debug("消息id:{}", sequenceId);

        // 获取消息体长度
        int length = byteBuffer.getInt();
        byte[] bytes = new byte[length];

        byteBuffer.get(bytes, 0, length);

        // 反序列化对象
        Serializer serializer = EnhancedServiceLoader.load(Serializer.class, SerializerTypeEnum.getNameByCode(serializerType));
        ImMessage message = serializer.deserialize(bytes);
        // 初始化值
        if (message.getSequenceId() == null) {
            message.setSequenceId(sequenceId);
        }
        if (message.getAppId() == null) {
            message.setAppId(appId);
        }
        if (message.getClientType() == null) {
            message.setClientType(clientType);
        }
        return message;
}