Spring Authorization Server(一)
spring Authorization Server(一)
单点登录和第三方登录具体流程是什么?区别是什么?
单点登录(SSO)和第三方登录都是现代身份认证和授权的流程,它们允许用户使用一个账户和密码或其他身份标识来访问多个应用或服务。但是,它们在实现和用途上有所不同。
单点登录 (SSO):
- 定义:SSO是一个用户身份验证过程,它允许用户使用一组登录凭据(例如,用户名和密码)来访问多个应用程序或服务。这些应用程序通常隶属于同一组织。
- 具体流程:用户首次登录时需要认证一次(比如通过用户名和密码)。认证成功后,认证服务器会创建一个认证标记(token)给用户。当用户尝试访问同一组织下的其他服务时,他们会被重定向到认证服务器,认证服务器检查该用户是否已经认证,并发放额外的令牌来访问其他服务。
- 优点:减少用户需要记住的密码数量;提升用户体验;加强安全性,因为用户认证是在集中的认证系统中进行的。
第三方登录:
- 定义:第三方登录,也称为社交登录,指用户使用第三方服务(如Google、Facebook、Twitter)的账号登录其他独立的应用或服务。
- 具体流程:当用户选择“通过Google登录”这样的选项时,他们被重定向到第三方服务的登录页。一旦在那里认证成功,第三方服务会发放一个令牌给原始应用,通知它用户已被成功认证,并通常带回一些用户信息(如姓名、邮箱地址等)。
- 优点:用户不需要为每个新服务创建一个新的账户,便捷地利用已经存在的账户即可登录;对于服务提供商而言,他们不需要开发和维护一个复杂的账户系统。
两者的区别:
- 归属不同:SSO系统是在单一组织或服务内部使用,而第三方登录通过外部服务实现身份验证。
- 控制权:在SSO中,组织拥有自己的用户凭据和认证流程的完全控制。而第三方登录依赖外部服务的认证方法。
- 应用场景:SSO更适用于一个组织要集中控制和管理用户对多个内部应用的访问权限。第三方登录更适用于用户以最少的摩擦加入新服务。
单点登录采用的是那种模式呢(简单模式,密码模式,授权码模式),具体的流程是怎样的呢?
在单点登录(SSO)系统中,最常使用的认证模式是授权码模式(Authorization Code Grant)。
这种模式符合OAuth 2.0标准,适合于需要用户授权并获取用户数据的应用进行访问控制。授权码模式包括以下步骤:
-
用户请求登录:用户试图访问一个受保护的资源。如果他们尚未登录,系统会将用户重定向到认证服务器的登录页面。
-
用户输入凭据:用户在认证服务器的页面上输入自己的用户名和密码。
-
授权码颁发:如果凭据验证成功,认证服务器会向用户的客户端(通常是一个Web应用程序)发回一个授权码。这个授权码是一个短期有效的代码,用于下一步换取访问令牌。
-
服务前端请求访问令牌:一旦用户的客户端获取了授权码,它就会向认证服务器后端服务发送一个请求,以授权码、客户端ID、客户端密钥以及之前发送授权码的重定向URL来交换访问令牌。
-
访问令牌与刷新令牌的颁发:验证授权码和客户端信息无误后,认证服务器会发放一个访问令牌和一个刷新令牌。访问令牌是有时效的,一定时间后会过期,而刷新令牌可以用来在不需要用户再次输入凭据的情况下获取新的访问令牌。
-
用户访问服务:客户端使用这个访问令牌去请求资源服务器返回用户请求的资源。
-
令牌校验:资源服务器验证访问令牌的有效性,如果验证通过,则返回资源给客户端。
-
跨应用自动登录:当用户尝试访问同一单点登录系统下的其他应用时,由于SSO会话已存在,用户会被自动授权并获得访问该应用所需的令牌,无需重新输入凭证。
单点登录系统如何实现跨应用自动登录?
单点登录(SSO)系统允许用户在多个应用程序间进行跨应用自动登录。实现SSO的基本步骤如下:
- 身份提供者(IdP)集成:
所有需要单点登录的应用都要与一个共同的身份提供者(Identity Provider,IdP)集成。身份提供者负责维护用户的登录凭证和身份信息。
- 首次认证:
当用户首次登录任何一个应用时,应用将用户重定向到身份提供者进行认证。用户在IdP上输入凭证(如用户名和密码)。
- 设置会话和令牌:
成功认证后,IdP会为用户创建一个全局会话,并给用户浏览器发放一个认证令牌,如安全令牌或票据(如SAML断言或JWT)。此外,IdP还会在用户的浏览器上设置一个cookie,服务于身份提供者的域。
- 重定向回应用:
用户认证成功后,IdP会将用户带着令牌重定向回初始请求的应用。应用使用这个令牌向身份提供者验证用户身份,并创建自己的会话。
- 跨应用自动登录:
当这个用户尝试访问另一个集成SSO的应用时,这个应用也会将用户重定向到IdP以验证身份。因为用户已经在IdP上有一个有效会话(通常由IdP的cookie证明),IdP会确认用户的身份,并提供一个新的认证令牌给第二个应用,而不需要用户重新输入凭证。
- 会话同步:
IdP和应用之间通常存在会话同步机制。当用户注销时,多个应用和IdP之间会同步这个状态,确保用户从所有应用中注销。
实现SSO的协议和技术有多种,包括SAML(安全断言标记语言),OAuth,OpenID Connect(OAuth 2.0的身份层)等。这些协议定义了用户身份信息在不同服务和应用之间安全传递的方式。
创建一个简单springboot3工程
<?xml version="1.0" encoding="UTF-8"?>
<project xmlns="http://maven.apache.org/POM/4.0.0" xmlns:xsi="http://www.w3.org/2001/XMLSchema-instance"
         xsi:schemaLocation="http://maven.apache.org/POM/4.0.0 https://maven.apache.org/xsd/maven-4.0.0.xsd">
    <modelVersion>4.0.0</modelVersion>
    <groupId>cn.com.wuhm.authorization.server</groupId>
    <artifactId>spring-boot3-authorization-server</artifactId>
    <version>0.0.1-SNAPSHOT</version>
    <name>spring-boot3-authorization-server</name>
    <description>spring-boot3-authorization-server</description>
    <properties>
        <java.version>17</java.version>
        <project.build.sourceEncoding>UTF-8</project.build.sourceEncoding>
        <project.reporting.outputEncoding>UTF-8</project.reporting.outputEncoding>
        <spring-boot.version>3.2.3</spring-boot.version>
        <oauth2-authorization-server.version>1.2.3</oauth2-authorization-server.version>
    </properties>
    <dependencies>
        <dependency>
            <groupId>org.springframework.boot</groupId>
            <artifactId>spring-boot-starter-web</artifactId>
        </dependency>

        <dependency>
            <groupId>org.projectlombok</groupId>
            <artifactId>lombok</artifactId>
            <optional>true</optional>
        </dependency>
        <dependency>
            <groupId>org.springframework.boot</groupId>
            <artifactId>spring-boot-starter-test</artifactId>
            <scope>test</scope>
        </dependency>

        <dependency>
            <groupId>org.springframework.security</groupId>
            <artifactId>spring-security-oauth2-authorization-server</artifactId>
            <version>${oauth2-authorization-server.version}</version>
        </dependency>
    </dependencies>
    <dependencyManagement>
        <dependencies>
            <dependency>
                <groupId>org.springframework.boot</groupId>
                <artifactId>spring-boot-dependencies</artifactId>
                <version>${spring-boot.version}</version>
                <type>pom</type>
                <scope>import</scope>
            </dependency>
        </dependencies>
    </dependencyManagement>

    <build>
        <plugins>
            <plugin>
                <groupId>org.apache.maven.plugins</groupId>
                <artifactId>maven-compiler-plugin</artifactId>
                <version>3.8.1</version>
                <configuration>
                    <source>17</source>
                    <target>17</target>
                    <encoding>UTF-8</encoding>
                </configuration>
            </plugin>
            <plugin>
                <groupId>org.springframework.boot</groupId>
                <artifactId>spring-boot-maven-plugin</artifactId>
                <version>${spring-boot.version}</version>
                <configuration>
                    <mainClass>
                        cn.com.wuhm.authorization.server.springboot3authorizationserver.SpringBoot3AuthorizationServerApplication
                    </mainClass>
                    <skip>true</skip>
                </configuration>
                <executions>
                    <execution>
                        <id>repackage</id>
                        <goals>
                            <goal>repackage</goal>
                        </goals>
                    </execution>
                </executions>
            </plugin>
        </plugins>
    </build>

</project>
参考官方文档:https://docs.spring.io/spring-authorization-server/reference/getting-started.html
然后一行一行来解读:
package cn.com.wuhm.authorization.server.springboot3authorizationserver.config;

import java.security.KeyPair;
import java.security.KeyPairGenerator;
import java.security.interfaces.RSAPrivateKey;
import java.security.interfaces.RSAPublicKey;
import java.util.UUID;

import com.nimbusds.jose.jwk.JWKSet;
import com.nimbusds.jose.jwk.RSAKey;
import com.nimbusds.jose.jwk.source.ImmutableJWKSet;
import com.nimbusds.jose.jwk.source.JWKSource;
import com.nimbusds.jose.proc.SecurityContext;

import org.springframework.context.annotation.Bean;
import org.springframework.context.annotation.Configuration;
import org.springframework.core.annotation.Order;
import org.springframework.http.MediaType;
import org.springframework.security.config.Customizer;
import org.springframework.security.config.annotation.web.builders.HttpSecurity;
import org.springframework.security.config.annotation.web.configuration.EnableWebSecurity;
import org.springframework.security.core.userdetails.User;
import org.springframework.security.core.userdetails.UserDetails;
import org.springframework.security.core.userdetails.UserDetailsService;
import org.springframework.security.oauth2.core.AuthorizationGrantType;
import org.springframework.security.oauth2.core.ClientAuthenticationMethod;
import org.springframework.security.oauth2.core.oidc.OidcScopes;
import org.springframework.security.oauth2.jwt.JwtDecoder;
import org.springframework.security.oauth2.server.authorization.client.InMemoryRegisteredClientRepository;
import org.springframework.security.oauth2.server.authorization.client.RegisteredClient;
import org.springframework.security.oauth2.server.authorization.client.RegisteredClientRepository;
import org.springframework.security.oauth2.server.authorization.config.annotation.web.configuration.OAuth2AuthorizationServerConfiguration;
import org.springframework.security.oauth2.server.authorization.config.annotation.web.configurers.OAuth2AuthorizationServerConfigurer;
import org.springframework.security.oauth2.server.authorization.settings.AuthorizationServerSettings;
import org.springframework.security.oauth2.server.authorization.settings.ClientSettings;
import org.springframework.security.provisioning.InMemoryUserDetailsManager;
import org.springframework.security.web.SecurityFilterChain;
import org.springframework.security.web.authentication.LoginUrlAuthenticationEntryPoint;
import org.springframework.security.web.util.matcher.MediaTypeRequestMatcher;

@Configuration
@EnableWebSecurity
public class SecurityConfig {

	@Bean
	@Order(1)
	public SecurityFilterChain authorizationServerSecurityFilterChain(HttpSecurity http)
			throws Exception {
		OAuth2AuthorizationServerConfiguration.applyDefaultSecurity(http);

//		authorizationServerConfigurer
//				.authorizationEndpoint(authorizationEndpoint ->
//						authorizationEndpoint
//								.authorizationRequestConverter(authorizationRequestConverter)
//								.authorizationRequestConverters(authorizationRequestConvertersConsumer)
//								.authenticationProvider(authenticationProvider)
//								.authenticationProviders(authenticationProvidersConsumer)
//								.authorizationResponseHandler(authorizationResponseHandler)
//								.errorResponseHandler(errorResponseHandler)
//								.consentPage("/oauth2/v1/authorize")
//				);

		http.getConfigurer(OAuth2AuthorizationServerConfigurer.class)
				// OAuth2AuthorizationEndpointConfigurer提供了自定义OAuth2授权端点的能力。它定义了扩展点,允许您自定义OAuth2授权请求的预处理、主处理和后处理逻辑。
				.authorizationEndpoint(authorizationEndpoint->
						authorizationEndpoint
								.authorizationRequestConverter()
				)
				// Enable OpenID Connect 1.0
				.oidc(Customizer.withDefaults());
		http
			// Redirect to the login page when not authenticated from the
			// authorization endpoint
			.exceptionHandling((exceptions) -> exceptions
				.defaultAuthenticationEntryPointFor(
					new LoginUrlAuthenticationEntryPoint("/login"),
					new MediaTypeRequestMatcher(MediaType.TEXT_HTML)
				)
			)
			// Accept access tokens for User Info and/or Client Registration
			.oauth2ResourceServer((resourceServer) -> resourceServer
				.jwt(Customizer.withDefaults()));

		return http.build();
	}

	@Bean
	@Order(2)
	public SecurityFilterChain defaultSecurityFilterChain(HttpSecurity http)
			throws Exception {
		http
			.authorizeHttpRequests((authorize) -> authorize
				.anyRequest().authenticated()
			)
			// Form login handles the redirect to the login page from the
			// authorization server filter chain
			.formLogin(Customizer.withDefaults());

		return http.build();
	}

	@Bean
	public UserDetailsService userDetailsService() {
		UserDetails userDetails = User.withDefaultPasswordEncoder()
				.username("user")
				.password("password")
				.roles("USER")
				.build();

		return new InMemoryUserDetailsManager(userDetails);
	}

	@Bean
	public RegisteredClientRepository registeredClientRepository() {
		RegisteredClient oidcClient = RegisteredClient.withId(UUID.randomUUID().toString())
				.clientId("oidc-client")
				.clientSecret("{noop}secret")
				.clientAuthenticationMethod(ClientAuthenticationMethod.CLIENT_SECRET_BASIC)
				.authorizationGrantType(AuthorizationGrantType.AUTHORIZATION_CODE)
				.authorizationGrantType(AuthorizationGrantType.REFRESH_TOKEN)
				.redirectUri("http://127.0.0.1:8080/login/oauth2/code/oidc-client")
				.postLogoutRedirectUri("http://127.0.0.1:8080/")
				.scope(OidcScopes.OPENID)
				.scope(OidcScopes.PROFILE)
				.clientSettings(ClientSettings.builder().requireAuthorizationConsent(true).build())
				.build();

		return new InMemoryRegisteredClientRepository(oidcClient);
	}

	@Bean
	public JWKSource<SecurityContext> jwkSource() {
		KeyPair keyPair = generateRsaKey();
		RSAPublicKey publicKey = (RSAPublicKey) keyPair.getPublic();
		RSAPrivateKey privateKey = (RSAPrivateKey) keyPair.getPrivate();
		RSAKey rsaKey = new RSAKey.Builder(publicKey)
				.privateKey(privateKey)
				.keyID(UUID.randomUUID().toString())
				.build();
		JWKSet jwkSet = new JWKSet(rsaKey);
		return new ImmutableJWKSet<>(jwkSet);
	}

	private static KeyPair generateRsaKey() {
		KeyPair keyPair;
		try {
			KeyPairGenerator keyPairGenerator = KeyPairGenerator.getInstance("RSA");
			keyPairGenerator.initialize(2048);
			keyPair = keyPairGenerator.generateKeyPair();
		}
		catch (Exception ex) {
			throw new IllegalStateException(ex);
		}
		return keyPair;
	}

	@Bean
	public JwtDecoder jwtDecoder(JWKSource<SecurityContext> jwkSource) {
		return OAuth2AuthorizationServerConfiguration.jwtDecoder(jwkSource);
	}

	@Bean
	public AuthorizationServerSettings authorizationServerSettings() {
		return AuthorizationServerSettings.builder().build();
	}

}
开始分析 Protocol Endpoints
第一个疑惑点:官方文档中提到了:org.springframework.security.web.authentication.AuthenticationConverter
什么是AuthenticationConverter
AuthenticationConverter 是Spring Security框架中的一个接口,它用于从HTTP请求(HttpServletRequest)转换或解析为Spring Security的Authentication类型对象。Authentication对象封装了认证信息,包括认证主体(如用户名)和凭据(如密码),以及其他详情。
这个转换器对于Spring Security的认证过程是很关键的,因为它允许系统解析和处理各种类型的认证机制,例如基本认证、表单登录、OAuth、SAML等。不同的认证类型可能需要不同的转换逻辑,因此AuthenticationConverter可以由不同的实现类来实现这些逻辑。例如,BasicAuthenticationConverter是一个实现了AuthenticationConverter的类,用于处理HTTP基本认证。
实现AuthenticationConverter的类通常需要重写一个方法,以便将请求数据转换为适当的Authentication对象。然后,这个对象可以用来与Spring Security的其他组件(如AuthenticationManager)交互,进行认证过程。
OAuth2 Token Endpoint和OAuth2 Token Introspection Endpoint,OAuth2 Token Revocation Endpoint,OAuth2 Authorization Server Metadata Endpoint的区别和含义
OAuth2 Token Endpoint (OAuth2 令牌端点):
- 定制能力: OAuth2TokenEndpointConfigurer 类提供了定制 OAuth2 Token Endpoint 的能力,允许自定义处理 OAuth2 访问令牌请求的预处理、主处理和后处理逻辑。
- 主要目的: 此端点主要用于处理 OAuth2 访问令牌请求。支持的授权类型包括 authorizationcode、refreshtoken、clientcredentials,和 urn:ietf:params:oauth:grant-type:devicecode。
- 默认配置: 默认提供了一套处理 OAuth2 授权码请求、刷新令牌请求、客户端凭据请求和设备代码请求的认证转换器和认证管理器。成功处理后,会返回 OAuth2 授权响应。
- OAuth2 Token Introspection Endpoint (OAuth2 令牌审查端点):
- 定制能力: OAuth2TokenIntrospectionEndpointConfigurer 类提供了定制 OAuth2 Token Introspection Endpoint 的能力,允许自定义处理 OAuth2 审查请求的预处理、主处理和后处理逻辑。
- 主要目的: 此端点用于审查给定的 OAuth2 令牌并返回该令牌的相关信息(如活跃状态和相关的权限范围)。
- 默认配置: 默认包括了处理 OAuth2 令牌审查请求的认证转换器和认证管理器,并在成功处理后返回 OAuth2 Token Introspection 响应。
- OAuth2 Token Revocation Endpoint (OAuth2 令牌撤销端点):
- 定制能力: OAuth2TokenRevocationEndpointConfigurer 类提供了定制 OAuth2 Token Revocation Endpoint 的能力,允许自定义处理 OAuth2 撤销请求的预处理、主处理和后处理逻辑。
- 主要目的: 此端点用于撤销之前发放的 OAuth2 令牌。
- 默认配置: 默认包括了处理 OAuth2 令牌撤销请求的认证转换器和认证管理器,成功处理后会返回撤销响应。
- OAuth2 Authorization Server Metadata Endpoint (OAuth2 授权服务器元数据端点):
- 定制能力: OAuth2AuthorizationServerMetadataEndpointConfigurer 类提供了定制 OAuth2 Authorization Server Metadata Endpoint 的能力,允许自定义 OAuth2 授权服务器元数据响应。
- 主要目的: 如其名称所示,此端点用于返回关于 OAuth2 授权服务器的配置数据。
- 默认配置: 默认情况下,它会返回一个包含授权服务器配置声明的 OAuth2AuthorizationServerMetadata 响应。
开始自定义认证方式
cn.com.wuhm.authorization.server.springboot3authorizationserver.endpoint.ConsumerAuthenticationConverter
/**
 * @author wuhming
 * @description ""
 * @date 2024/4/12 16:56
 */
public class ConsumerAuthenticationConverter implements AuthenticationConverter {
    @Override
    public Authentication convert(HttpServletRequest request) {
        return null;
    }
}
根据官网可知默认实现是:OAuth2AuthorizationCodeAuthenticationConverter 我们先将源码拷贝过来
由于某些类不提供给外部使用所以代码有些许更改:
public class ConsumerAuthenticationConverter implements AuthenticationConverter {

    static final String ACCESS_TOKEN_REQUEST_ERROR_URI = "https://datatracker.ietf.org/doc/html/rfc6749#section-5.2";


    @Nullable
    @Override
    public Authentication convert(HttpServletRequest request) {

        MultiValueMap<String, String> parameters = new LinkedMultiValueMap<>();
        Map<String, String[]> parameterMap = request.getParameterMap();
        parameterMap.forEach((key, values) -> {
            for (String value : values) {
                parameters.add(key, value);
            }
        });

        // grant_type (REQUIRED)
        String grantType = parameters.getFirst(OAuth2ParameterNames.GRANT_TYPE);
        if (!AuthorizationGrantType.AUTHORIZATION_CODE.getValue().equals(grantType)) {
            return null;
        }

        Authentication clientPrincipal = SecurityContextHolder.getContext().getAuthentication();

        // code (REQUIRED)
        String code = parameters.getFirst(OAuth2ParameterNames.CODE);
        if (!StringUtils.hasText(code) ||
                parameters.get(OAuth2ParameterNames.CODE).size() != 1) {

            OAuth2Error error = new OAuth2Error(OAuth2ErrorCodes.INVALID_REQUEST,
                    "OAuth 2.0 Parameter: " + OAuth2ParameterNames.CODE,
                    ACCESS_TOKEN_REQUEST_ERROR_URI);
            throw new OAuth2AuthenticationException(error);

        }

        // redirect_uri (REQUIRED)
        // Required only if the "redirect_uri" parameter was included in the authorization request
        String redirectUri = parameters.getFirst(OAuth2ParameterNames.REDIRECT_URI);
        if (StringUtils.hasText(redirectUri) &&
                parameters.get(OAuth2ParameterNames.REDIRECT_URI).size() != 1) {

            OAuth2Error error = new OAuth2Error(OAuth2ErrorCodes.INVALID_REQUEST,
                    "OAuth 2.0 Parameter: " + OAuth2ParameterNames.REDIRECT_URI,
                    ACCESS_TOKEN_REQUEST_ERROR_URI);
            throw new OAuth2AuthenticationException(error);
        }

        Map<String, Object> additionalParameters = new HashMap<>();
        parameters.forEach((key, value) -> {
            if (!key.equals(OAuth2ParameterNames.GRANT_TYPE) &&
                    !key.equals(OAuth2ParameterNames.CLIENT_ID) &&
                    !key.equals(OAuth2ParameterNames.CODE) &&
                    !key.equals(OAuth2ParameterNames.REDIRECT_URI)) {
                additionalParameters.put(key, (value.size() == 1) ? value.get(0) : value.toArray(new String[0]));
            }
        });

        return new OAuth2AuthorizationCodeAuthenticationToken(
                code, clientPrincipal, redirectUri, additionalParameters);
    }

}
最后面他返回了:
OAuth2AuthorizationCodeAuthenticationToken(
                code, clientPrincipal, redirectUri, additionalParameters);
他继承了 org.springframework.security.authentication.AbstractAuthenticationToken 这个类
AbstractAuthenticationToken这个类主要是干什么的?
org.springframework.security.authentication.AbstractAuthenticationToken 类是Spring Security框架中用于表示认证信息的核心抽象类。这个类实现了 Authentication 接口,是很多认证令牌实现的基类。当一个用户尝试登录到系统时,它们的身份验证信息会被封装在一个实现了 Authentication 接口的对象中。
AbstractAuthenticationToken 类提供了以下核心功能:
-
存储主要信息:它存储了关于被认证的主体(如用户)的主要信息,通常是一个 UserDetails 对象,其中包含用户名、密码、权限等信息。
-
存储权限:存储了与主体相关的权限信息,通常包括由 GrantedAuthority 接口实现的一系列权限。
-
存储凭证:它可以存储身份验证过程中使用的凭证(如密码、令牌等)。
-
存储细节:提供了在身份验证过程中存储特定于应用的附加信息的能力,通过一个对象来表示,通常是个 WebAuthenticationDetails ,包含了诸如IP地址、会话ID等信息。
-
确定身份验证状态:身份验证对象能够表示用户的身份验证状态(是否已经成功认证),通过 isAuthenticated() 方法提供这一信息。
在Spring Security中,不同类型的认证机制,如用户名和密码认证、OAuth2、LDAP等,都会继承 AbstractAuthenticationToken 并提供特定于那种身份验证类型的行为和属性。自定义认证令牌通常扩展 AbstractAuthenticationToken,以便与Spring Security的认证架构集成。
自定义一个AuthenticationToken
import org.springframework.security.authentication.AbstractAuthenticationToken;
import org.springframework.security.core.GrantedAuthority;

import java.util.Collection;

/**
 * A custom authentication token that represents a user's authentication request with a token.
 */
public class CustomAuthenticationToken extends OAuth2AuthorizationGrantAuthenticationToken {

    private final String code;
    private final String redirectUri;

    /**
     * Constructs an {@code OAuth2AuthorizationCodeAuthenticationToken} using the provided parameters.
     *
     * @param code the authorization code
     * @param clientPrincipal the authenticated client principal
     * @param redirectUri the redirect uri
     * @param additionalParameters the additional parameters
     */
    public CustomAuthenticationToken(String code, Authentication clientPrincipal,
                                                      @Nullable String redirectUri, @Nullable Map<String, Object> additionalParameters) {
        super(AuthorizationGrantType.AUTHORIZATION_CODE, clientPrincipal, additionalParameters);
        Assert.hasText(code, "code cannot be empty");
        this.code = code;
        this.redirectUri = redirectUri;
    }

    /**
     * Returns the authorization code.
     *
     * @return the authorization code
     */
    public String getCode() {
        return this.code;
    }

    /**
     * Returns the redirect uri.
     *
     * @return the redirect uri
     */
    @Nullable
    public String getRedirectUri() {
        return this.redirectUri;
    }
}
继续看官网:
authenticationProviders(): Sets the Consumer providing access to the List of default and (optionally) added AuthenticationProvider’s allowing the ability to add, remove, or customize a specific AuthenticationProvider.
什么是 AuthenticationProvider
AuthenticationProvider 是Spring Security核心的一部分,它是一个接口,定义了一个认证(authentication)机制。在Spring Security中,认证流程由一个或多个 AuthenticationProvider 实例处理,用于根据不同类型的认证需求完成用户的认证过程。
在认证请求过程中,一个 Authentication 类型的对象,通常是 UsernamePasswordAuthenticationToken 或者是一个自定义的扩展了 AbstractAuthenticationToken 接口的令牌,被传递给认证管理器(AuthenticationManager),它会委托一个或多个 AuthenticationProvider 实例处理这个请求。
实现 AuthenticationProvider 接口需要实现以下两个方法:
-
authenticate(Authentication authentication): 这个方法接受一个 Authentication 对象作为参数,并返回一个填充了授权信息的已认证的 Authentication 对象,如果认证过程失败,则返回 null 或者抛出 AuthenticationException。
-
supports(Class authentication): 该方法用于确定该 AuthenticationProvider 是否能处理传递过来的 Authentication 类的实例。通常,这涉及到检查 Authentication 是否为你的 AuthenticationProvider 支持的具体或自定义的 Authentication 类型。
每个 AuthenticationProvider 都有自己的认证策略,例如检查用户名和密码、证书、一次性令牌等。在一个复杂的系统中,可以配置多个 AuthenticationProvider,每个 AuthenticationProvider 负责不同类型的认证。例如,你可以同时使用用户名/密码认证和LDAP认证,并且Spring Security认证管理器会按顺序尝试每个提供程序,直到其中一个成功认证请求为止。
通过官网我们知道默认的是:OAuth2AuthorizationCodeAuthenticationProvider 类 实现了 org.springframework.security.authentication.AuthenticationProvider 这个接口
自定义 AuthenticationProvider
cn.com.wuhm.authorization.server.springboot3authorizationserver.endpoint.CustomAuthenticationProvider
package cn.com.wuhm.authorization.server.springboot3authorizationserver.endpoint;

import cn.com.wuhm.authorization.server.springboot3authorizationserver.utils.MyOAuth2AuthenticationProviderUtils;
import org.apache.commons.logging.Log;
import org.apache.commons.logging.LogFactory;
import org.springframework.core.log.LogMessage;
import org.springframework.security.authentication.AuthenticationProvider;
import org.springframework.security.core.Authentication;
import org.springframework.security.core.AuthenticationException;
import org.springframework.security.core.session.SessionInformation;
import org.springframework.security.core.session.SessionRegistry;
import org.springframework.security.oauth2.core.*;
import org.springframework.security.oauth2.core.endpoint.OAuth2AuthorizationRequest;
import org.springframework.security.oauth2.core.endpoint.OAuth2ParameterNames;
import org.springframework.security.oauth2.core.oidc.OidcIdToken;
import org.springframework.security.oauth2.core.oidc.OidcScopes;
import org.springframework.security.oauth2.core.oidc.endpoint.OidcParameterNames;
import org.springframework.security.oauth2.jwt.Jwt;
import org.springframework.security.oauth2.server.authorization.OAuth2Authorization;
import org.springframework.security.oauth2.server.authorization.OAuth2AuthorizationCode;
import org.springframework.security.oauth2.server.authorization.OAuth2AuthorizationService;
import org.springframework.security.oauth2.server.authorization.OAuth2TokenType;
import org.springframework.security.oauth2.server.authorization.authentication.OAuth2AccessTokenAuthenticationToken;
import org.springframework.security.oauth2.server.authorization.authentication.OAuth2AuthorizationCodeAuthenticationToken;
import org.springframework.security.oauth2.server.authorization.authentication.OAuth2ClientAuthenticationToken;
import org.springframework.security.oauth2.server.authorization.client.RegisteredClient;
import org.springframework.security.oauth2.server.authorization.context.AuthorizationServerContextHolder;
import org.springframework.security.oauth2.server.authorization.token.DefaultOAuth2TokenContext;
import org.springframework.security.oauth2.server.authorization.token.OAuth2TokenContext;
import org.springframework.security.oauth2.server.authorization.token.OAuth2TokenGenerator;
import org.springframework.util.Assert;
import org.springframework.util.CollectionUtils;
import org.springframework.util.StringUtils;

import java.nio.charset.StandardCharsets;
import java.security.MessageDigest;
import java.security.NoSuchAlgorithmException;
import java.security.Principal;
import java.util.*;

/**
 * 这是一个用于处理OAuth 2.0授权码授权请求的认证提供者实现类。
 * @author wuhming
 * @description ""
 * @date 2024/4/12 18:00
 */
public class CustomAuthenticationProvider implements AuthenticationProvider {
    /**
     * 错误页面的URI
     */
    private static final String ERROR_URI = "https://datatracker.ietf.org/doc/html/rfc6749#section-5.2";
    /**
     * 授权码的OAuth 2.0令牌类型
     */
    private static final OAuth2TokenType AUTHORIZATION_CODE_TOKEN_TYPE =
            new OAuth2TokenType(OAuth2ParameterNames.CODE);
    /**
     * ID令牌的OAuth 2.0令牌类型
     */
    private static final OAuth2TokenType ID_TOKEN_TOKEN_TYPE =
            new OAuth2TokenType(OidcParameterNames.ID_TOKEN);
    private final Log logger = LogFactory.getLog(getClass());
    /**
     * 用于执行授权相关操作的服务
     */
    private final OAuth2AuthorizationService authorizationService;
    /**
     * 用于生成各种类型令牌的生成器
     */
    private final OAuth2TokenGenerator<? extends OAuth2Token> tokenGenerator;
    /**
     * 用于跟踪OpenID连接会话的会话注册表
     */
    private SessionRegistry sessionRegistry;

    /**
     * Constructs an {@code OAuth2AuthorizationCodeAuthenticationProvider} using the provided parameters.
     *
     * @param authorizationService the authorization service
     * @param tokenGenerator       the token generator
     * @since 0.2.3
     */
    public CustomAuthenticationProvider(OAuth2AuthorizationService authorizationService,
                                                         OAuth2TokenGenerator<? extends OAuth2Token> tokenGenerator) {
        Assert.notNull(authorizationService, "authorizationService cannot be null");
        Assert.notNull(tokenGenerator, "tokenGenerator cannot be null");
        this.authorizationService = authorizationService;
        this.tokenGenerator = tokenGenerator;
    }

    /**
     * 实现了AuthenticationProvider接口的authenticate方法,
     * 这个方法会处理认证流程,根据提供的认证码授权信息 CustomAuthenticationToken)
     * 来生成OAuth2访问令牌
     * @param authentication
     * @return
     * @throws AuthenticationException
     */
    @Override
    public Authentication authenticate(Authentication authentication) throws AuthenticationException {
        CustomAuthenticationToken authorizationCodeAuthentication =
                (CustomAuthenticationToken) authentication;


        OAuth2ClientAuthenticationToken clientPrincipal = null;
        if (OAuth2ClientAuthenticationToken.class.isAssignableFrom(authentication.getPrincipal().getClass())) {
            clientPrincipal = (OAuth2ClientAuthenticationToken) authentication.getPrincipal();
        }
        if (!(clientPrincipal != null && clientPrincipal.isAuthenticated())) {
            throw new OAuth2AuthenticationException(OAuth2ErrorCodes.INVALID_CLIENT);
        }

        RegisteredClient registeredClient = clientPrincipal.getRegisteredClient();

        if (this.logger.isTraceEnabled()) {
            this.logger.trace("Retrieved registered client");
        }

        OAuth2Authorization authorization = this.authorizationService.findByToken(
                authorizationCodeAuthentication.getCode(), AUTHORIZATION_CODE_TOKEN_TYPE);
        if (authorization == null) {
            throw new OAuth2AuthenticationException(OAuth2ErrorCodes.INVALID_GRANT);
        }

        if (this.logger.isTraceEnabled()) {
            this.logger.trace("Retrieved authorization with authorization code");
        }

        OAuth2Authorization.Token<OAuth2AuthorizationCode> authorizationCode =
                authorization.getToken(OAuth2AuthorizationCode.class);

        OAuth2AuthorizationRequest authorizationRequest = authorization.getAttribute(
                OAuth2AuthorizationRequest.class.getName());

        if (!registeredClient.getClientId().equals(authorizationRequest.getClientId())) {
            if (!authorizationCode.isInvalidated()) {
                // Invalidate the authorization code given that a different client is attempting to use it
                authorization = MyOAuth2AuthenticationProviderUtils.invalidate(authorization, authorizationCode.getToken());
                this.authorizationService.save(authorization);
                if (this.logger.isWarnEnabled()) {
                    this.logger.warn(LogMessage.format("Invalidated authorization code used by registered client '%s'", registeredClient.getId()));
                }
            }
            throw new OAuth2AuthenticationException(OAuth2ErrorCodes.INVALID_GRANT);
        }

        if (StringUtils.hasText(authorizationRequest.getRedirectUri()) &&
                !authorizationRequest.getRedirectUri().equals(authorizationCodeAuthentication.getRedirectUri())) {
            throw new OAuth2AuthenticationException(OAuth2ErrorCodes.INVALID_GRANT);
        }

        if (!authorizationCode.isActive()) {
            if (authorizationCode.isInvalidated()) {
                OAuth2Authorization.Token<? extends OAuth2Token> token = authorization.getRefreshToken() != null ?
                        authorization.getRefreshToken() :
                        authorization.getAccessToken();
                if (token != null) {
                    // Invalidate the access (and refresh) token as the client is attempting to use the authorization code more than once
                    authorization = MyOAuth2AuthenticationProviderUtils.invalidate(authorization, token.getToken());
                    this.authorizationService.save(authorization);
                    if (this.logger.isWarnEnabled()) {
                        this.logger.warn(LogMessage.format("Invalidated authorization token(s) previously issued to registered client '%s'", registeredClient.getId()));
                    }
                }
            }
            throw new OAuth2AuthenticationException(OAuth2ErrorCodes.INVALID_GRANT);
        }

        if (this.logger.isTraceEnabled()) {
            this.logger.trace("Validated token request parameters");
        }

        Authentication principal = authorization.getAttribute(Principal.class.getName());

        // @formatter:off
        DefaultOAuth2TokenContext.Builder tokenContextBuilder = DefaultOAuth2TokenContext.builder()
                .registeredClient(registeredClient)
                .principal(principal)
                .authorizationServerContext(AuthorizationServerContextHolder.getContext())
                .authorization(authorization)
                .authorizedScopes(authorization.getAuthorizedScopes())
                .authorizationGrantType(AuthorizationGrantType.AUTHORIZATION_CODE)
                .authorizationGrant(authorizationCodeAuthentication);
        // @formatter:on

        OAuth2Authorization.Builder authorizationBuilder = OAuth2Authorization.from(authorization);

        // ----- Access token -----
        OAuth2TokenContext tokenContext = tokenContextBuilder.tokenType(OAuth2TokenType.ACCESS_TOKEN).build();
        OAuth2Token generatedAccessToken = this.tokenGenerator.generate(tokenContext);
        if (generatedAccessToken == null) {
            OAuth2Error error = new OAuth2Error(OAuth2ErrorCodes.SERVER_ERROR,
                    "The token generator failed to generate the access token.", ERROR_URI);
            throw new OAuth2AuthenticationException(error);
        }

        if (this.logger.isTraceEnabled()) {
            this.logger.trace("Generated access token");
        }

        OAuth2AccessToken accessToken = new OAuth2AccessToken(OAuth2AccessToken.TokenType.BEARER,
                generatedAccessToken.getTokenValue(), generatedAccessToken.getIssuedAt(),
                generatedAccessToken.getExpiresAt(), tokenContext.getAuthorizedScopes());
        if (generatedAccessToken instanceof ClaimAccessor) {
            authorizationBuilder.token(accessToken, (metadata) ->
                    metadata.put(OAuth2Authorization.Token.CLAIMS_METADATA_NAME, ((ClaimAccessor) generatedAccessToken).getClaims()));
        } else {
            authorizationBuilder.accessToken(accessToken);
        }

        // ----- Refresh token -----
        OAuth2RefreshToken refreshToken = null;
        if (registeredClient.getAuthorizationGrantTypes().contains(AuthorizationGrantType.REFRESH_TOKEN)) {
            tokenContext = tokenContextBuilder.tokenType(OAuth2TokenType.REFRESH_TOKEN).build();
            OAuth2Token generatedRefreshToken = this.tokenGenerator.generate(tokenContext);
            if (generatedRefreshToken != null) {
                if (!(generatedRefreshToken instanceof OAuth2RefreshToken)) {
                    OAuth2Error error = new OAuth2Error(OAuth2ErrorCodes.SERVER_ERROR,
                            "The token generator failed to generate a valid refresh token.", ERROR_URI);
                    throw new OAuth2AuthenticationException(error);
                }

                if (this.logger.isTraceEnabled()) {
                    this.logger.trace("Generated refresh token");
                }

                refreshToken = (OAuth2RefreshToken) generatedRefreshToken;
                authorizationBuilder.refreshToken(refreshToken);
            }
        }

        // ----- ID token -----
        OidcIdToken idToken;
        if (authorizationRequest.getScopes().contains(OidcScopes.OPENID)) {
            SessionInformation sessionInformation = getSessionInformation(principal);
            if (sessionInformation != null) {
                try {
                    // Compute (and use) hash for Session ID
                    sessionInformation = new SessionInformation(sessionInformation.getPrincipal(),
                            createHash(sessionInformation.getSessionId()), sessionInformation.getLastRequest());
                } catch (NoSuchAlgorithmException ex) {
                    OAuth2Error error = new OAuth2Error(OAuth2ErrorCodes.SERVER_ERROR,
                            "Failed to compute hash for Session ID.", ERROR_URI);
                    throw new OAuth2AuthenticationException(error);
                }
                tokenContextBuilder.put(SessionInformation.class, sessionInformation);
            }
            // @formatter:off
            tokenContext = tokenContextBuilder
                    .tokenType(ID_TOKEN_TOKEN_TYPE)
                    .authorization(authorizationBuilder.build())	// ID token customizer may need access to the access token and/or refresh token
                    .build();
            // @formatter:on
            OAuth2Token generatedIdToken = this.tokenGenerator.generate(tokenContext);
            if (!(generatedIdToken instanceof Jwt)) {
                OAuth2Error error = new OAuth2Error(OAuth2ErrorCodes.SERVER_ERROR,
                        "The token generator failed to generate the ID token.", ERROR_URI);
                throw new OAuth2AuthenticationException(error);
            }

            if (this.logger.isTraceEnabled()) {
                this.logger.trace("Generated id token");
            }

            idToken = new OidcIdToken(generatedIdToken.getTokenValue(), generatedIdToken.getIssuedAt(),
                    generatedIdToken.getExpiresAt(), ((Jwt) generatedIdToken).getClaims());
            authorizationBuilder.token(idToken, (metadata) ->
                    metadata.put(OAuth2Authorization.Token.CLAIMS_METADATA_NAME, idToken.getClaims()));
        } else {
            idToken = null;
        }

        authorization = authorizationBuilder.build();

        // Invalidate the authorization code as it can only be used once
        authorization = MyOAuth2AuthenticationProviderUtils.invalidate(authorization, authorizationCode.getToken());

        this.authorizationService.save(authorization);

        if (this.logger.isTraceEnabled()) {
            this.logger.trace("Saved authorization");
        }

        Map<String, Object> additionalParameters = Collections.emptyMap();
        if (idToken != null) {
            additionalParameters = new HashMap<>();
            additionalParameters.put(OidcParameterNames.ID_TOKEN, idToken.getTokenValue());
        }

        if (this.logger.isTraceEnabled()) {
            this.logger.trace("Authenticated token request");
        }

        return new OAuth2AccessTokenAuthenticationToken(
                registeredClient, clientPrincipal, accessToken, refreshToken, additionalParameters);
    }

    @Override
    public boolean supports(Class<?> authentication) {
        return OAuth2AuthorizationCodeAuthenticationToken.class.isAssignableFrom(authentication);
    }

    /**
     * Sets the {@link SessionRegistry} used to track OpenID Connect sessions.
     *
     * @param sessionRegistry the {@link SessionRegistry} used to track OpenID Connect sessions
     * @since 1.1
     */
    public void setSessionRegistry(SessionRegistry sessionRegistry) {
        Assert.notNull(sessionRegistry, "sessionRegistry cannot be null");
        this.sessionRegistry = sessionRegistry;
    }

    private SessionInformation getSessionInformation(Authentication principal) {
        SessionInformation sessionInformation = null;
        if (this.sessionRegistry != null) {
            List<SessionInformation> sessions = this.sessionRegistry.getAllSessions(principal.getPrincipal(), false);
            if (!CollectionUtils.isEmpty(sessions)) {
                sessionInformation = sessions.get(0);
                if (sessions.size() > 1) {
                    // Get the most recent session
                    sessions = new ArrayList<>(sessions);
                    sessions.sort(Comparator.comparing(SessionInformation::getLastRequest));
                    sessionInformation = sessions.get(sessions.size() - 1);
                }
            }
        }
        return sessionInformation;
    }

    private static String createHash(String value) throws NoSuchAlgorithmException {
        MessageDigest md = MessageDigest.getInstance("SHA-256");
        byte[] digest = md.digest(value.getBytes(StandardCharsets.US_ASCII));
        return Base64.getUrlEncoder().withoutPadding().encodeToString(digest);
    }
}
回到 SecurityConfig 配置类
@Bean
	@Order(1)
	public SecurityFilterChain authorizationServerSecurityFilterChain(HttpSecurity http)
			throws Exception {
		OAuth2AuthorizationServerConfiguration.applyDefaultSecurity(http);


		http.getConfigurer(OAuth2AuthorizationServerConfigurer.class)
				// OAuth2 Token Endpoint提供了自定义OAuth2授权端点的能力。它定义了扩展点,允许您自定义OAuth2授权请求的预处理、主处理和后处理逻辑。
				.tokenEndpoint(tokenEndpoint->
						tokenEndpoint
								// 添加自定义的认证方式
								.accessTokenRequestConverters(authenticationConverters ->
										authenticationConverters.addAll(
												List.of(new CustomAuthenticationConverter())
										))
								// 添加自定义
								.authenticationProviders(providers -> providers.add(new CustomAuthenticationProvider()))
				)
				// Enable OpenID Connect 1.0
				.oidc(Customizer.withDefaults());
		http
			// Redirect to the login page when not authenticated from the
			// authorization endpoint
			.exceptionHandling((exceptions) -> exceptions
				.defaultAuthenticationEntryPointFor(
					new LoginUrlAuthenticationEntryPoint("/login"),
					new MediaTypeRequestMatcher(MediaType.TEXT_HTML)
				)
			)
			// Accept access tokens for User Info and/or Client Registration
			.oauth2ResourceServer((resourceServer) -> resourceServer
				.jwt(Customizer.withDefaults()));

		return http.build();
	}
cn.com.wuhm.authorization.server.springboot3authorizationserver.endpoint.CustomAuthenticationProvide 需要两个参数:
- org.springframework.security.oauth2.server.authorization.OAuth2AuthorizationService
- org.springframework.security.oauth2.server.authorization.token.OAuth2TokenGenerator
什么是OAuth2AuthorizationService
查看官网:https://docs.spring.io/spring-authorization-server/reference/core-model-components.html#oauth2-authorization-service
OAuth2AuthorizationService是存储新授权和查询现有授权的中心组件。当遵循特定协议流时,其他组件会使用它——例如,客户端鉴权、授权授予处理、代币自省、代币撤销、动态客户端注册等。
OAuth2AuthorizationService提供的实现InMemoryOAuth2AuthorizationService和JdbcOAuth2AuthorizationService。InMemoryOAuth2AuthorizationService实现将OAuth2Authorize实例存储在记忆中,建议仅在开发和测试期间使用。JdbcOAuth2AuthorizationService是一个JDBC实现,它使用Jdbc操作来持久化OAuth2Authorize实例。
什么是OAuth2TokenGenerator
查看官网:https://docs.spring.io/spring-authorization-server/reference/core-model-components.html#oauth2-token-generator
演示授权码模式:
http://127.0.0.1:9000/oauth2/authorize?response_type=code&redirect_uri=http://127.0.0.1:8080/login/oauth2/code/oidc-client&client_id=oidc-client&scope=profile

http://127.0.0.1:9000/oauth2/authorize?response_type=code&redirect_uri=http://127.0.0.1:8080/login/oauth2/code/oidc-client&client_id=oidc-client&scope=openid

http://127.0.0.1:9000/oauth2/authorize?response_type=code&redirect_uri=http://127.0.0.1:8080/login/oauth2/code/oidc-client&client_id=oidc-client&scope=phone-a
浏览器响应:
http://127.0.0.1:8080/login/oauth2/code/oidc-client?code=kiiZAWf8cBOw36NhA2Wco_f-iYDcujQxgQMvVXKgbIJITqi0vSh-AuvacJ6GhiT2xZM6l9D3DOCMi4hRi-RPgr2xzJT7shGIezpIHQIVSg9ekMgPeIWcRWfKk31KDW88通过code获取token
curl -X POST -H "Content-Type: application/x-www-form-urlencoded" -d "grant_type=authorization_code&code=rF6p3L6uViY1_PJ0I4XFhuhE-d-3PXHcx_sg0ubRYfuNTqTLk2iaNoeyDdRI3k1Y7LvpfCoNOB7GsdcmYvTr5eKgaBNZQDXQrc7-uzPh44DZjbaW53GzOnS924JzoAxO&redirect_uri=http://127.0.0.1:8080/login/oauth2/code/oidc-client&client_id=oidc-client&client_secret=secret" http://127.0.0.1:9000/oauth2/token结果:
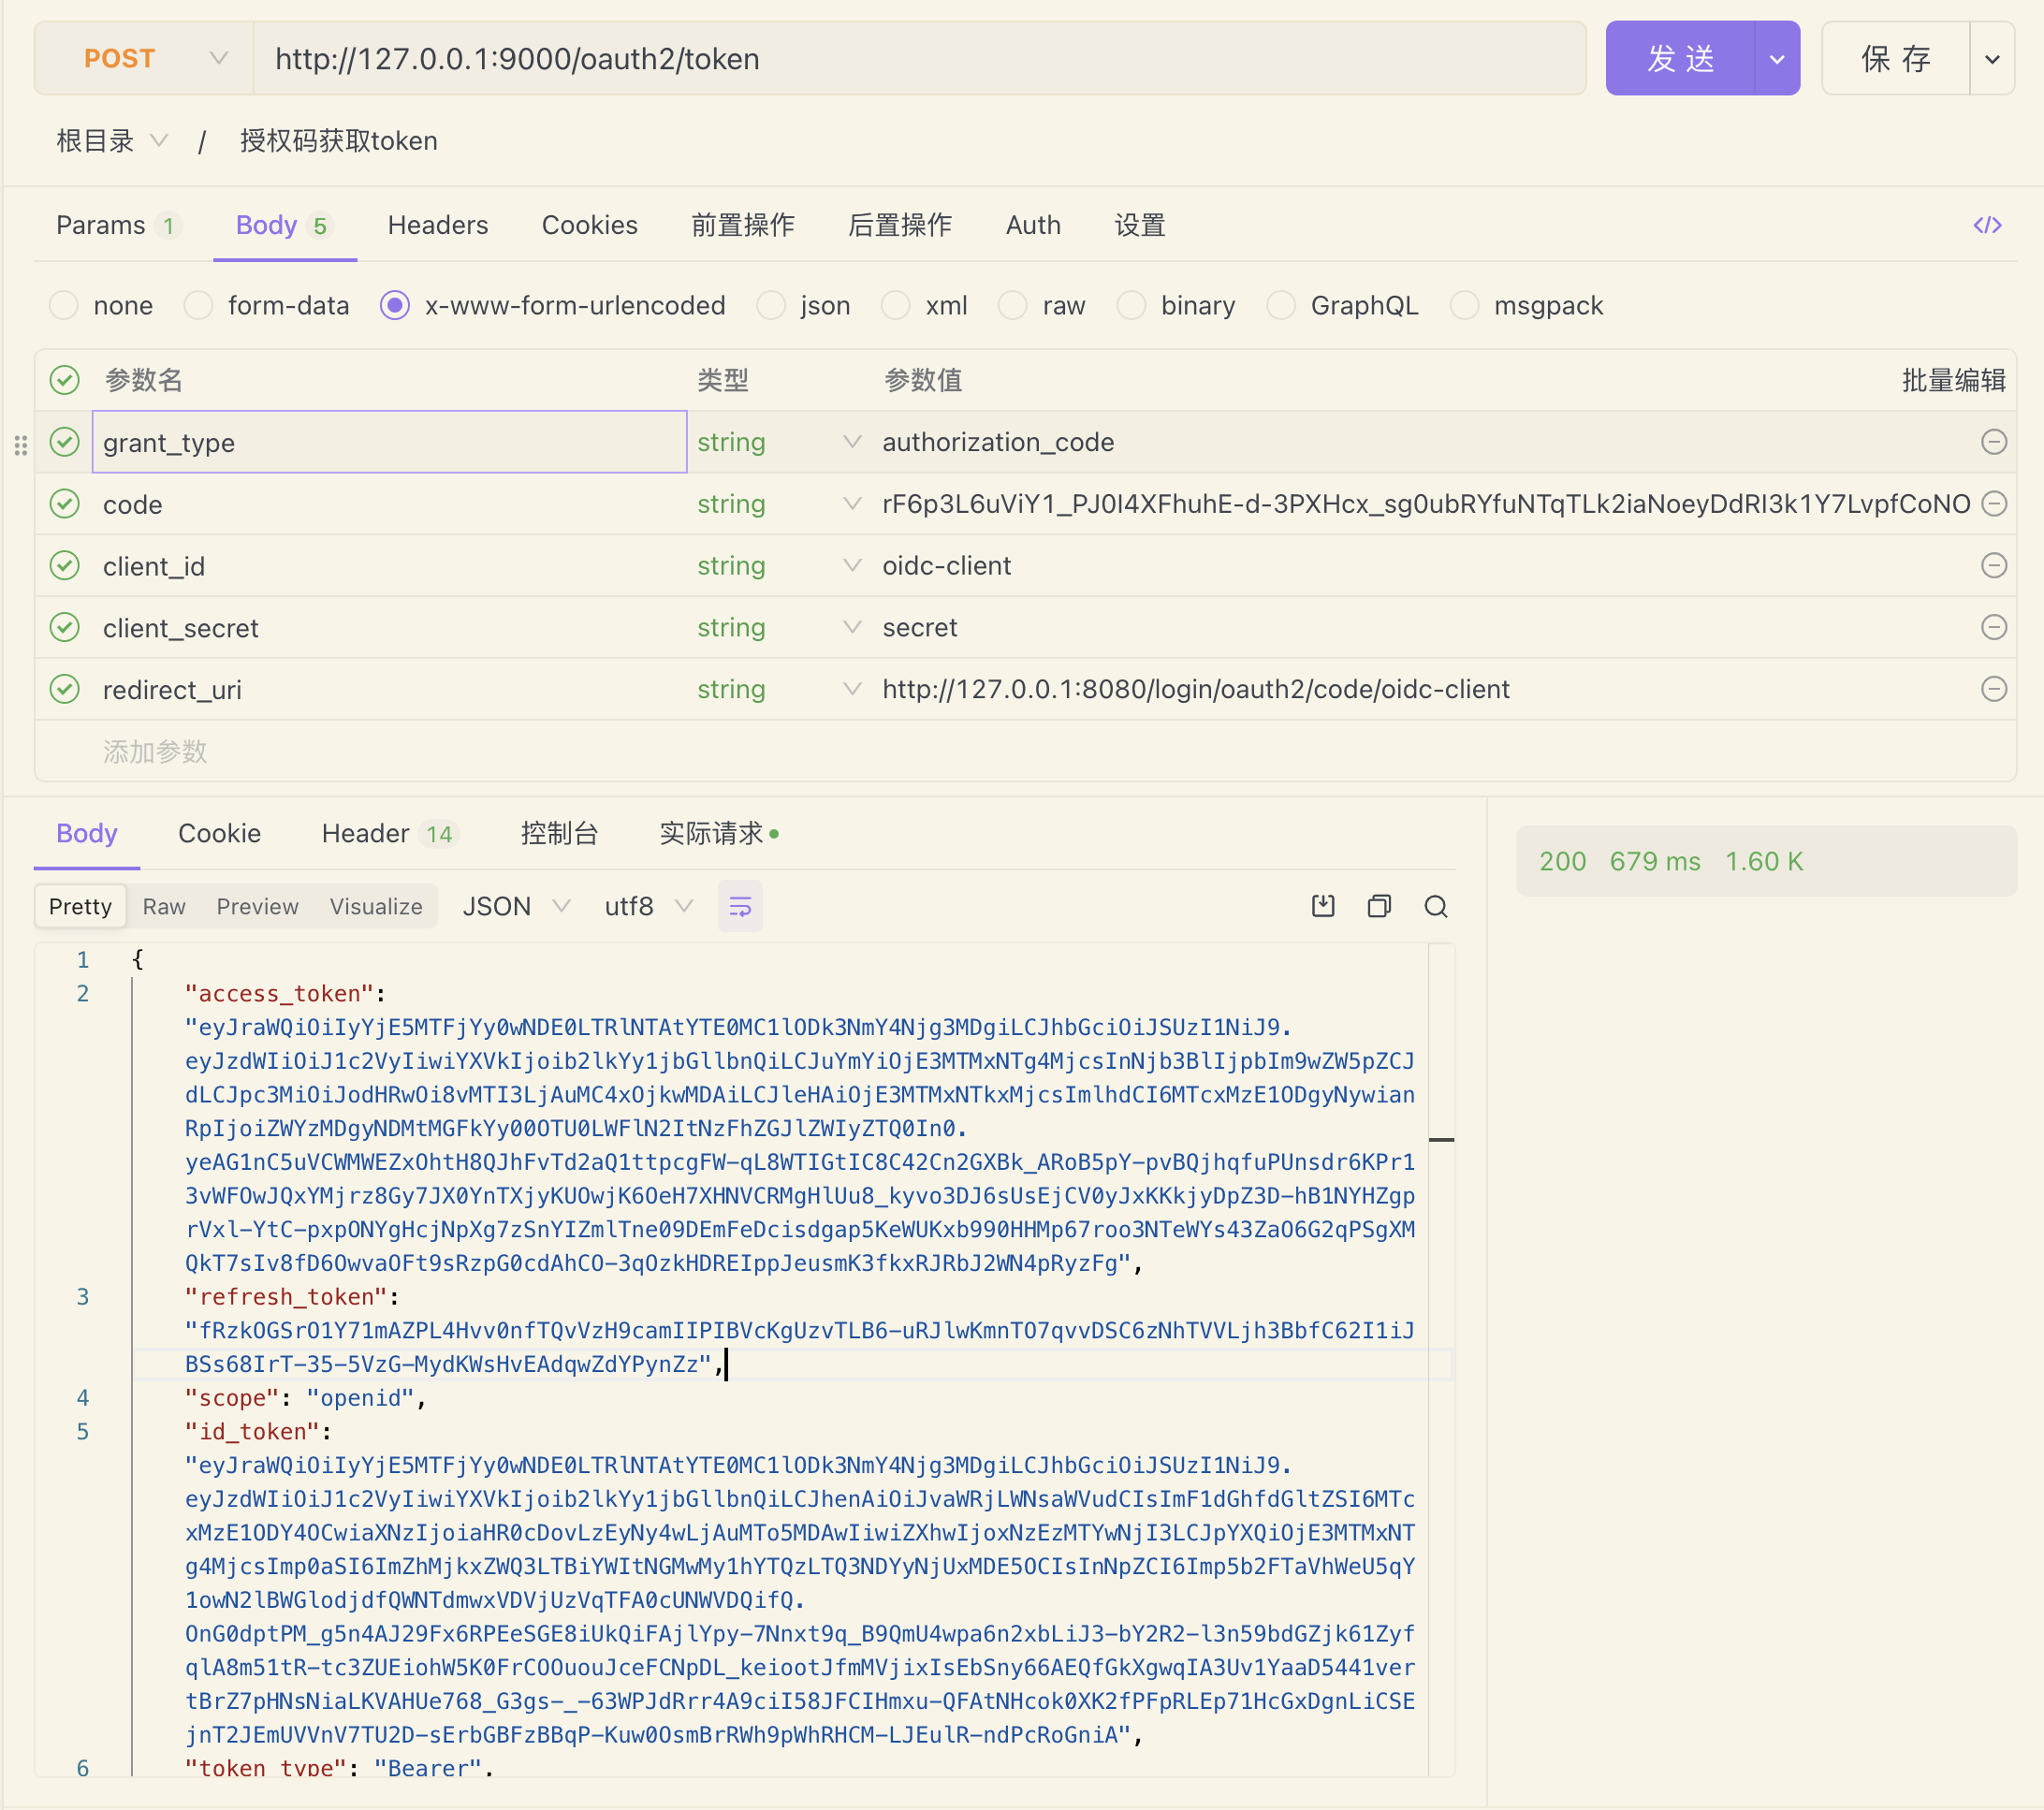
在此过程中我遇见了一个问题:
如果 scope=openid 是不需要进入授权页面的,其他的scop都是需要进入授权页面的。
进入授权页面:
添加自定义的scope
RegisteredClient oidcClient = RegisteredClient.withId(UUID.randomUUID().toString())
				.clientId("oidc-client")
				.clientSecret("{noop}secret")
				.clientAuthenticationMethod(ClientAuthenticationMethod.CLIENT_SECRET_BASIC)
				.clientAuthenticationMethod(ClientAuthenticationMethod.CLIENT_SECRET_POST)
				.authorizationGrantType(AuthorizationGrantType.AUTHORIZATION_CODE)
				.authorizationGrantType(AuthorizationGrantType.REFRESH_TOKEN)
				.authorizationGrantType(new AuthorizationGrantType("my_auth_code"))
				.redirectUri("http://127.0.0.1:8080/login/oauth2/code/oidc-client")
				.postLogoutRedirectUri("http://127.0.0.1:8080/")
				.scope(OidcScopes.OPENID)
				.scope(OidcScopes.PROFILE)
				.scope("email")
				.scope("phone-a")
				.clientSettings(ClientSettings.builder().requireAuthorizationConsent(true).build())
				.tokenSettings(TokenSettings.builder()
						.accessTokenTimeToLive(Duration.ofDays(1))
						.build())
.build();http://127.0.0.1:9000/oauth2/authorize?response_type=code&redirect_uri=http://127.0.0.1:8080/login/oauth2/code/oidc-client&client_id=oidc-client&scope=phone-a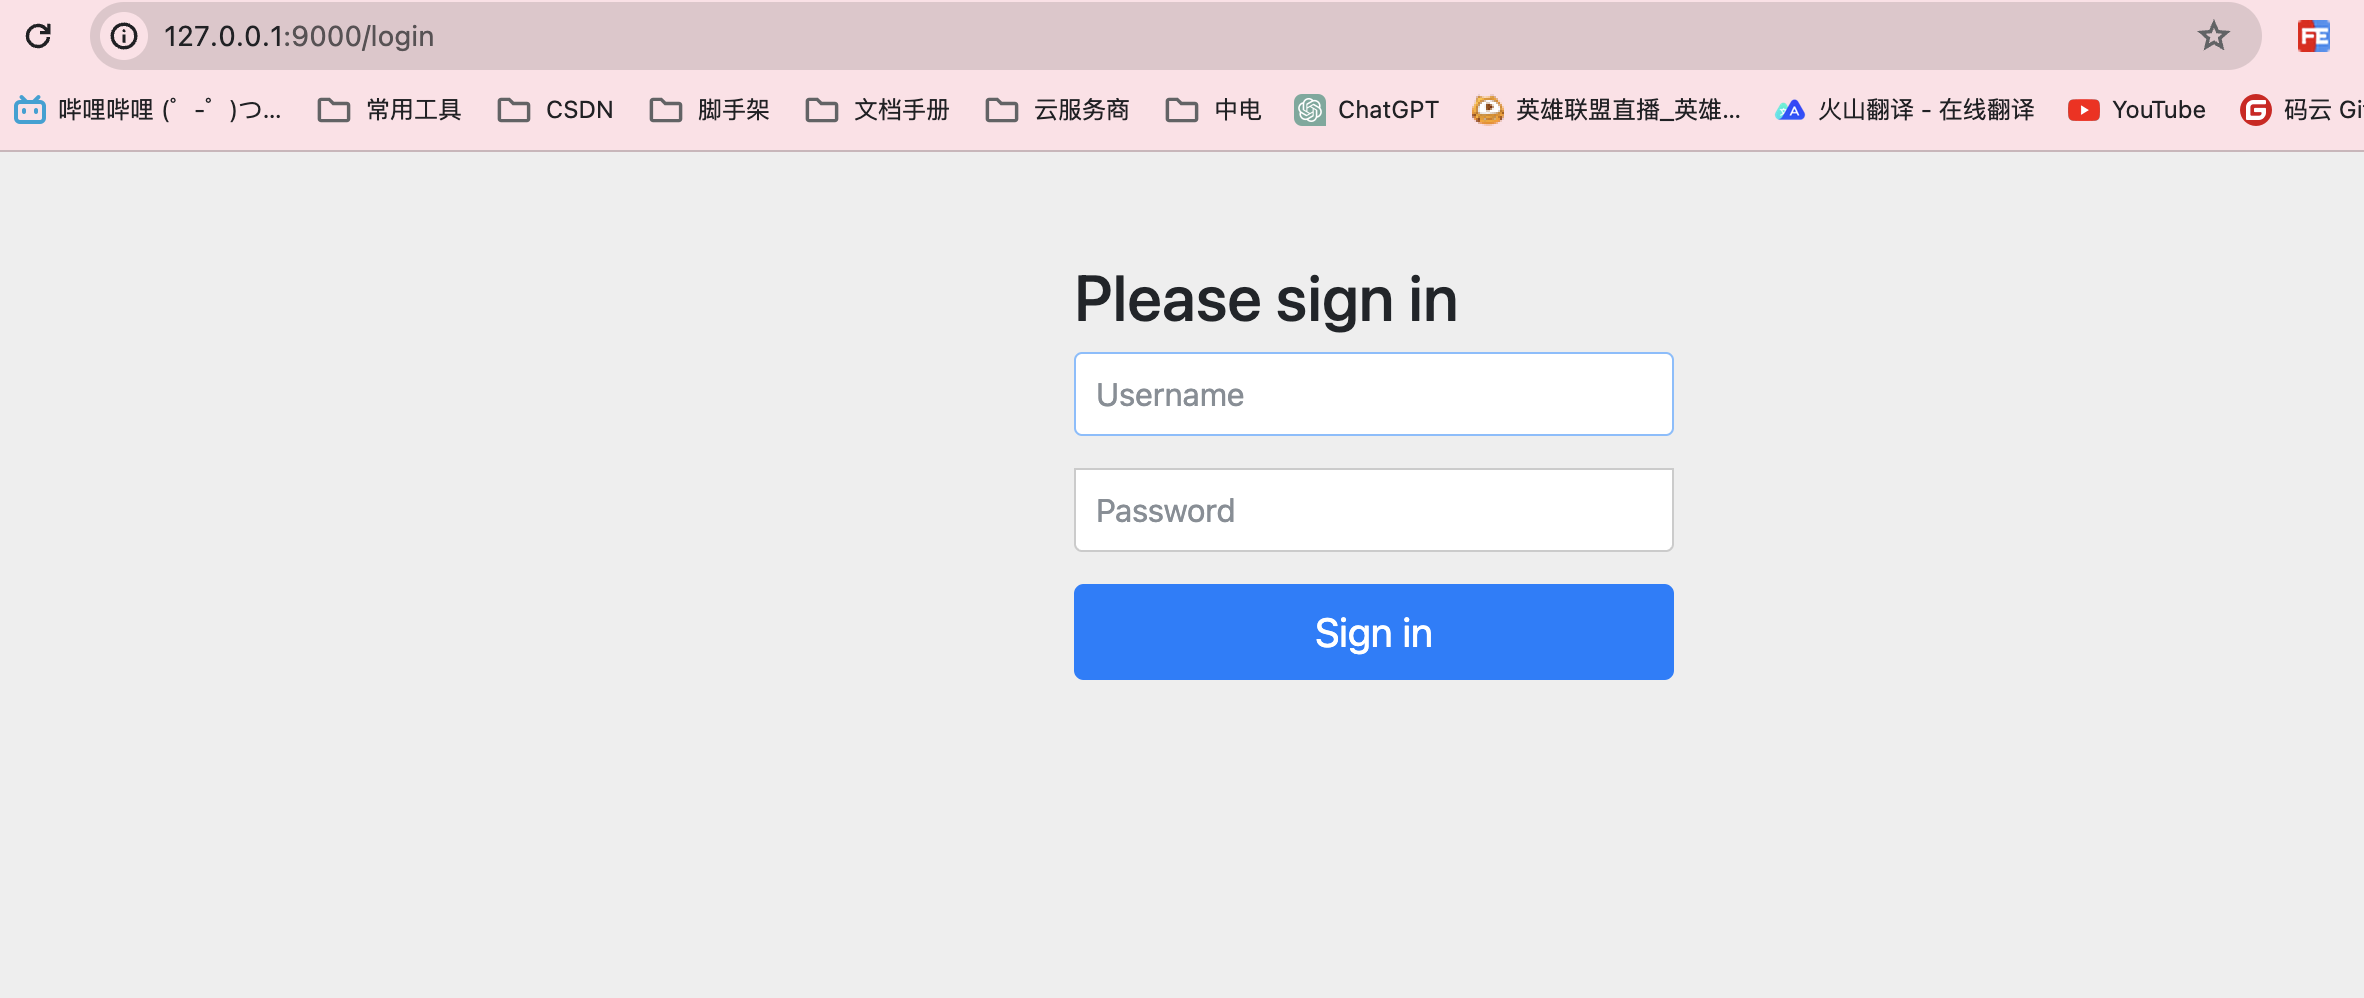
输入账号和密码:
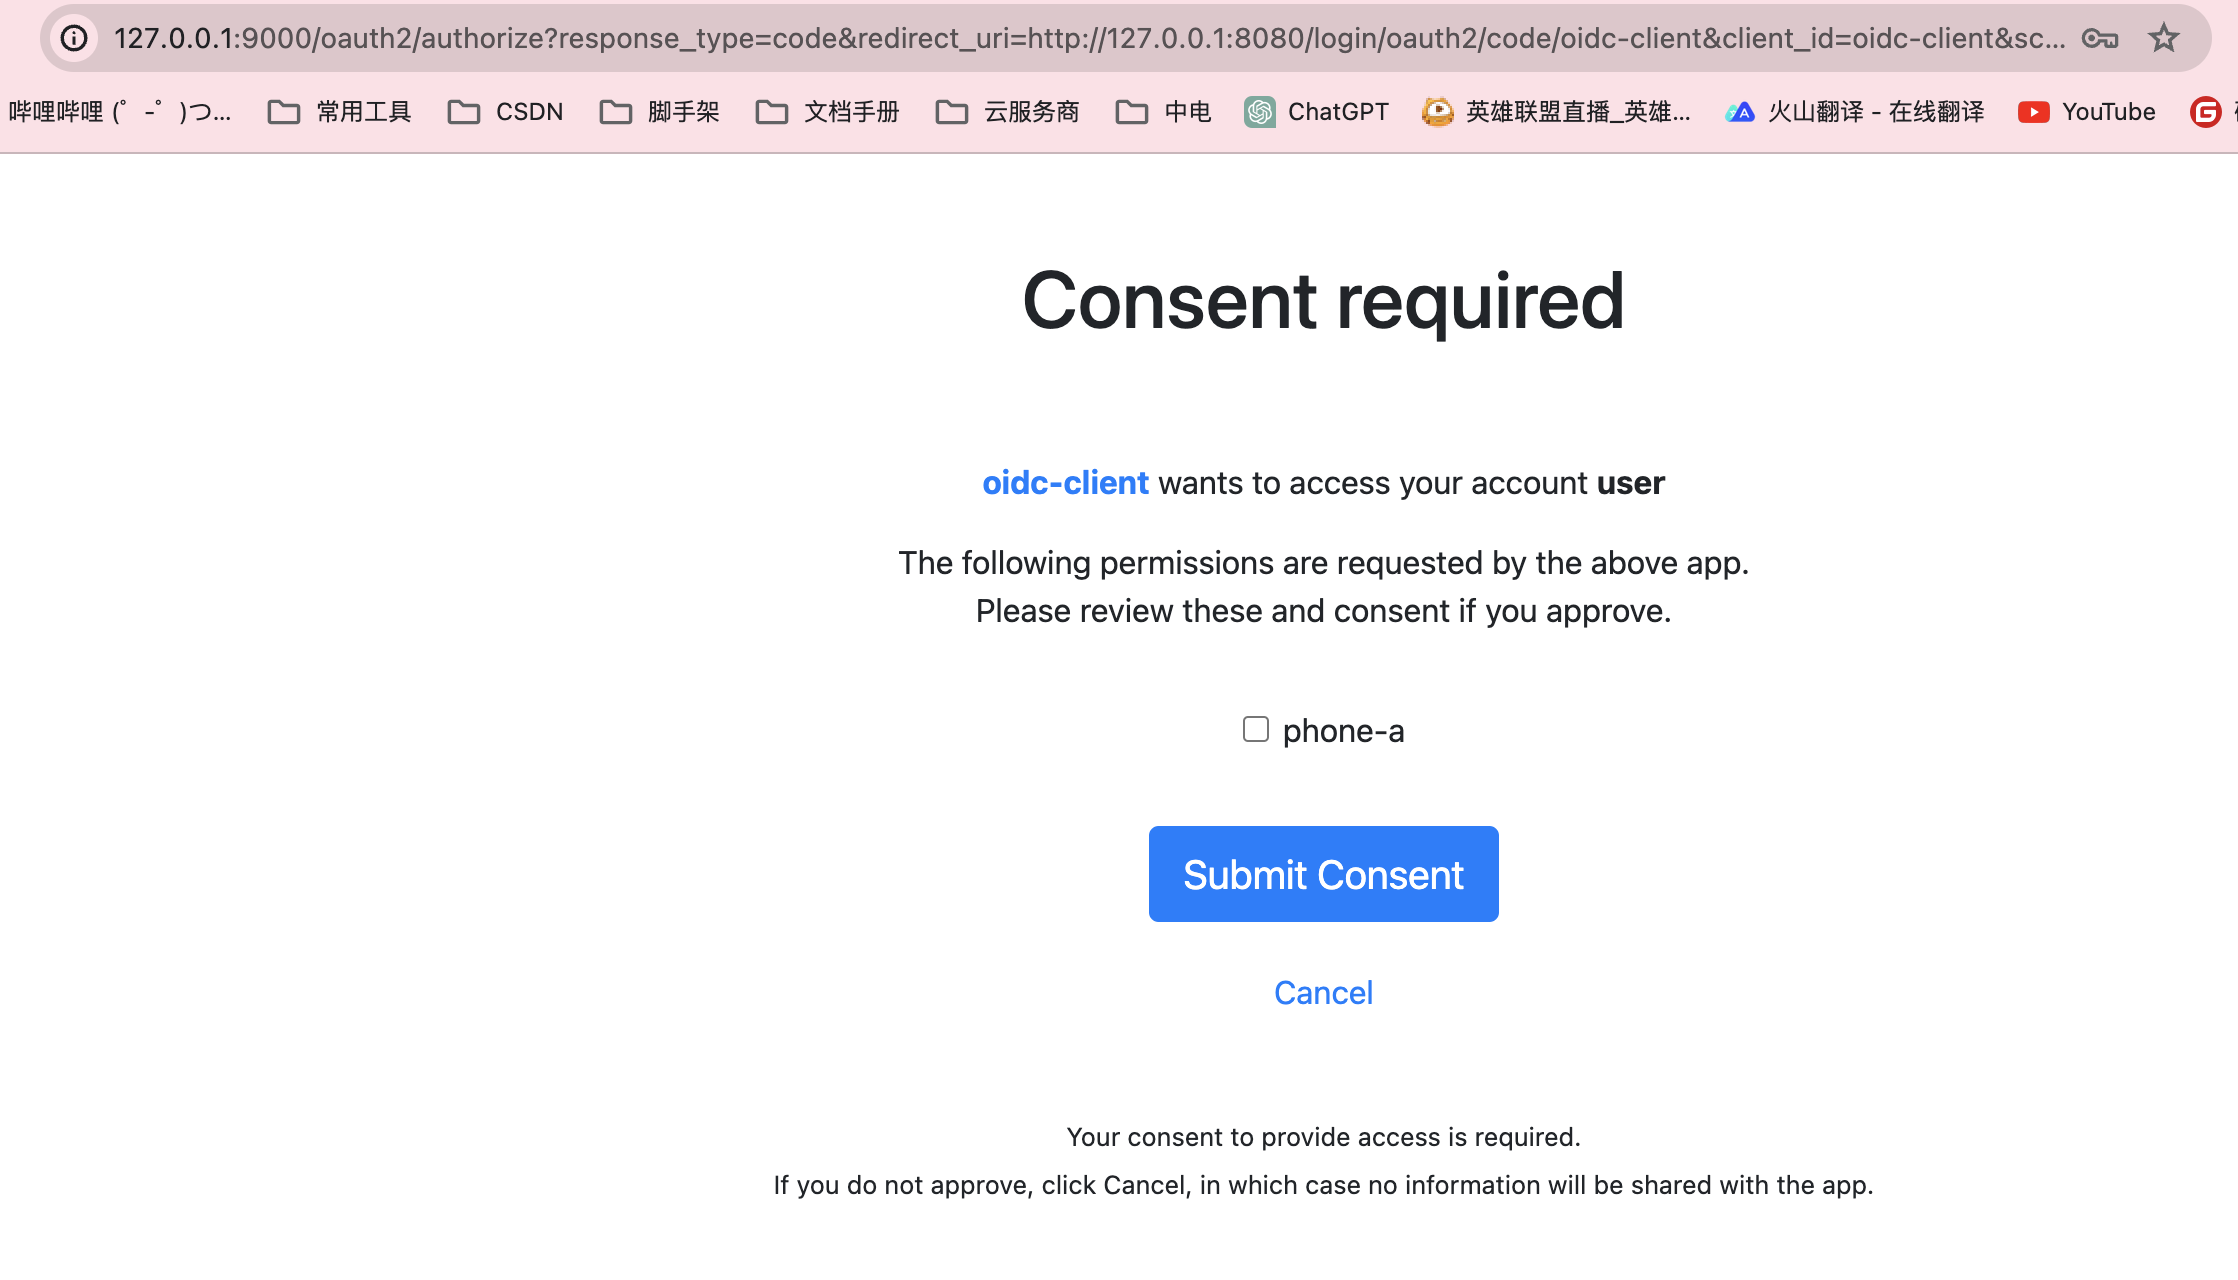
勾选 phone-a 然后提交
http://127.0.0.1:8080/login/oauth2/code/oidc-client?code=pfd-021E-qbij517oIWYxJFJjfTzXYI9KBcE4hW6hR-c1ESN5mZiyUbRn47FMM352ugANZ3rjDkAvzpap_xKflSBhLKqjxzVZLA_O014cU2kvYi9kQgp5Wba5o915uo3重复上面的工作即可
我们如何自定义登录页以及授权页面呢?
查看官网可知:
consentPage(): The URI of the custom consent page to redirect resource owners to if consent is required during the authorization request flow.
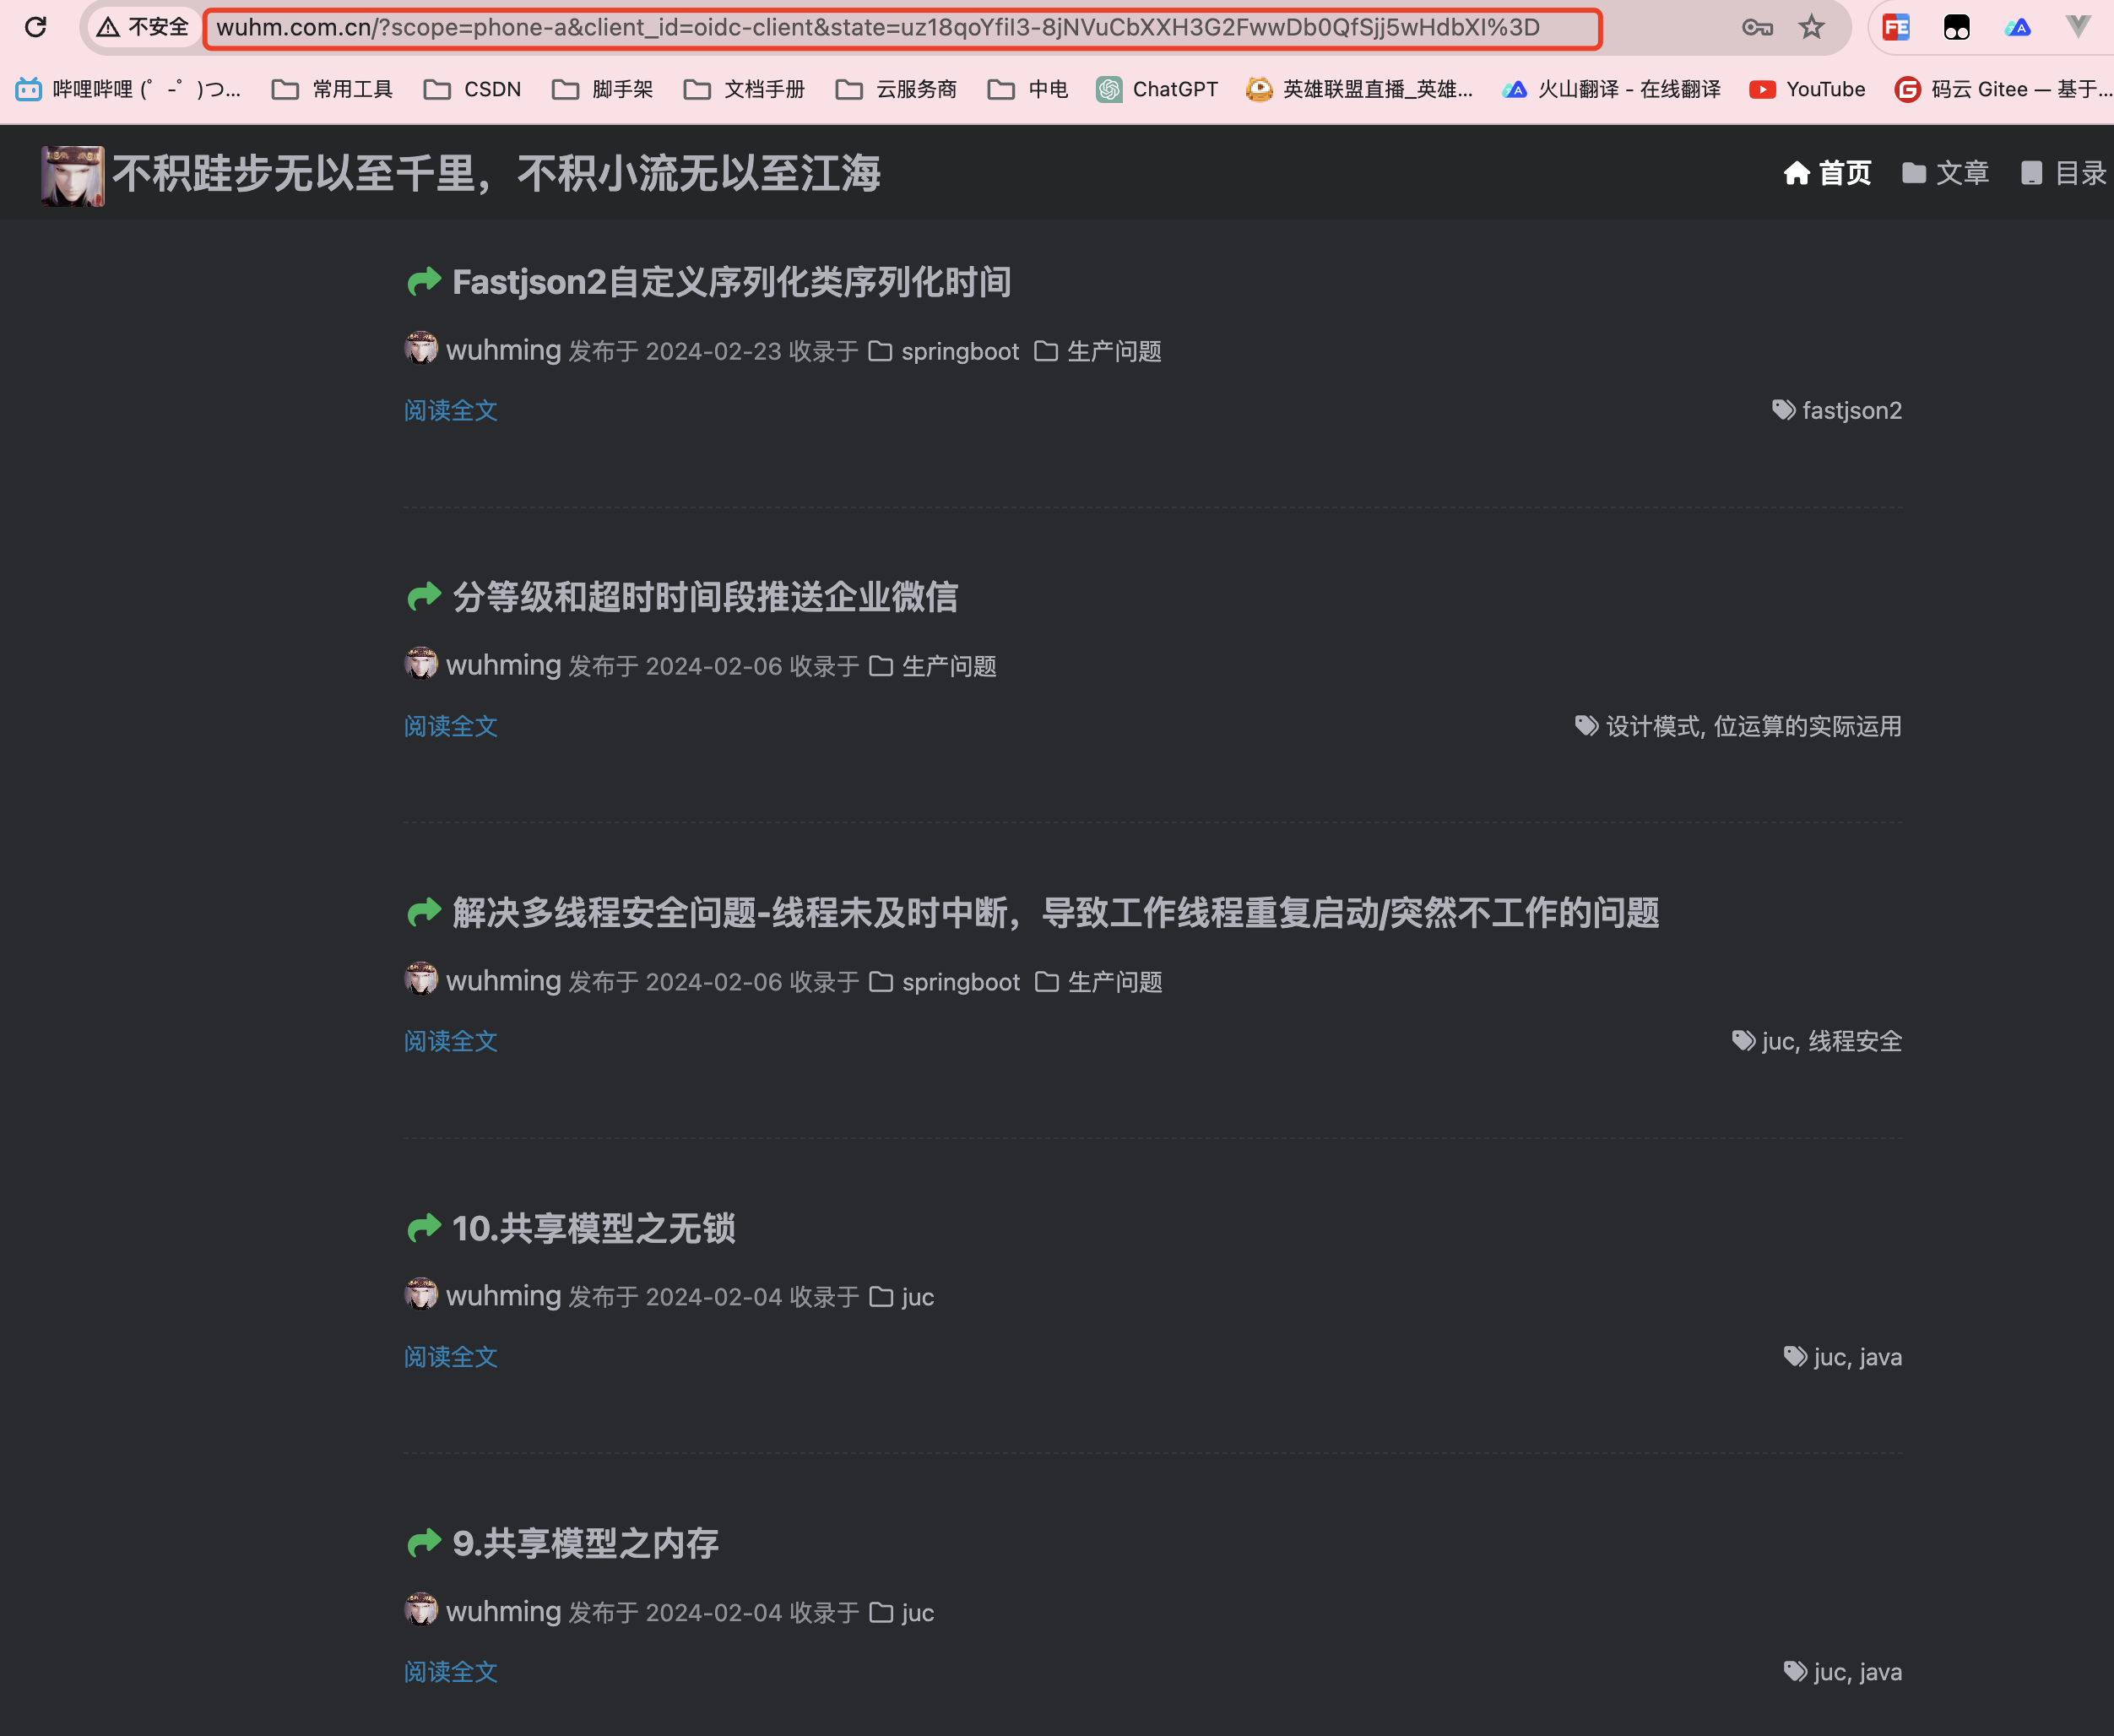
为了测试我将这个配置修改为另一个域名:
@Bean
	@Order(1)
	public SecurityFilterChain authorizationServerSecurityFilterChain(HttpSecurity http, OAuth2TokenGenerator<?> tokenGenerator)
			throws Exception {
		OAuth2AuthorizationServerConfiguration.applyDefaultSecurity(http);


		http.getConfigurer(OAuth2AuthorizationServerConfigurer.class)

				.authorizationEndpoint(authorizationEndpoint ->
						authorizationEndpoint
								.consentPage("http://www.wuhm.com.cn")
				)
				// OAuth2 Token Endpoint提供了自定义OAuth2授权端点的能力。它定义了扩展点,允许您自定义OAuth2授权请求的预处理、主处理和后处理逻辑。
				.tokenEndpoint(tokenEndpoint->
						tokenEndpoint
								// 添加自定义的认证方式
								.accessTokenRequestConverters(authenticationConverters ->
										authenticationConverters.addAll(
												List.of(new CustomAuthenticationConverter())
										))
								// 添加自定义
								.authenticationProviders(providers -> providers.add(new CustomAuthenticationProvider(oAuth2AuthorizationService(), tokenGenerator)))
				)
				// Enable OpenID Connect 1.0
				.oidc(Customizer.withDefaults());
		http
			// Redirect to the login page when not authenticated from the
			// authorization endpoint
			.exceptionHandling((exceptions) -> exceptions
				.defaultAuthenticationEntryPointFor(
					new LoginUrlAuthenticationEntryPoint("/login"),
					new MediaTypeRequestMatcher(MediaType.TEXT_HTML)
				)
			)
			// Accept access tokens for User Info and/or Client Registration
			.oauth2ResourceServer((resourceServer) -> resourceServer
				.jwt(Customizer.withDefaults()));

		return http.build();
	}
新增加了如下代码:
.authorizationEndpoint(authorizationEndpoint ->
						authorizationEndpoint
								.consentPage("http://www.wuhm.com.cn")
				)
测试一下:自定义跳转了,但是这个是临时改的一个页面,后续可以改成前后端分离的前端授权页面,后续版本中会实现这一步
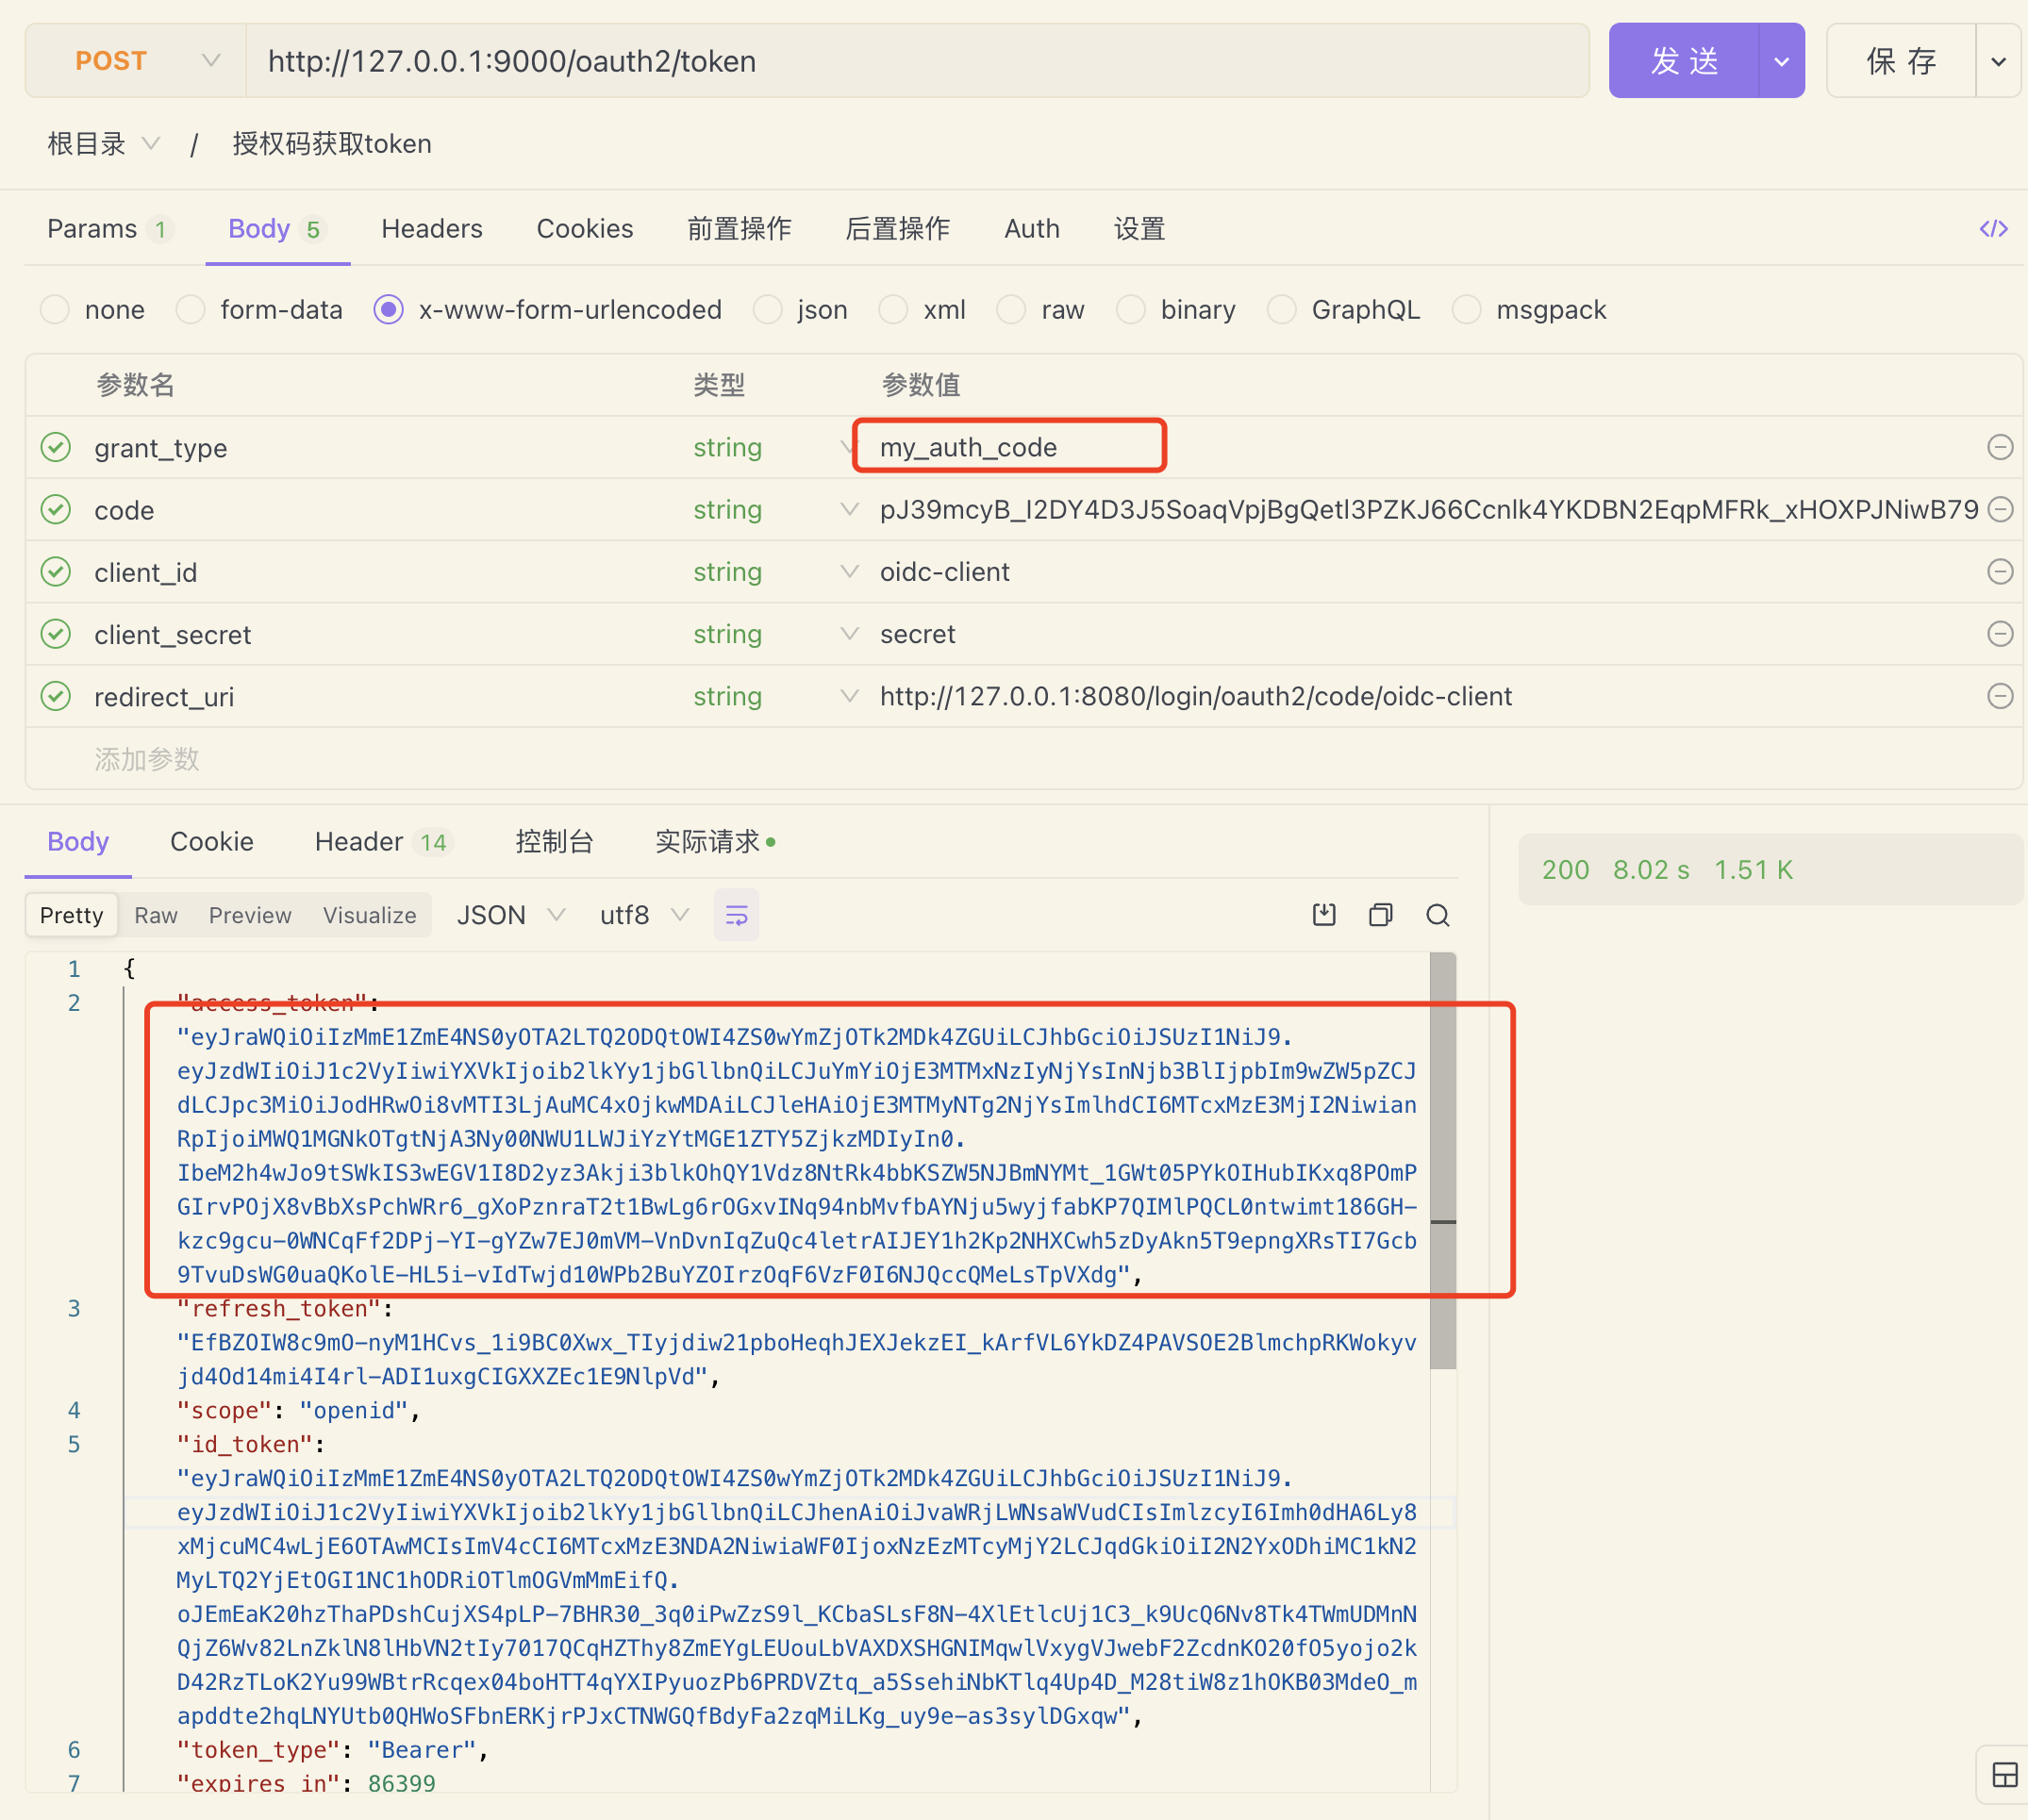
还有个问题自定义的:my_auth_code 这个授权方式并没有用起来,在后面的原因是:
cn/com/wuhm/authorization/server/springboot3authorizationserver/endpoint/CustomAuthenticationConverter.java:45 这一行中代码是:
    if (!AuthorizationGrantType.AUTHORIZATION_CODE.getValue().equals(grantType)) {
            return null;
        }
所以导致上面在使用 my_auth_code 这个类型的时候直接返回了,需要修改为:
// grant_type (REQUIRED)
String grantType = parameters.getFirst(OAuth2ParameterNames.GRANT_TYPE);
if (!"my_auth_code".equals(grantType)) {
    return null;
}改了之后还有问题,报错:No AuthenticationProvider found for cn.com.wuhm.authorization.server.springboot3authorizationserver.endpoint.CustomAuthenticationToken
所以我们还需要修改:cn.com.wuhm.authorization.server.springboot3authorizationserver.endpoint.CustomAuthenticationProvider#supports 这个方法
 @Override
    public boolean supports(Class<?> authentication) {
        // 将CustomAuthenticationToken 和 CustomAuthenticationProvider 建立映射关系,
        // 否则会报错:No AuthenticationProvider found for cn.com.wuhm.authorization.server.springboot3authorizationserver.endpoint.CustomAuthenticationToken
        return CustomAuthenticationToken.class.isAssignableFrom(authentication);
    }
然后测试:
在官网中展示未找到怎样修改登录页的地方,后续再科普一下,未完。。。。。。