Ubuntu22.04安装k8s 1.29.x集群
ubuntu22.04安装k8s-1.29.x集群
0环境准备
| hostname | ip | 备注 |
|---|---|---|
| k8s-master1 | 192.168.0.130 | |
| k8s-master2 | 192.168.0.131 | |
| k8s-master3 | 192.168.0.132 | |
| k8s-node1 | 192.168.0.180 | |
| k8s-node2 | 192.168.0.181 |
添加到 /etc/hosts 文件中
sudo tee -a /etc/hosts <<EOF
192.168.0.130 k8s-master1
192.168.0.131 k8s-master2
192.168.0.132 k8s-node1
192.168.0.133 k8s-node2
EOF
下面的【1-7】每台机器都需要执行
1.关闭swap分区
sed -i 's/.*swap.*/#&/' /etc/fstab2.修改seLinux模式
sed -i 's/^SELINUX=enforcing$/SELINUX=permissive/' /etc/selinux/config3.关闭防火墙
ufw disable
# 或
systemctl disable --now ufw
4.设置时区(根据自己的时间情况可选)
timedatectl set-timezone Asia/Shanghai
systemctl restart systemd-timesyncd.service
date
5.允许IPtables查看桥接流量
cat <<EOF | sudo tee /etc/modules-load.d/k8s.conf
overlay
br_netfilter
EOF

modprobe overlay
modprobe br_netfilter

cat <<EOF | sudo tee /etc/sysctl.d/k8s.conf
net.bridge.bridge-nf-call-iptables  = 1
net.bridge.bridge-nf-call-ip6tables = 1
net.ipv4.ip_forward                 = 1
vm.swappiness=0
EOF

sudo sysctl --system
6.安装kubectl kubeadm kubelet
apt install -y apt-transport-https ca-certificates curl gpgapt-get update && apt-get install -y apt-transport-https
curl -fsSL https://mirrors.aliyun.com/kubernetes-new/core/stable/v1.29/deb/Release.key |
gpg --dearmor -o /etc/apt/keyrings/kubernetes-apt-keyring.gpg
echo "deb [signed-by=/etc/apt/keyrings/kubernetes-apt-keyring.gpg] https://mirrors.aliyun.com/kubernetes-new/core/stable/v1.29/deb/ /" |
tee /etc/apt/sources.list.d/kubernetes.list
apt-get update
# 查看本地可以安装的k8s的版本
apt-cache madison kubeadm
apt-get install -y kubelet=1.29.5-1.1 kubeadm=1.29.5-1.1 kubectl=1.29.-1.1
# apt-mark hold命令用于在Debian和Ubuntu系统中标记软件包以防止它们被自动升级。
apt-mark hold kubelet-1.29.5 kubeadm-1.29.5 kubectl-1.29.5https://developer.aliyun.com/mirror/kubernetes
7.0安装docker(如果已安装可以跳过)
docker install -y docker-ce/etc/docker/daemon.json
systemctl daemon-reload && systemctl restart docker && systemctl enable docker7.安装cri-docker
wget https://github.com/Mirantis/cri-dockerd/releases/download/v0.3.14/cri-dockerd-0.3.14.amd64.tgz

tar xvf cri-dockerd-0.3.14.amd64.tgz
chmod a+x cri-dockerd/cri-dockerd
 mv cri-dockerd/cri-dockerd /usr/bin/
7.1 配置cri-docker服务
wget https://raw.githubusercontent.com/Mirantis/cri-dockerd/master/packaging/systemd/cri-docker.service -P /etc/systemd/system

wget https://raw.githubusercontent.com/Mirantis/cri-dockerd/master/packaging/systemd/cri-docker.socket -P  /usr/lib/systemd/system
日志:
cri-docker.service                    100%[=======================================================================>]   1.29K  --.-KB/s    in 0s

2024-06-02 09:10:55 (143 MB/s) - ‘/etc/systemd/system/cri-docker.service’ saved [1319/1319]
......
2024-06-02 09:12:03 (855 KB/s) - ‘/usr/lib/systemd/system/cri-docker.socket’ saved [204/204]修改/etc/systemd/system/cri-docker.service 文件
[Unit]
Description=CRI Interface for Docker Application Container Engine
Documentation=https://docs.mirantis.com
After=network-online.target firewalld.service docker.service
Wants=network-online.target
Requires=cri-docker.socket

[Service]
Type=notify
ExecStart=/usr/bin/cri-dockerd --container-runtime-endpoint fd:// --network-plugin=cni  --pod-infra-container-image=registry.aliyuncs.com/google_containers/pause:3.9
ExecReload=/bin/kill -s HUP $MAINPID
ExecReload=/bin/kill -s HUP $MAINPID
TimeoutSec=0
RestartSec=2
Restart=always

# Note that StartLimit* options were moved from "Service" to "Unit" in systemd 229.
# Both the old, and new location are accepted by systemd 229 and up, so using the old location
# to make them work for either version of systemd.
StartLimitBurst=3

# Note that StartLimitInterval was renamed to StartLimitIntervalSec in systemd 230.
# Both the old, and new name are accepted by systemd 230 and up, so using the old name to make
# this option work for either version of systemd.
StartLimitInterval=60s

# Having non-zero Limit*s causes performance problems due to accounting overhead
# in the kernel. We recommend using cgroups to do container-local accounting.
LimitNOFILE=infinity
LimitNPROC=infinity
LimitCORE=infinity

# Comment TasksMax if your systemd version does not support it.
# Only systemd 226 and above support this option.
TasksMax=infinity
Delegate=yes
KillMode=process

[Install]
WantedBy=multi-user.target
/usr/lib/systemd/system/cri-docker.socket
[Unit]
Description=CRI Docker Socket for the API
PartOf=cri-docker.service

[Socket]
ListenStream=%t/cri-dockerd.sock
SocketMode=0660
SocketUser=root
SocketGroup=docker

[Install]
WantedBy=sockets.target
7.2启动并启用 cri-dockerd 服务:
 systemctl daemon-reload
 systemctl enable cri-docker.service
 systemctl enable cri-docker.socket
 systemctl start cri-docker.service
 systemctl start cri-docker.socket
8.在master1机器上执行
查看kubelet的状态
root@k8s-master1:~# systemctl status kubectl
Unit kubectl.service could not be found.
root@k8s-master1:~# systemctl status kubelet.service
● kubelet.service - kubelet: The Kubernetes Node Agent
     Loaded: loaded (/lib/systemd/system/kubelet.service; enabled; vendor preset: enabled)
    Drop-In: /etc/systemd/system/kubelet.service.d
             └─10-kubeadm.conf
     Active: activating (auto-restart) (Result: exit-code) since Sun 2024-06-02 09:38:34 CST; 4s ago
       Docs: https://kubernetes.io/docs/home/
    Process: 1557 ExecStart=/usr/bin/kubelet $KUBELET_KUBECONFIG_ARGS $KUBELET_CONFIG_ARGS $KUBELET_KUBEADM_ARGS $KUBELET_EXTRA_ARGS (code=exited, st>
   Main PID: 1557 (code=exited, status=1/FAILURE)
        CPU: 45ms

Jun 02 09:38:34 k8s-master1 systemd[1]: kubelet.service: Failed with result 'exit-code'.
所有master节点执行,开机启动kubelet
systemctl enable --now kubelet初始化kubeadm
kubeadm config print init-defaults > kubeadm.yamlkubeadm.yaml
apiVersion: kubeadm.k8s.io/v1beta3
bootstrapTokens:
- groups:
  - system:bootstrappers:kubeadm:default-node-token
  token: abcdef.0123456789abcdef
  ttl: 24h0m0s
  usages:
  - signing
  - authentication
kind: InitConfiguration
localAPIEndpoint:
  advertiseAddress: 192.168.0.130
  bindPort: 6443
nodeRegistration:
  # 使用cri-docker为容器引擎
  criSocket: unix:///var/run/cri-dockerd.sock
  imagePullPolicy: IfNotPresent
  name: k8s-master01
  taints: null
---
apiServer:
  timeoutForControlPlane: 4m0s
apiVersion: kubeadm.k8s.io/v1beta3
certificatesDir: /etc/kubernetes/pki
clusterName: kubernetes
# 添加集群端点配置
controlPlaneEndpoint: 192.168.0.130:6443
controllerManager: {}
dns: {}
etcd:
  local:
    dataDir: /var/lib/etcd
# 修改容器镜像为阿里云镜像源
imageRepository: registry.cn-hangzhou.aliyuncs.com/google_containers
kind: ClusterConfiguration
kubernetesVersion: v1.29.5
networking:
  dnsDomain: cluster.local
  # 配置pod的网段
  podSubnet: 192.168.0.0/16
  serviceSubnet: 10.96.0.0/12
scheduler: {}
kubeadm init --config=kubeadm.yaml如果启动失败了重试之前先重置
kubeadm reset --cri-socket unix:///var/run/cri-dockerd.sock -f安装日志
Your Kubernetes control-plane has initialized successfully!

To start using your cluster, you need to run the following as a regular user:

  mkdir -p $HOME/.kube
  sudo cp -i /etc/kubernetes/admin.conf $HOME/.kube/config
  sudo chown $(id -u):$(id -g) $HOME/.kube/config

Alternatively, if you are the root user, you can run:

  export KUBECONFIG=/etc/kubernetes/admin.conf

You should now deploy a pod network to the cluster.
Run "kubectl apply -f [podnetwork].yaml" with one of the options listed at:
  https://kubernetes.io/docs/concepts/cluster-administration/addons/

You can now join any number of control-plane nodes by copying certificate authorities
and service account keys on each node and then running the following as root:

  kubeadm join 192.168.0.130:6443 --token abcdef.0123456789abcdef \
        --discovery-token-ca-cert-hash sha256:9ccd90d19d14cf37e1d1248f4123597edb8c8ca37465891bcac901ae95c1cf9e \
        --control-plane

Then you can join any number of worker nodes by running the following on each as root:

kubeadm join 192.168.0.130:6443 --token abcdef.0123456789abcdef \
        --discovery-token-ca-cert-hash sha256:9ccd90d19d14cf37e1d1248f4123597edb8c8ca37465891bcac901ae95c1cf9e
根据上面提示执行命令:
mkdir -p $HOME/.kube
sudo cp -i /etc/kubernetes/admin.conf $HOME/.kube/config
sudo chown $(id -u):$(id -g) $HOME/.kube/config
踩坑环节(省流可以直接跳过)
如果join命令过期或者忘记了可以重新生成: master1节点生成
kubeadm token create --print-join-command结果:
kubeadm join 192.168.0.130:6443 --token 1syhnx.t45fvej61t321ozo --discovery-token-ca-cert-hash sha256:9ccd90d19d14cf37e1d1248f4123597edb8c8ca37465891bcac901ae95c1cf9e如果是join master 节点只需要在最后面增加 --control-plane
kubeadm join 192.168.0.130:6443 --token 1syhnx.t45fvej61t321ozo --discovery-token-ca-cert-hash sha256:9ccd90d19d14cf37e1d1248f4123597edb8c8ca37465891bcac901ae95c1cf9e --control-plane报错:
Found multiple CRI endpoints on the host. Please define which one do you wish to use by setting the 'criSocket' field in the kubeadm configuration file: unix:///var/run/containerd/containerd.sock, unix:///var/run/cri-dockerd.sock
To see the stack trace of this error execute with --v=5 or higher
因为我们使用的是cri-docker 所以在加入node节点时需要配置参数:
kubeadm join 192.168.0.130:6443 --token 1syhnx.t45fvej61t321ozo --discovery-token-ca-cert-hash sha256:9ccd90d19d14cf37e1d1248f4123597edb8c8ca37465891bcac901ae95c1cf9e --control-plane --cri-socket /var/run/cri-dockerd.sock继续报错:
W0618 09:54:55.591344   26320 initconfiguration.go:125] Usage of CRI endpoints without URL scheme is deprecated and can cause kubelet errors in the future. Automatically prepending scheme "unix" to the "criSocket" with value "/var/run/cri-dockerd.sock". Please update your configuration!
[preflight] Running pre-flight checks
[preflight] Reading configuration from the cluster...
[preflight] FYI: You can look at this config file with 'kubectl -n kube-system get cm kubeadm-config -o yaml'
error execution phase preflight:
One or more conditions for hosting a new control plane instance is not satisfied.

[failure loading certificate for CA: couldn't load the certificate file /etc/kubernetes/pki/ca.crt: open /etc/kubernetes/pki/ca.crt: no such file or directory, failure loading key for service account: couldn't load the private key file /etc/kubernetes/pki/sa.key: open /etc/kubernetes/pki/sa.key: no such file or directory, failure loading certificate for front-proxy CA: couldn't load the certificate file /etc/kubernetes/pki/front-proxy-ca.crt: open /etc/kubernetes/pki/front-proxy-ca.crt: no such file or directory, failure loading certificate for etcd CA: couldn't load the certificate file /etc/kubernetes/pki/etcd/ca.crt: open /etc/kubernetes/pki/etcd/ca.crt: no such file or directory]

Please ensure that:
* The cluster has a stable controlPlaneEndpoint address.
* The certificates that must be shared among control plane instances are provided.


To see the stack trace of this error execute with --v=5 or higher继续生成证书:master1节点生成
kubeadm init phase upload-certs --upload-certs结果
I0618 10:05:33.115919   33868 version.go:256] remote version is much newer: v1.30.2; falling back to: stable-1.29
[upload-certs] Storing the certificates in Secret "kubeadm-certs" in the "kube-system" Namespace
[upload-certs] Using certificate key:
37c9129e5dd6555abbfa8ba38313f05e6d2aad8b2b937a0be08f74f2f989fdd9
master(2/3) 加入集群(重要部分)
kubeadm join 192.168.0.130:6443 --token 1syhnx.t45fvej61t321ozo --discovery-token-ca-cert-hash sha256:9ccd90d19d14cf37e1d1248f4123597edb8c8ca37465891bcac901ae95c1cf9e --control-plane --cri-socket /var/run/cri-dockerd.sock --certificate-key 37c9129e5dd6555abbfa8ba38313f05e6d2aad8b2b937a0be08f74f2f989fdd9master(2/3)节点日志
This node has joined the cluster and a new control plane instance was created:

* Certificate signing request was sent to apiserver and approval was received.
* The Kubelet was informed of the new secure connection details.
* Control plane label and taint were applied to the new node.
* The Kubernetes control plane instances scaled up.
* A new etcd member was added to the local/stacked etcd cluster.

To start administering your cluster from this node, you need to run the following as a regular user:

        mkdir -p $HOME/.kube
        sudo cp -i /etc/kubernetes/admin.conf $HOME/.kube/config
        sudo chown $(id -u):$(id -g) $HOME/.kube/config

Run 'kubectl get nodes' to see this node join the cluster.
node(1/2) 加入集群(重要部分)
kubeadm join 192.168.0.130:6443 --token 1syhnx.t45fvej61t321ozo --discovery-token-ca-cert-hash sha256:9ccd90d19d14cf37e1d1248f4123597edb8c8ca37465891bcac901ae95c1cf9e --cri-socket /var/run/cri-dockerd.sock --certificate-key 37c9129e5dd6555abbfa8ba38313f05e6d2aad8b2b937a0be08f74f2f989fdd9node(1/2)节点日志
This node has joined the cluster:
* Certificate signing request was sent to apiserver and a response was received.
* The Kubelet was informed of the new secure connection details.

Run 'kubectl get nodes' on the control-plane to see this node join the cluster.
查看集群(master1)
kubectl get nodes结果:
root@k8s-master1:~# kubectl get nodes
NAME           STATUS     ROLES           AGE     VERSION
k8s-master01   NotReady   control-plane   2d23h   v1.29.5
k8s-master2    NotReady   control-plane   12m     v1.29.5
k8s-master3    NotReady   control-plane   11m     v1.29.5
k8s-node1      NotReady   <none>          9m45s   v1.29.5
k8s-node2      NotReady   <none>          9m17s   v1.29.5
root@k8s-master1:~#
可以发现现在节点的状态都是NotReady的状态,因为我们还没有安装网络插件
安装网络插件calico(master1)
wget https://raw.githubusercontent.com/projectcalico/calico/v3.28.0/manifests/calico.yamlcalico.yaml
放开注释的地方
                      ......
           # Set MTU for the Wireguard tunnel device.
            - name: FELIX_WIREGUARDMTU
              valueFrom:
                configMapKeyRef:
                  name: calico-config
                  key: veth_mtu
            # The default IPv4 pool to create on startup if none exists. Pod IPs will be
            # chosen from this range. Changing this value after installation will have
            # no effect. This should fall within `--cluster-cidr`.
            - name: CALICO_IPV4POOL_CIDR
              value: "192.168.0.0/16"
            # Disable file logging so `kubectl logs` works.
            - name: CALICO_DISABLE_FILE_LOGGING
              value: "true"
            # Set Felix endpoint to host default action to ACCEPT.
            - name: FELIX_DEFAULTENDPOINTTOHOSTACTION
              value: "ACCEPT"
            # Disable IPv6 on Kubernetes.
            - name: FELIX_IPV6SUPPORT
              value: "false"
            - name: FELIX_HEALTHENABLED
              value: "true"

......==关键是这个值CALICO_IPV4POOL_CIDR== 要和我们kubeadm.yaml配置文件中的pod配置的值一样:192.168.0.0/16
替换镜像:
calico/node:v3.28.0

calico/cni:v3.28.0

calico/kube-controllers:v3.28.0
为阿里云镜像仓库
registry.cn-beijing.aliyuncs.com/wuhm_google_containers/calico_node:v3.28.0

registry.cn-beijing.aliyuncs.com/wuhm_google_containers/calico_cni:v3.28.0

registry.cn-beijing.aliyuncs.com/wuhm_google_containers/kube-controllers:v3.28.0
安装calico插件
kubectl apply -f calico.yaml查看pod运行情况
root@k8s-master1:~# kubectl get pod -A
NAMESPACE     NAME                                       READY   STATUS    RESTARTS      AGE
kube-system   calico-kube-controllers-6c497db46f-zd9fg   1/1     Running   0             81s
kube-system   calico-node-6tmdq                          1/1     Running   0             81s
kube-system   calico-node-86xvr                          1/1     Running   0             81s
kube-system   calico-node-bdf54                          1/1     Running   0             81s
kube-system   calico-node-fqqqc                          1/1     Running   0             81s
kube-system   calico-node-xmprb                          1/1     Running   0             81s
kube-system   coredns-5f98f8d567-9vpvh                   1/1     Running   0             3d2h
kube-system   coredns-5f98f8d567-tm5w7                   1/1     Running   0             3d2h
kube-system   etcd-k8s-master01                          1/1     Running   4 (85m ago)   3d2h
kube-system   etcd-k8s-master2                           1/1     Running   2 (85m ago)   3h32m
kube-system   etcd-k8s-master3                           1/1     Running   2 (85m ago)   3h30m
kube-system   kube-apiserver-k8s-master01                1/1     Running   4 (85m ago)   3d2h
kube-system   kube-apiserver-k8s-master2                 1/1     Running   3 (85m ago)   3h32m
kube-system   kube-apiserver-k8s-master3                 1/1     Running   2 (85m ago)   3h30m
kube-system   kube-controller-manager-k8s-master01       1/1     Running   5 (85m ago)   3d2h
kube-system   kube-controller-manager-k8s-master2        1/1     Running   2 (85m ago)   3h32m
kube-system   kube-controller-manager-k8s-master3        1/1     Running   2 (85m ago)   3h30m
kube-system   kube-proxy-sd49l                           1/1     Running   3 (86m ago)   3d2h
kube-system   kube-proxy-tcsj4                           1/1     Running   2 (85m ago)   3h29m
kube-system   kube-proxy-tzl9b                           1/1     Running   1 (86m ago)   3h30m
kube-system   kube-proxy-vb25c                           1/1     Running   1 (86m ago)   3h32m
kube-system   kube-proxy-wctnl                           1/1     Running   2 (85m ago)   3h28m
kube-system   kube-scheduler-k8s-master01                1/1     Running   4 (85m ago)   3d2h
kube-system   kube-scheduler-k8s-master2                 1/1     Running   2 (85m ago)   3h32m
kube-system   kube-scheduler-k8s-master3                 1/1     Running   2 (85m ago)   3h30m
查看node节点状态
root@k8s-master1:~# kubectl get nodes
NAME           STATUS   ROLES           AGE     VERSION
k8s-master01   Ready    control-plane   3d2h    v1.29.5
k8s-master2    Ready    control-plane   3h32m   v1.29.5
k8s-master3    Ready    control-plane   3h31m   v1.29.5
k8s-node1      Ready    <none>          3h29m   v1.29.5
k8s-node2      Ready    <none>          3h28m   v1.29.5
root@k8s-master1:~#
全是ready的状态
以创建nginx为例
nginx.yaml
apiVersion: apps/v1
kind: Deployment
metadata:
  labels:
    app: nginx-demo
  name: nginx-demo
spec:
  replicas: 2
  selector:
    matchLabels:
      app: nginx-demo
  strategy:
    rollingUpdate:
      maxSurge: 25%
      maxUnavailable: 1
    type: RollingUpdate
  template:
    metadata:
      labels:
        app: nginx-demo
    spec:
      containers:
      - image: registry.openanolis.cn/openanolis/nginx:1.14.1-8.6
        imagePullPolicy: IfNotPresent
        name: nginx-demo
        ports:
        - containerPort: 80
          name: web
          protocol: TCP
        resources:
          limits:
            memory: 170Mi
            cpu: 1
          requests:
            cpu: 100m
            memory: 70Mi
      restartPolicy: Always
部署
kubectl apply -f nginx.yaml查看:
kubectl get po -o wide结果
root@k8s-master1:~# kubectl get po -o wide
NAME                          READY   STATUS    RESTARTS   AGE   IP                NODE        NOMINATED NODE   READINESS GATES
nginx-demo-7595447b56-q4bd4   1/1     Running   0          27s   192.168.169.131   k8s-node2   <none>           <none>
nginx-demo-7595447b56-xkhpm   1/1     Running   0          27s   192.168.36.67     k8s-node1   <none>           <none>
root@k8s-master1:~#
部署了两个副本,均匀分布在node1和node2节点上
创建一个service
apiVersion: v1
kind: Service
metadata:
  creationTimestamp: "2022-08-15T14:13:33Z"
  name: nginx-service
  namespace: default
  resourceVersion: "222449"
  uid: 1c2f3bf5-24cc-43e1-a3a6-821fd5966fec
spec:
  clusterIP: 10.111.244.145
  clusterIPs:
  - 10.111.244.145
  ports:
  - name: http
    port: 80
    protocol: TCP
    targetPort: 80
    nodePort: 30188
  selector:
    app: nginx-demo
  sessionAffinity: None
  type: NodePort
status:
  loadBalancer: {}
查看service
root@k8s-master1:~# kubectl get svc
NAME            TYPE        CLUSTER-IP       EXTERNAL-IP   PORT(S)        AGE
kubernetes      ClusterIP   10.96.0.1        <none>        443/TCP        3d3h
nginx-service   NodePort    10.111.244.145   <none>        80:30188/TCP   9s
root@k8s-master1:~#
在宿主机中访问: http://192.168.0.181:30188/ 这里的ip可以使集群中的任意一台机器的ip
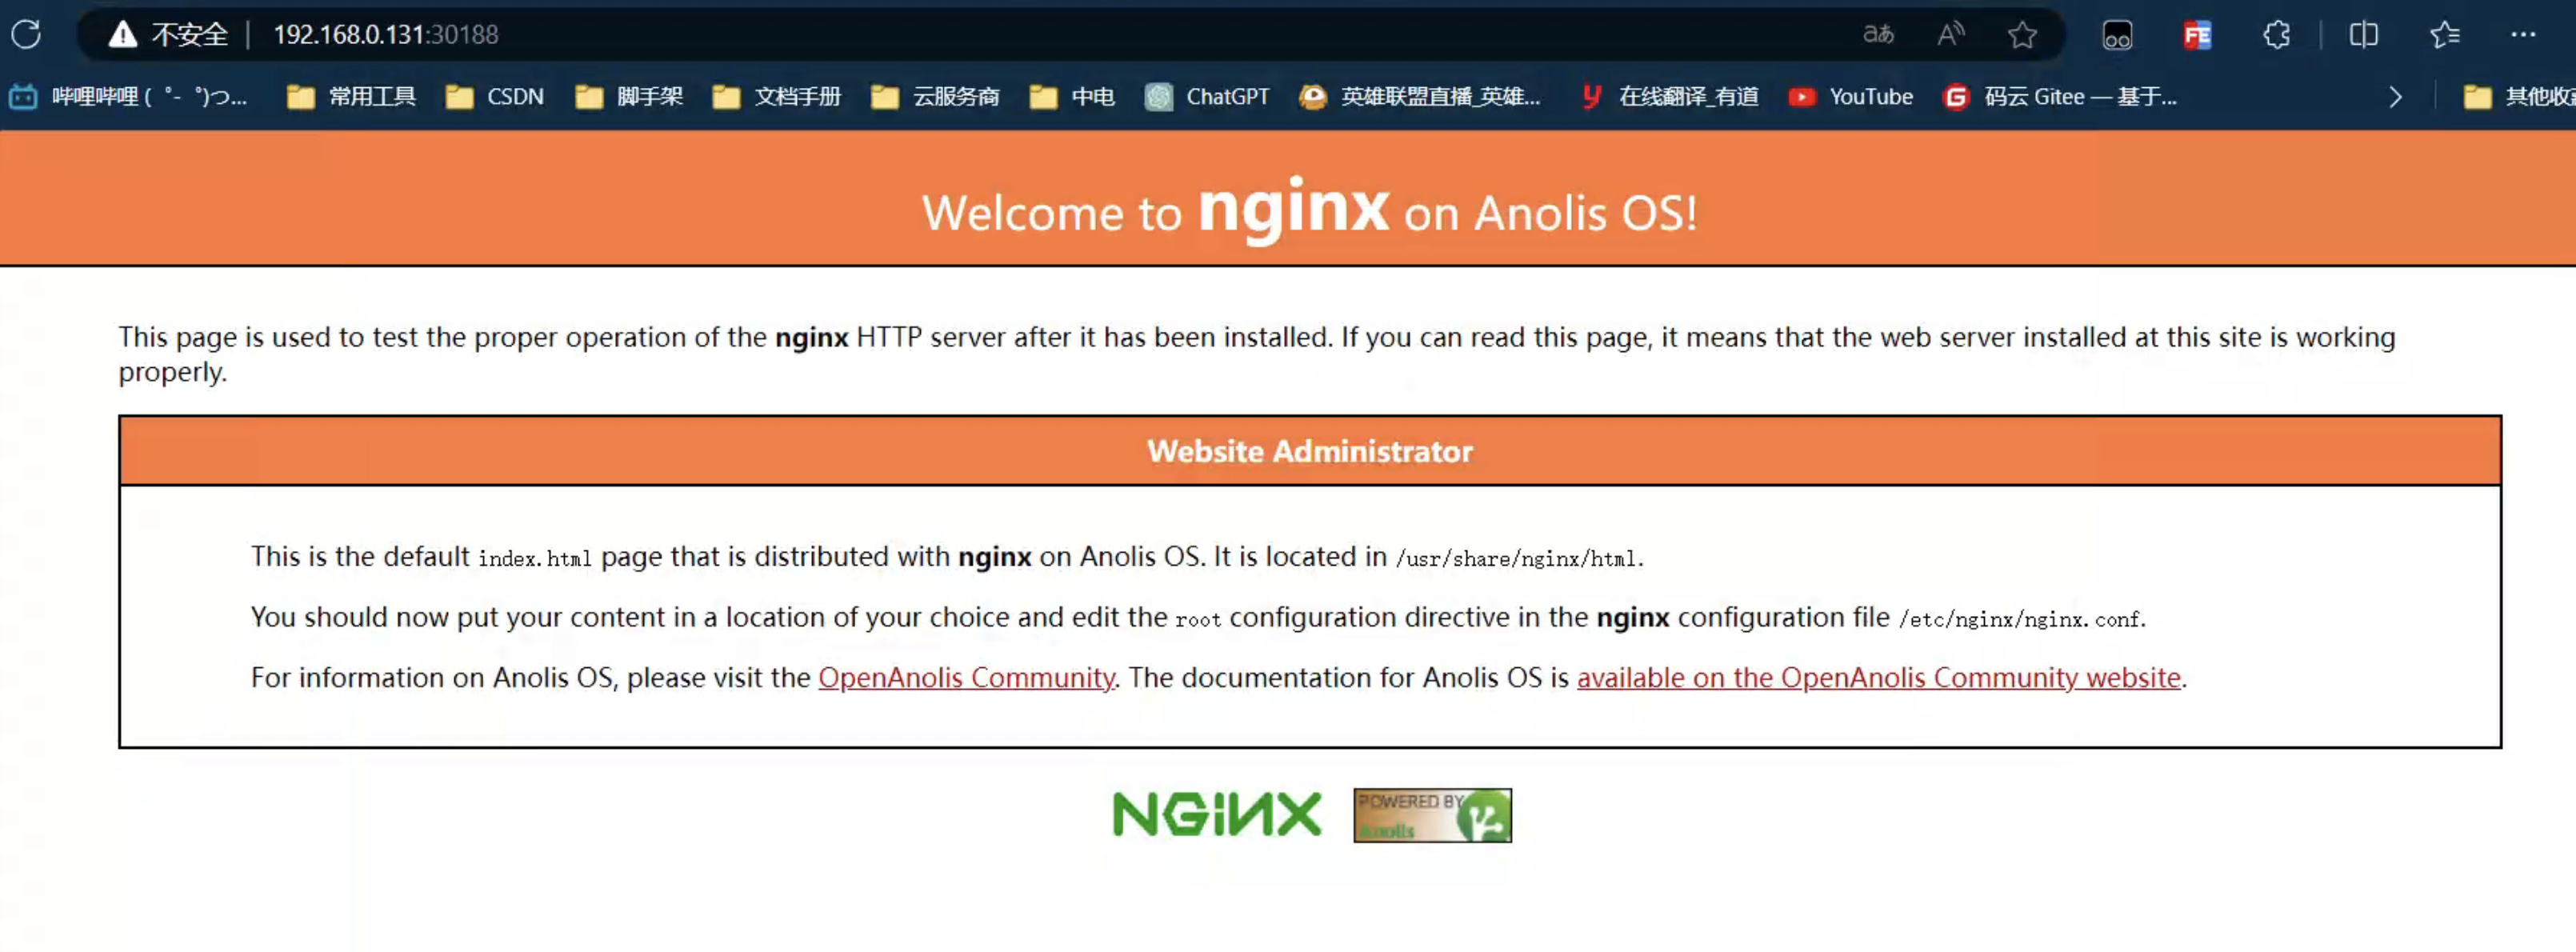
==k8s多master集群搭建成功==