JavaNIO模型
NIO模型
简介
-
java NIO 全称
java non-blocking IO,是指JDK提供的新API。从JDK1.4开始,JAVA提供了一系列改进的输入/输出的新特性,是同步非阻塞的 -
NIO相关类都被放在
java.nio包及子包下,并对原java.io包中的很多类进行改写 -
NIO有三大核心组件:
Channel(通道),Buffer(缓冲区),Selector(选择器)
-
NIO 是面向
缓冲区或则面向块编程的,数据读取到一个它稍后处理的缓冲区,需要时可在缓冲区中前后移动,这就增加了处理过程中的灵活性,使用它可以提供非阻塞式的高伸缩性网络 -
java NIO 的非阻塞模式,使一个线程从某通道发送请求或则读取数据,但是它仅能得到目前可用的数据,如果目前没有数据可用时,就什么都不会获取,而不是保持线程阻塞,所以直到数据变的可以读取之前,该线程可以继续做其他的事情。非阻塞写也是如此,一个线程请求写入一些数据到某通道,不需要等待它完全写入,这个线程同时可以去做别的事情。
-
NIO是可以做到用一个线程来处理多个操作的,假设有10000个请求过来,根据实际情况,可以分配50或者100个线程来处理,不像之前阻塞IO那样,非得分配10000个线程。
-
HTTP2.0使用了多路复用的技术,做到用一个连接并发处理多个请求,而且并发请求的数量不HTTP1.0大了好几个数量级
Buffer简单使用
public class BufferTest {
    public static void main(String[] args) {
        // 创建一个buffer
        IntBuffer intBuffer = IntBuffer.allocate(10);
        // 写入数据到buffer
        for (int i = 0; i < 10; i++) {
            intBuffer.put(i * 2);
        }
        // 读取数据,
        // 先将buffer切换为读模式
        intBuffer.flip();
        while(intBuffer.hasRemaining()){
            System.out.println(intBuffer.get());
        }

    }
}
NIO与BIO的比较
- BIO以流的方式处理数据,而NIO以块的方式处理数据,快的效率比流高很多
- BIO是阻塞的,NIO是非阻塞的
- BIO基于字节流和字符流进行操作,而NIO基于Channel和buffer进行操作,数据总是从通道读取到缓冲区中,或者从缓冲区写入到通道中。Selector(选择器)用于监听多个通道的事件(连接请求,数据到达等),因此使用单个线程就可以监听多个客户端通道
NIO三大组件
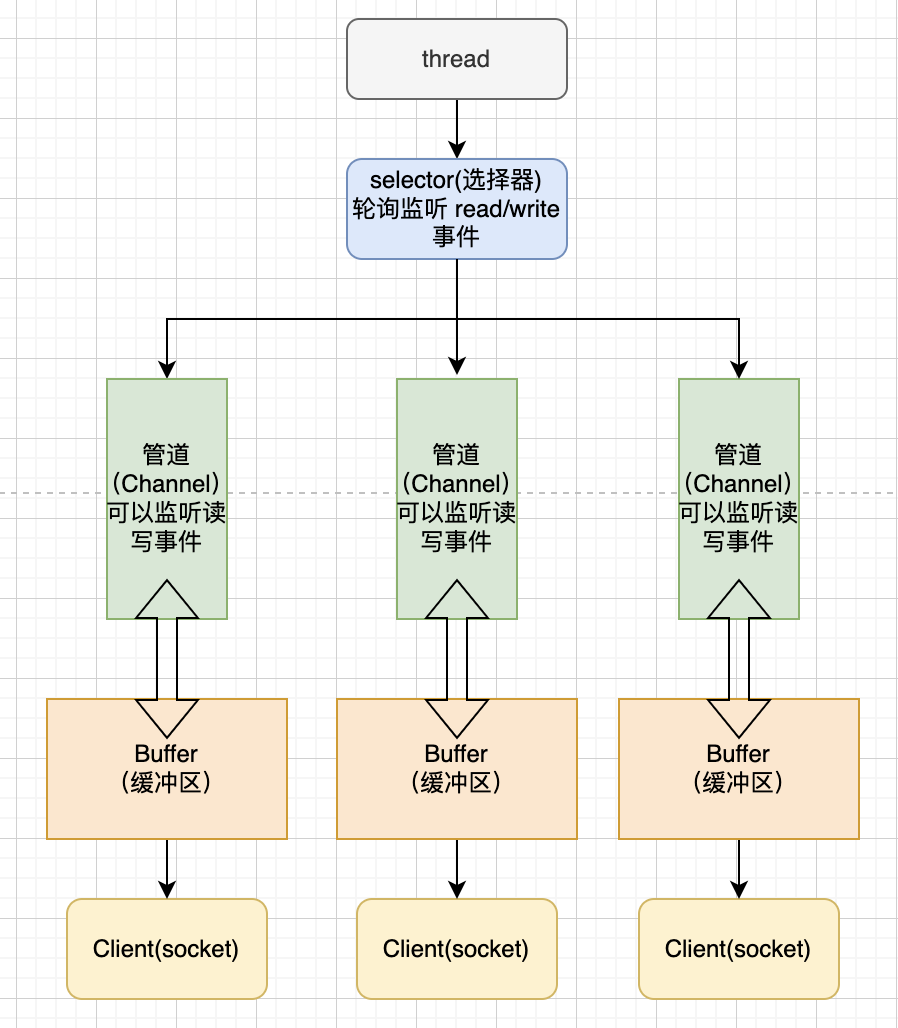
- 每个
Channel对应一个buffer - 每个线程对应一个
selector,每个selector管理多个Channel selector切换到哪个Channel是由事件(Event)决定的,Selector会根据不同的事件,在各个通道上切换Buffer就是一个内存块,底层是有一个数组- 数据的读取写入是通过
Buffer,Buffer是可以读也可以写,需要调用flip()方法来切换 - Channel是双向的,可以返回底层操作系统的情况,比如Linux底层的操作系统通道就是双向的。
channel(连接)
类似于stream,读写数据的双向通道,可以从channel中将数据读入buffer中,也可以将buffer的数据写入channel。
常见的channel
-
FileChannel:主要用于对本地文件进行IO操作
public int read(ByteBuffer var1): 从通道读取数据并放入缓冲区中public int write(ByteBuffer var1):把缓冲区中的数据写入到通道中public long transferFrom(ReadableByteChannel var1, long var2, long var4): 从目标通道中复制数据到当前通道public long transferTo(long var1, long var3, WritableByteChannel var5): 把数据从当前通道复制给目标通道
-
DatagramChannel
-
SocketChannel:类似:Socket
-
ServerSocketChannel:类似:serverSocket
channel 案例
使用bytebuffer和FileChannel将数据写入文件中
public class FileChannelTest {
    public static void main(String[] args) throws Exception {
        String msg = "hello Nio";
        // 创建一个输出流
        String filePath = System.getProperty("user.dir") + "/src/main/resources/static/file01.txt";
        FileOutputStream fileOutputStream = new FileOutputStream(filePath);
        // 根据fileOutputStream获取FileChannel
        FileChannel fileChannel = fileOutputStream.getChannel();
        // 创建一个缓冲区
        ByteBuffer buffer = ByteBuffer.allocate(1024);
        // 将数据写入Buffer中
        buffer.put(msg.getBytes(StandardCharsets.UTF_8));
        // 写完数据后需要讲Buffer转为读模式
        buffer.flip();
        // 将Buffer中的数据写入到channel中
        fileChannel.write(buffer);
        fileOutputStream.close();
        fileChannel.close();
    }
}
使用FileChannel读取文件的内容
public class FileChannel02 {
    public static void main(String[] args) throws Exception{
        // 定义一个文件输入流
        String filePath = System.getProperty("user.dir") + "/src/main/resources/static/file01.txt";
        File file = new File(filePath);
        FileInputStream fileInputStream = new FileInputStream(file);

        // 根据fileOutputStream获取FileChannel
        FileChannel fileChannel = fileInputStream.getChannel();
        // 创建一个缓冲区
        ByteBuffer buffer = ByteBuffer.allocate((int) file.length());
        fileChannel.read(buffer);
        System.out.println(new String(buffer.array()));
        fileInputStream.close();
    }
}
使用Channel完成文件的拷贝

public class FileChannel03 {
    public static void main(String[] args) throws Exception{
        // 定义一个文件输入流
        String filePath = System.getProperty("user.dir") + "/src/main/resources/static/file01.txt";
        FileInputStream fileInputStream = new FileInputStream(filePath);
        // 根据fileInputStream获取FileChannel
        FileChannel fileInputStreamChannel = fileInputStream.getChannel();

        String targetPath = System.getProperty("user.dir") + "/src/main/resources/static/file02.txt";
        FileOutputStream fileOutputStream = new FileOutputStream(targetPath);
        FileChannel outputStreamChannel = fileOutputStream.getChannel();
        // 创建一个缓冲区
        ByteBuffer buffer = ByteBuffer.allocate(4);
        while(true){
            int read = fileInputStreamChannel.read(buffer);
            if(read == -1){
                break;
            }
            buffer.flip();
            outputStreamChannel.write(buffer);
            // 写入数据后需要讲Buffer复位,否则 limit = position; 相等,再次read的时候会返回0
            buffer.clear();
        }
        // 关闭流
        fileInputStream.close();
        fileOutputStream.close();
    }
}
关键代码:
buffer.flip();
outputStreamChannel.write(buffer);
// 写入数据后需要讲Buffer复位,否则 limit = position; 相等,再次read的时候会返回0
buffer.clear();
使用
FileChannel的transferTo方法复制文件
public class FileChannel04 {
    public static void main(String[] args) throws Exception{
        // 定义一个文件输入流
        String filePath = System.getProperty("user.dir") + "/src/main/resources/static/file02.txt";
        String targetPath = System.getProperty("user.dir") + "/src/main/resources/static/file03.txt";
        try(FileChannel source = new FileInputStream(filePath).getChannel();
            FileChannel target = new FileOutputStream(targetPath).getChannel()){
            // 这种方式的效率高,底层会利用操作系统的零拷贝优化
            source.transferTo(0, source.size(), target);
        }catch (Exception e){
            e.printStackTrace();
        }

    }
}
使用
FileChannel传输大于2G的文件
public class FileChannel04 {
    public static void main(String[] args) throws Exception{
        // 定义一个文件输入流
        String filePath = System.getProperty("user.dir") + "/src/main/resources/static/file02.txt";
        String targetPath = System.getProperty("user.dir") + "/src/main/resources/static/file03.txt";
        try( FileChannel source = new FileInputStream(filePath).getChannel();
            FileChannel target = new FileOutputStream(targetPath).getChannel()){
            // 这种方式的效率高,底层会利用操作系统的零拷贝优化
            // 如果文件大于2G
            long size = source.size();
            for(long left = size; left > 0; ){
                left -= source.transferTo((size - left), left, target);
            }
        }catch (Exception e){
            e.printStackTrace();
        }
    }
}
buffer
数据缓冲区,本质上是一个可以读写数据的内存块,可以理解成是一个容器对象,该对象提供了一组方法,可以更轻松的使用内存块,缓冲区对象内置了一些机制,能够跟踪和记录缓冲区的状态变化情况,Channel提供从文件,网络读取数据的渠道,但是读取或写入的数据都必须经过Buffer;在NIO中Buffer是一个顶层父类,它是一个抽象类
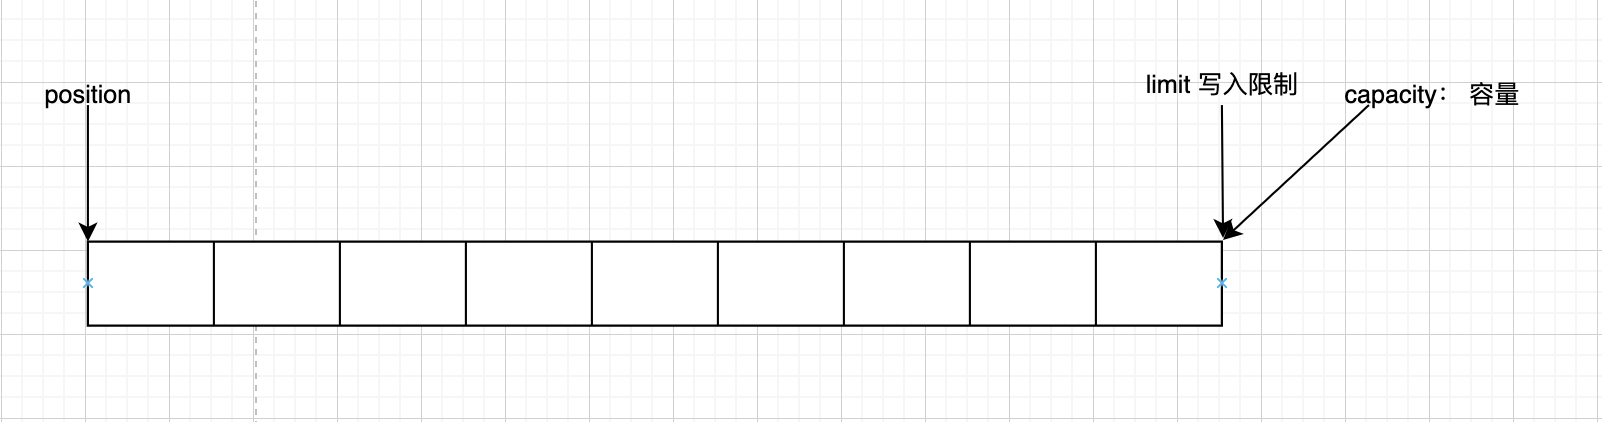
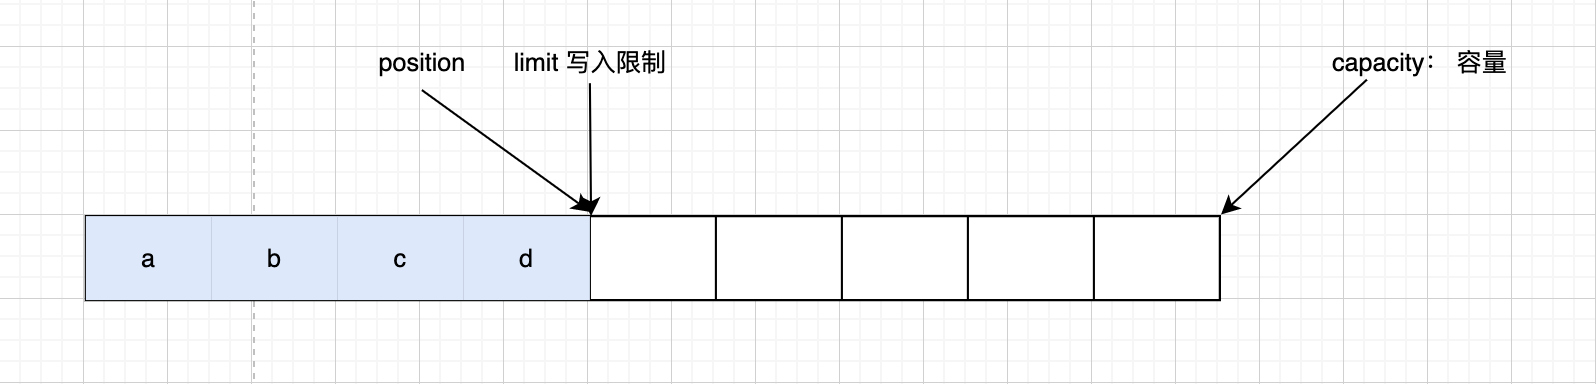
Buffer类定义了所有的缓冲区都具有的四个属性。
- Capacity:缓冲区最大容量
- Limit:表示缓冲区的当前终点,不能对缓冲区超过极限的位置进行读写操作。其极限是可以修改的
- position:位置,下一个要被读或写的元素的索引,每次读写缓冲区数据时都会改变这个值,为下次读写做准备
- mark:标记
buffer使用
- 写入数据:
channel.read(bytebuffer) - 调用flip()方法切换为读模式
- 从
buffer中读取数据:buffer.get() - 调用
clear()方法或compact()方法切换至写模式
常见buffer子类
- ByteBuffer
- MappedByteBuffer:可以让文件直接在内存(堆外的内存)中进行修改,而如何同步到文件由NIO来完成
- DirectByteBeffer: 直接内存,读写效率高(少一次拷贝),不会受垃圾回收(GC)影响,但是分配的效率低,如果使用不到容易导致内存泄漏
- HeapByteBuffer:java 堆内存,读写效率较低,受到垃圾回收(GC)的影响
- ShortBuffer
- IntBuffer
- LongBuffer
- DoubleBuffer
- FloatBuffer
- CharBuffer
buffer 状态转换流程图
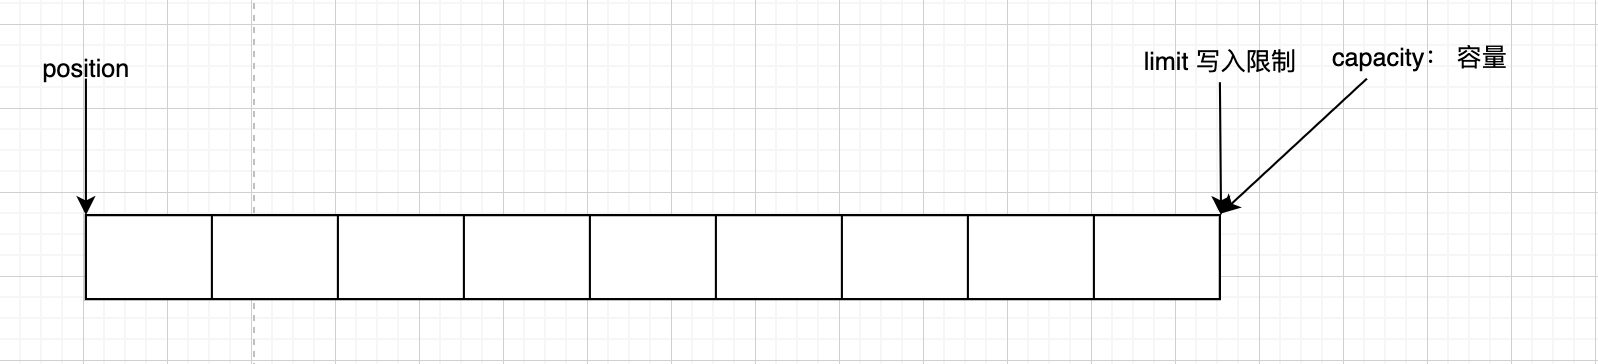
一开始创建buffer 的初始状态
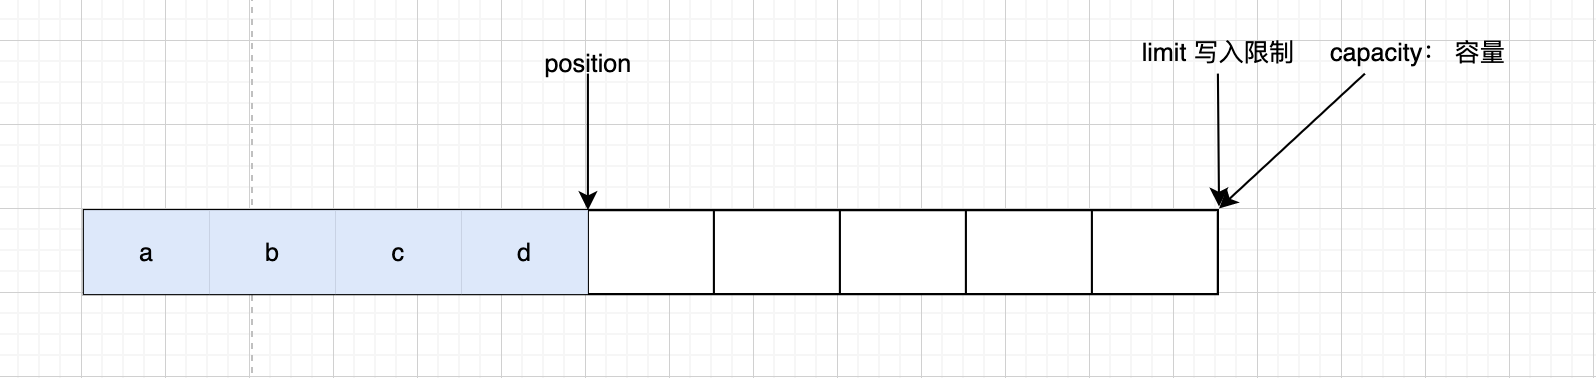
写模式下,position是写入的位置,limit等于容量,下面是写入4个自节后的图
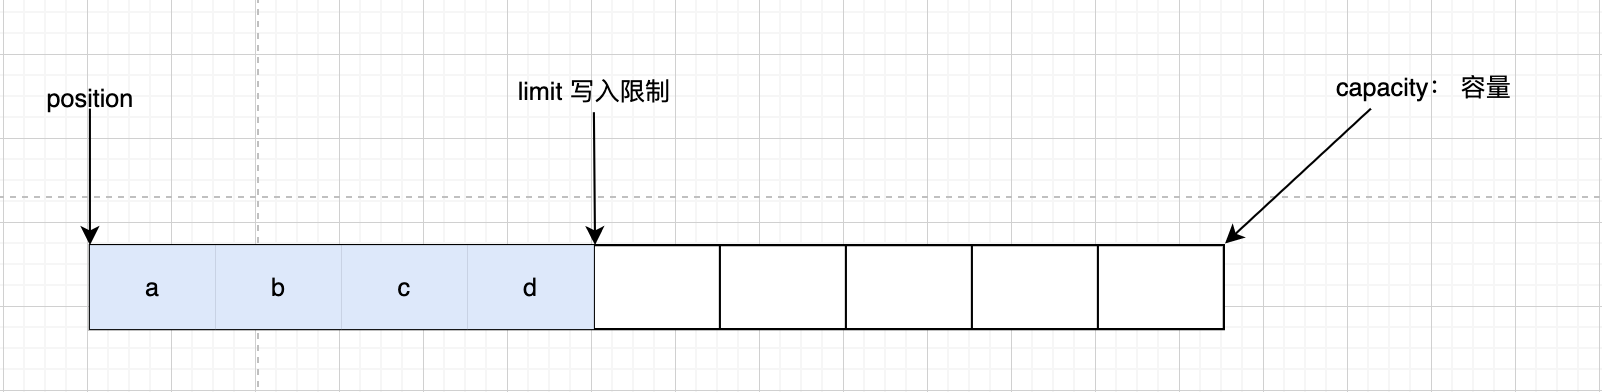
调用 flip() 方法后,position切换为读的位置,limit切换为可读的最大限制位
读取四个字节以后
调用 clear() 方法后,position切换为写的位置,limit切换为可写的最大限制位
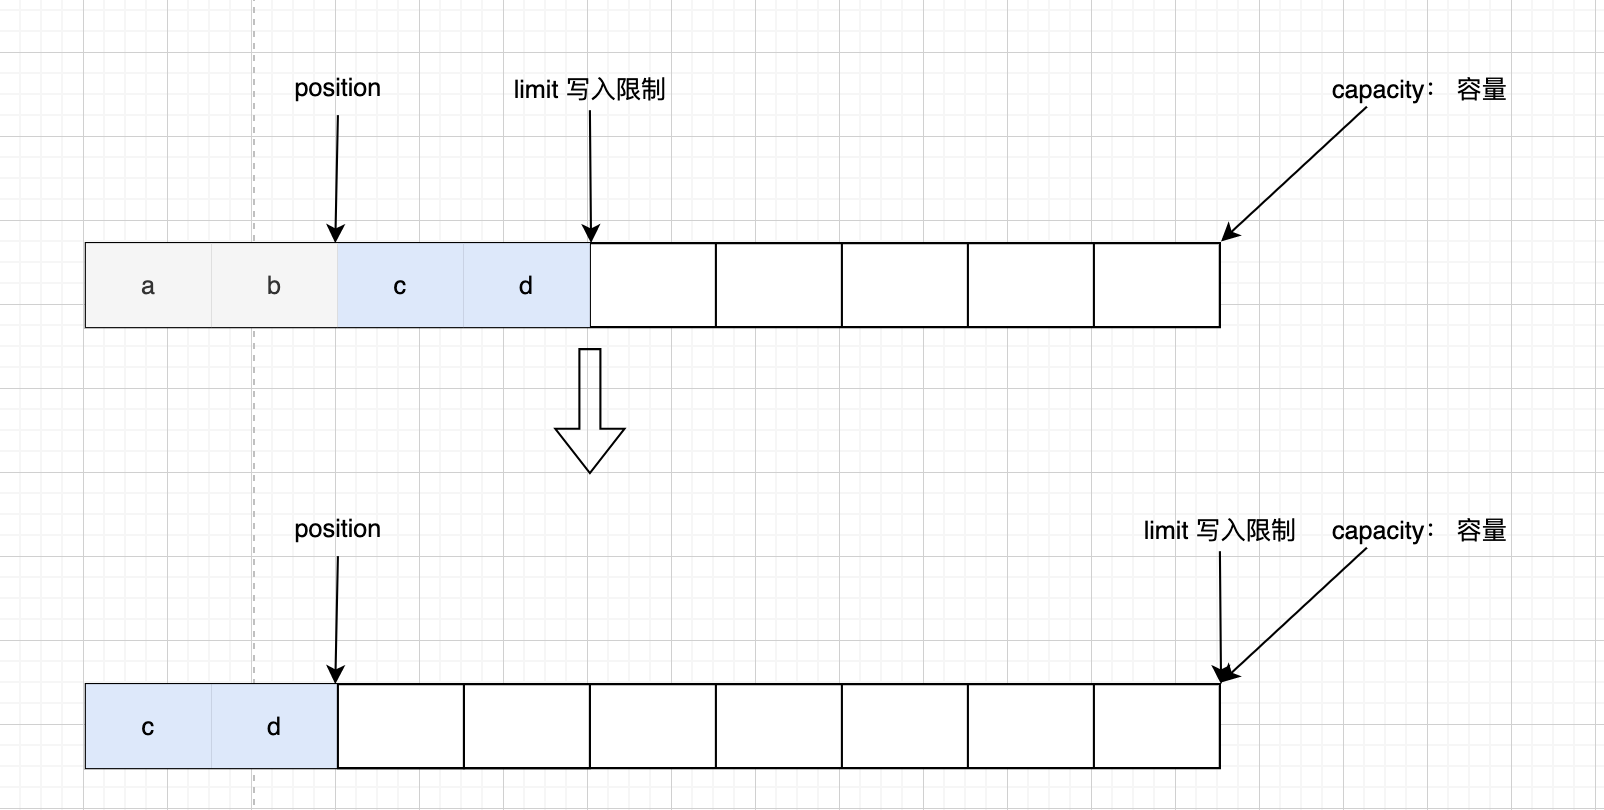
调用 compact() 方法后,把未读完的数据向前压缩,然后切换为写模式
Buffer 案例
MapperByteBuffer 操作
public class MapperByteBuffer {

    public static void main(String[] args)  throws Exception{
        String filePath = System.getProperty("user.dir") + "/src/main/resources/static/file01.txt";
        RandomAccessFile randomAccessFile = new RandomAccessFile(filePath, "rw");
        // 获取文件通道
        FileChannel fileChannel = randomAccessFile.getChannel();

        // FileChannel.MapMode.READ_WRITE: 读写模式
        // 0: 表示可以直接修改的起始位置
        // 5: 映射到内存的大小(不是索引位置),即有多少个字节映射到内存
        // 可以修改的内容范围是:0-5
        MappedByteBuffer mappedByteBuffer = fileChannel.map(FileChannel.MapMode.READ_WRITE, 0, 5);
        // 修改文件内容
        mappedByteBuffer.put(0, (byte) 'H');
        mappedByteBuffer.put(3, (byte) 9);
        randomAccessFile.close();
    }
}
Buffer的分散(Scattering)与聚合(Gathering)
Scattering: 将数据写入到Buffer时,可以采用buffer数组,依次写入(分散)
Gathering:从buffer读取数据时,可以采用buffer数组,依次读(聚合)
public class ScatteringAndGatheringTest {
    public static void main(String[] args) throws Exception {
        // 使用 ServerSocketChannel
        ServerSocketChannel serverSocketChannel = ServerSocketChannel.open();
        InetSocketAddress inetSocketAddress = new InetSocketAddress(8000);
        // 绑定端口到Socket并启动
        serverSocketChannel.socket().bind(inetSocketAddress);
        // 创建一个Buffer数组
        ByteBuffer[] byteBuffers = new ByteBuffer[2];
        byteBuffers[0] = ByteBuffer.allocate(5);
        byteBuffers[1] = ByteBuffer.allocate(3);
        // 等待客户端连接
        SocketChannel socketChannel = serverSocketChannel.accept();
        // 模拟从客户端接收8个字节
        int messageLength = 8;

        while(true){
            int byteRead = 0;

            while(byteRead < messageLength){
                long read = socketChannel.read(byteBuffers);
                byteRead += read;
                System.out.println("byteRead=" + byteRead);
                // 使用流打印
                Arrays.asList(byteBuffers)
                        .stream()
                        .map(buffer-> "position = " + buffer.position() + " limit= " + buffer.limit())
                        .forEach(System.out::println);
            }
            // 将所有的Buffer转为读模式
            Arrays.asList(byteBuffers).forEach(Buffer::clear);
            // 将数据读出显示到客户端
            int byteWrite = 0;
            while(byteWrite < messageLength){
                long write = socketChannel.write(byteBuffers);
                byteWrite += write;
            }
            Arrays.asList(byteBuffers).forEach(Buffer::flip);

        }

    }
}
Selector
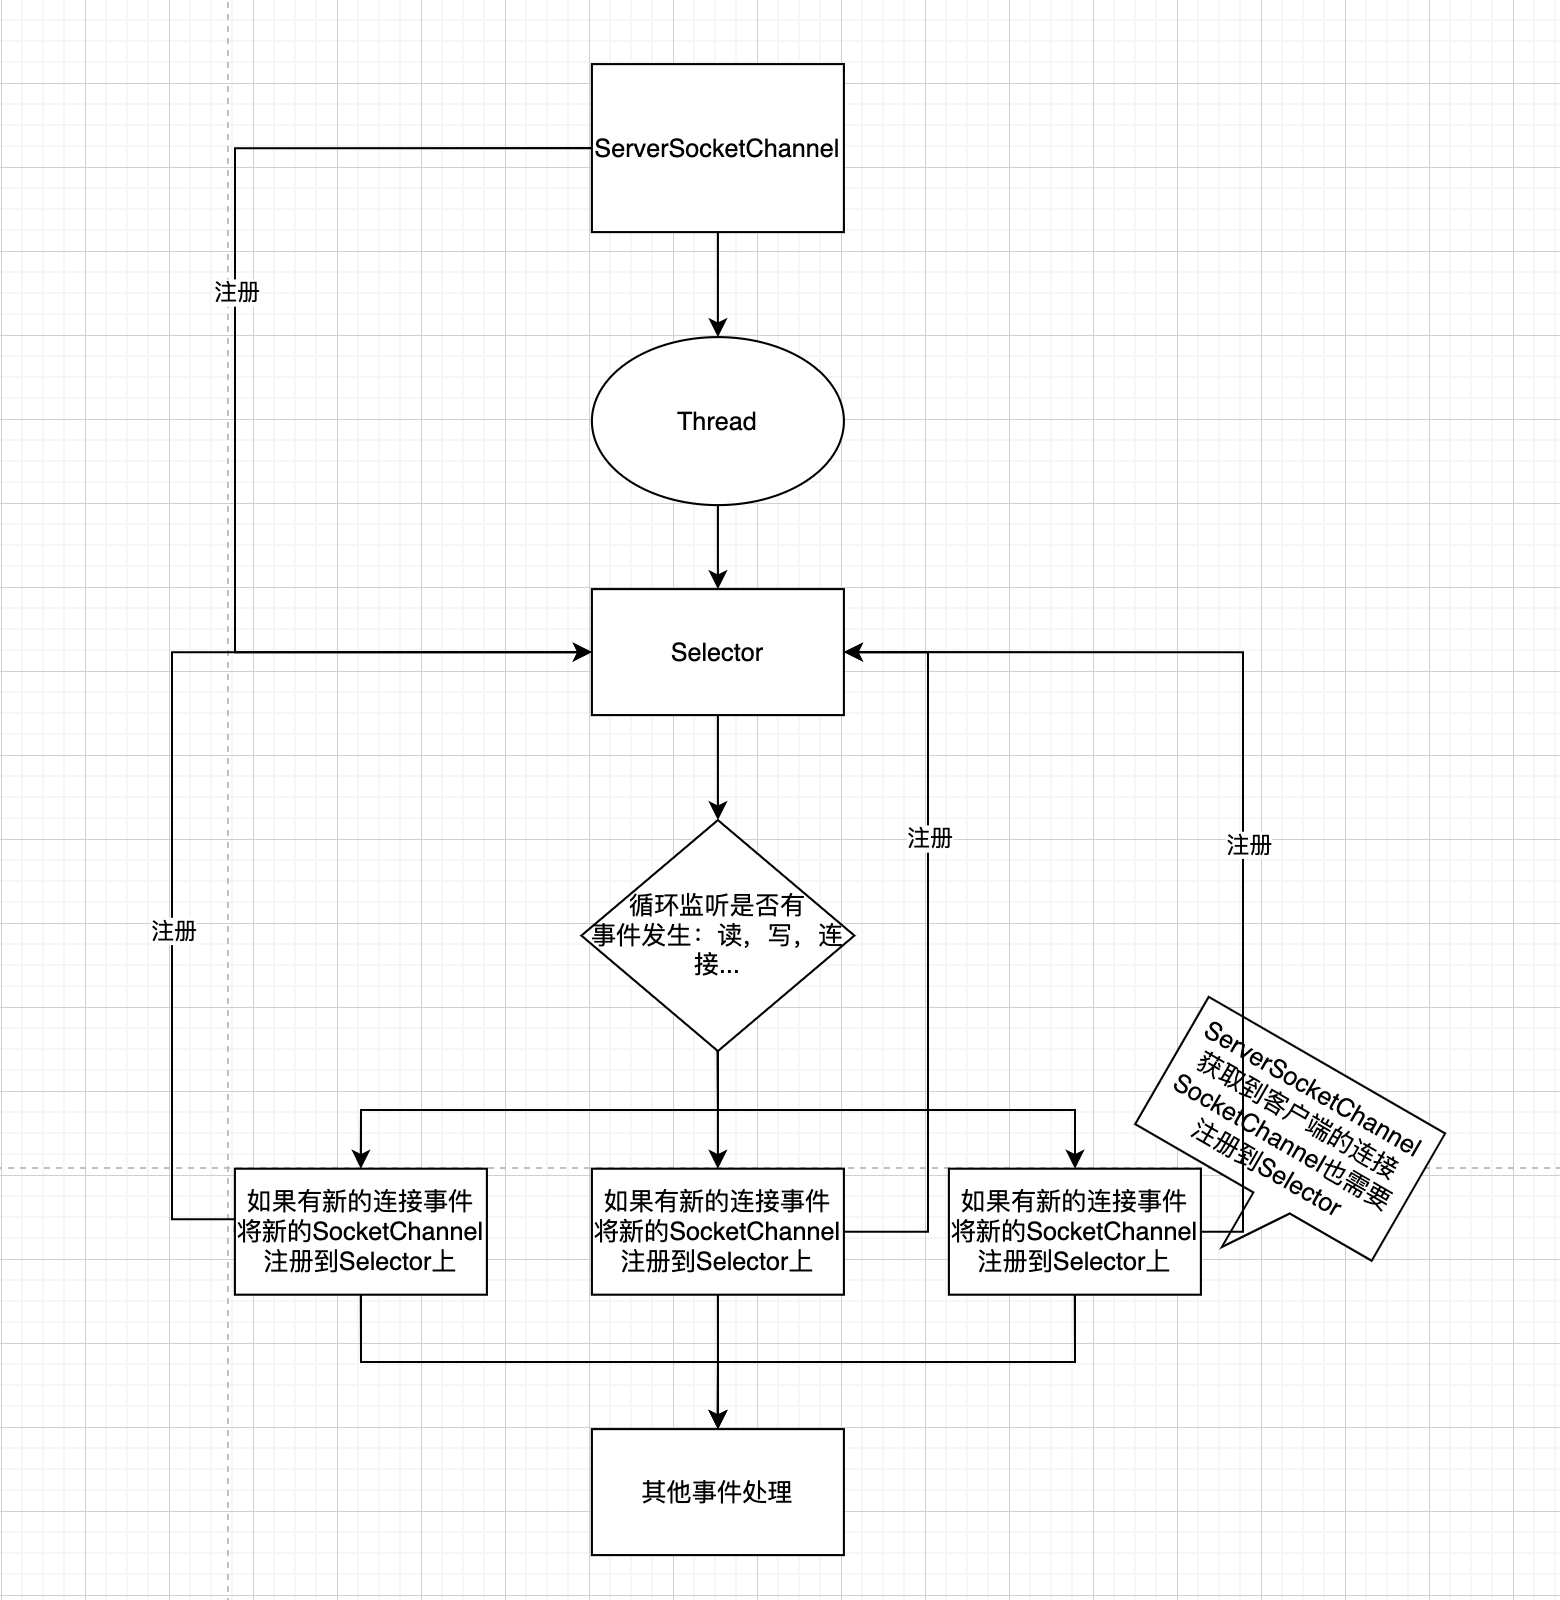
- selector能够检测多个注册的通道上是有事件发生(注意:多个Channel以事件的方式可以注册到同一个selector上),如果事件发生,便获取事件然后针对每个事件进行相应的处理,这样就可以只用一个单线程去管理多个通道,也就是管理多个连接和请求
- 只有在连接/通道真正有读写事件发生时,才会进行读写,就大大减少了系统开销,并且不必为每个连接都创建一个线程。
selector 相关方法
public static Selector open():得到一个选择器对象public abstract int select(long timeout):监控所有注册的通道,当其中有IO操作可以进行时,将对应的SelectionKey加入到内部集合中并返回,参数用来设置超时时间,阻塞timeout时间后返回public abstract int select():会阻塞public abstract Set<SelectionKey> selectedKeys():从内部集合中得到所有的SelectionKeypublic abstract Selector wakeup():唤醒selector
线程池缺点:
- 阻塞模式下,线程仅能处理一个socket连接
- 适合短连接的场景
selector场景
selector作用就是配和一个线程来管理多个channel,获取这些channel上发生的事件,这些channel工作在非阻塞模式下,不会让线程吊死在一个channel上。适合连接数特别多,流量低的场景;
调用selector的select()会阻塞,直到channel发生了读写就绪事件,select方法就会返回这些事件交给thread来处理。
NIO 非阻塞网络编程原理
- 当客户端连接时,会通过
ServerSocketChannel得到SocketChannel - 通过
public final SelectionKey register(Selector sel, int ops)方法将SocketChannel注册到selector上,一个selector可以注册多个socketchannel - 注册后返回一个
SelectingKey,会和该Selector关联 selector开始监听select方法,返回有事件发生的通道个数- 进一步得到各个
SelectionKey,在通过SelectiongKey获取SockerChannel - 再通过得到的Channel完成业务处理
NIO简单编程案例
非阻塞模式
创建Server
@Slf4j
public class NioNoBlockServer {
    public static void main(String[] args) throws IOException, InterruptedException {
        // 创建一个接收数据的buffer
        ByteBuffer byteBuffer = ByteBuffer.allocate(16);
        // 创建服务端
        ServerSocketChannel serverSocketChannel = ServerSocketChannel.open();
        // 绑定端口
        serverSocketChannel.bind(new InetSocketAddress(8000));
        // 设置非阻塞模式
        serverSocketChannel.configureBlocking(false);
        // 定义一个连接的集合
        List<SocketChannel> socketChannelList = new ArrayList<>();
        while(true){
            // accept 建立客户端连接,SocketChannel是用来与客户端之间通信的通道
//            log.info("等待客户端加入......");
            // 阻塞方法,直到有连接加入
            SocketChannel socketChannel = serverSocketChannel.accept();
//            Thread.sleep(2000);
            if(socketChannel != null){
                log.info("连接加入......{}", socketChannel.getRemoteAddress());
                // 设置为非阻塞模式
                socketChannel.configureBlocking(false);
                socketChannelList.add(socketChannel);
            }

            for(SocketChannel sc : socketChannelList){
                // 接收客户端数据
                // 阻塞方法,直到客户端发送数据
//                    log.info("read before......");
                int read = sc.read(byteBuffer);
                if(read > 0){
                    // 输出buffer中的内容
                    byteBuffer.flip();
                    ByteBufferUtil.debugAll(byteBuffer);
                    // 切换为写模式
                    byteBuffer.clear();
                    log.info("read after......");
                }
            }
        }
    }
}
创建client
public class NioNoBlockClient {
    public static void main(String[] args) throws IOException {
        SocketChannel socketChannel = SocketChannel.open();
        socketChannel.connect(new InetSocketAddress("localhost", 8000));

        System.out.println();
    }
}
先启动一个server和两个client
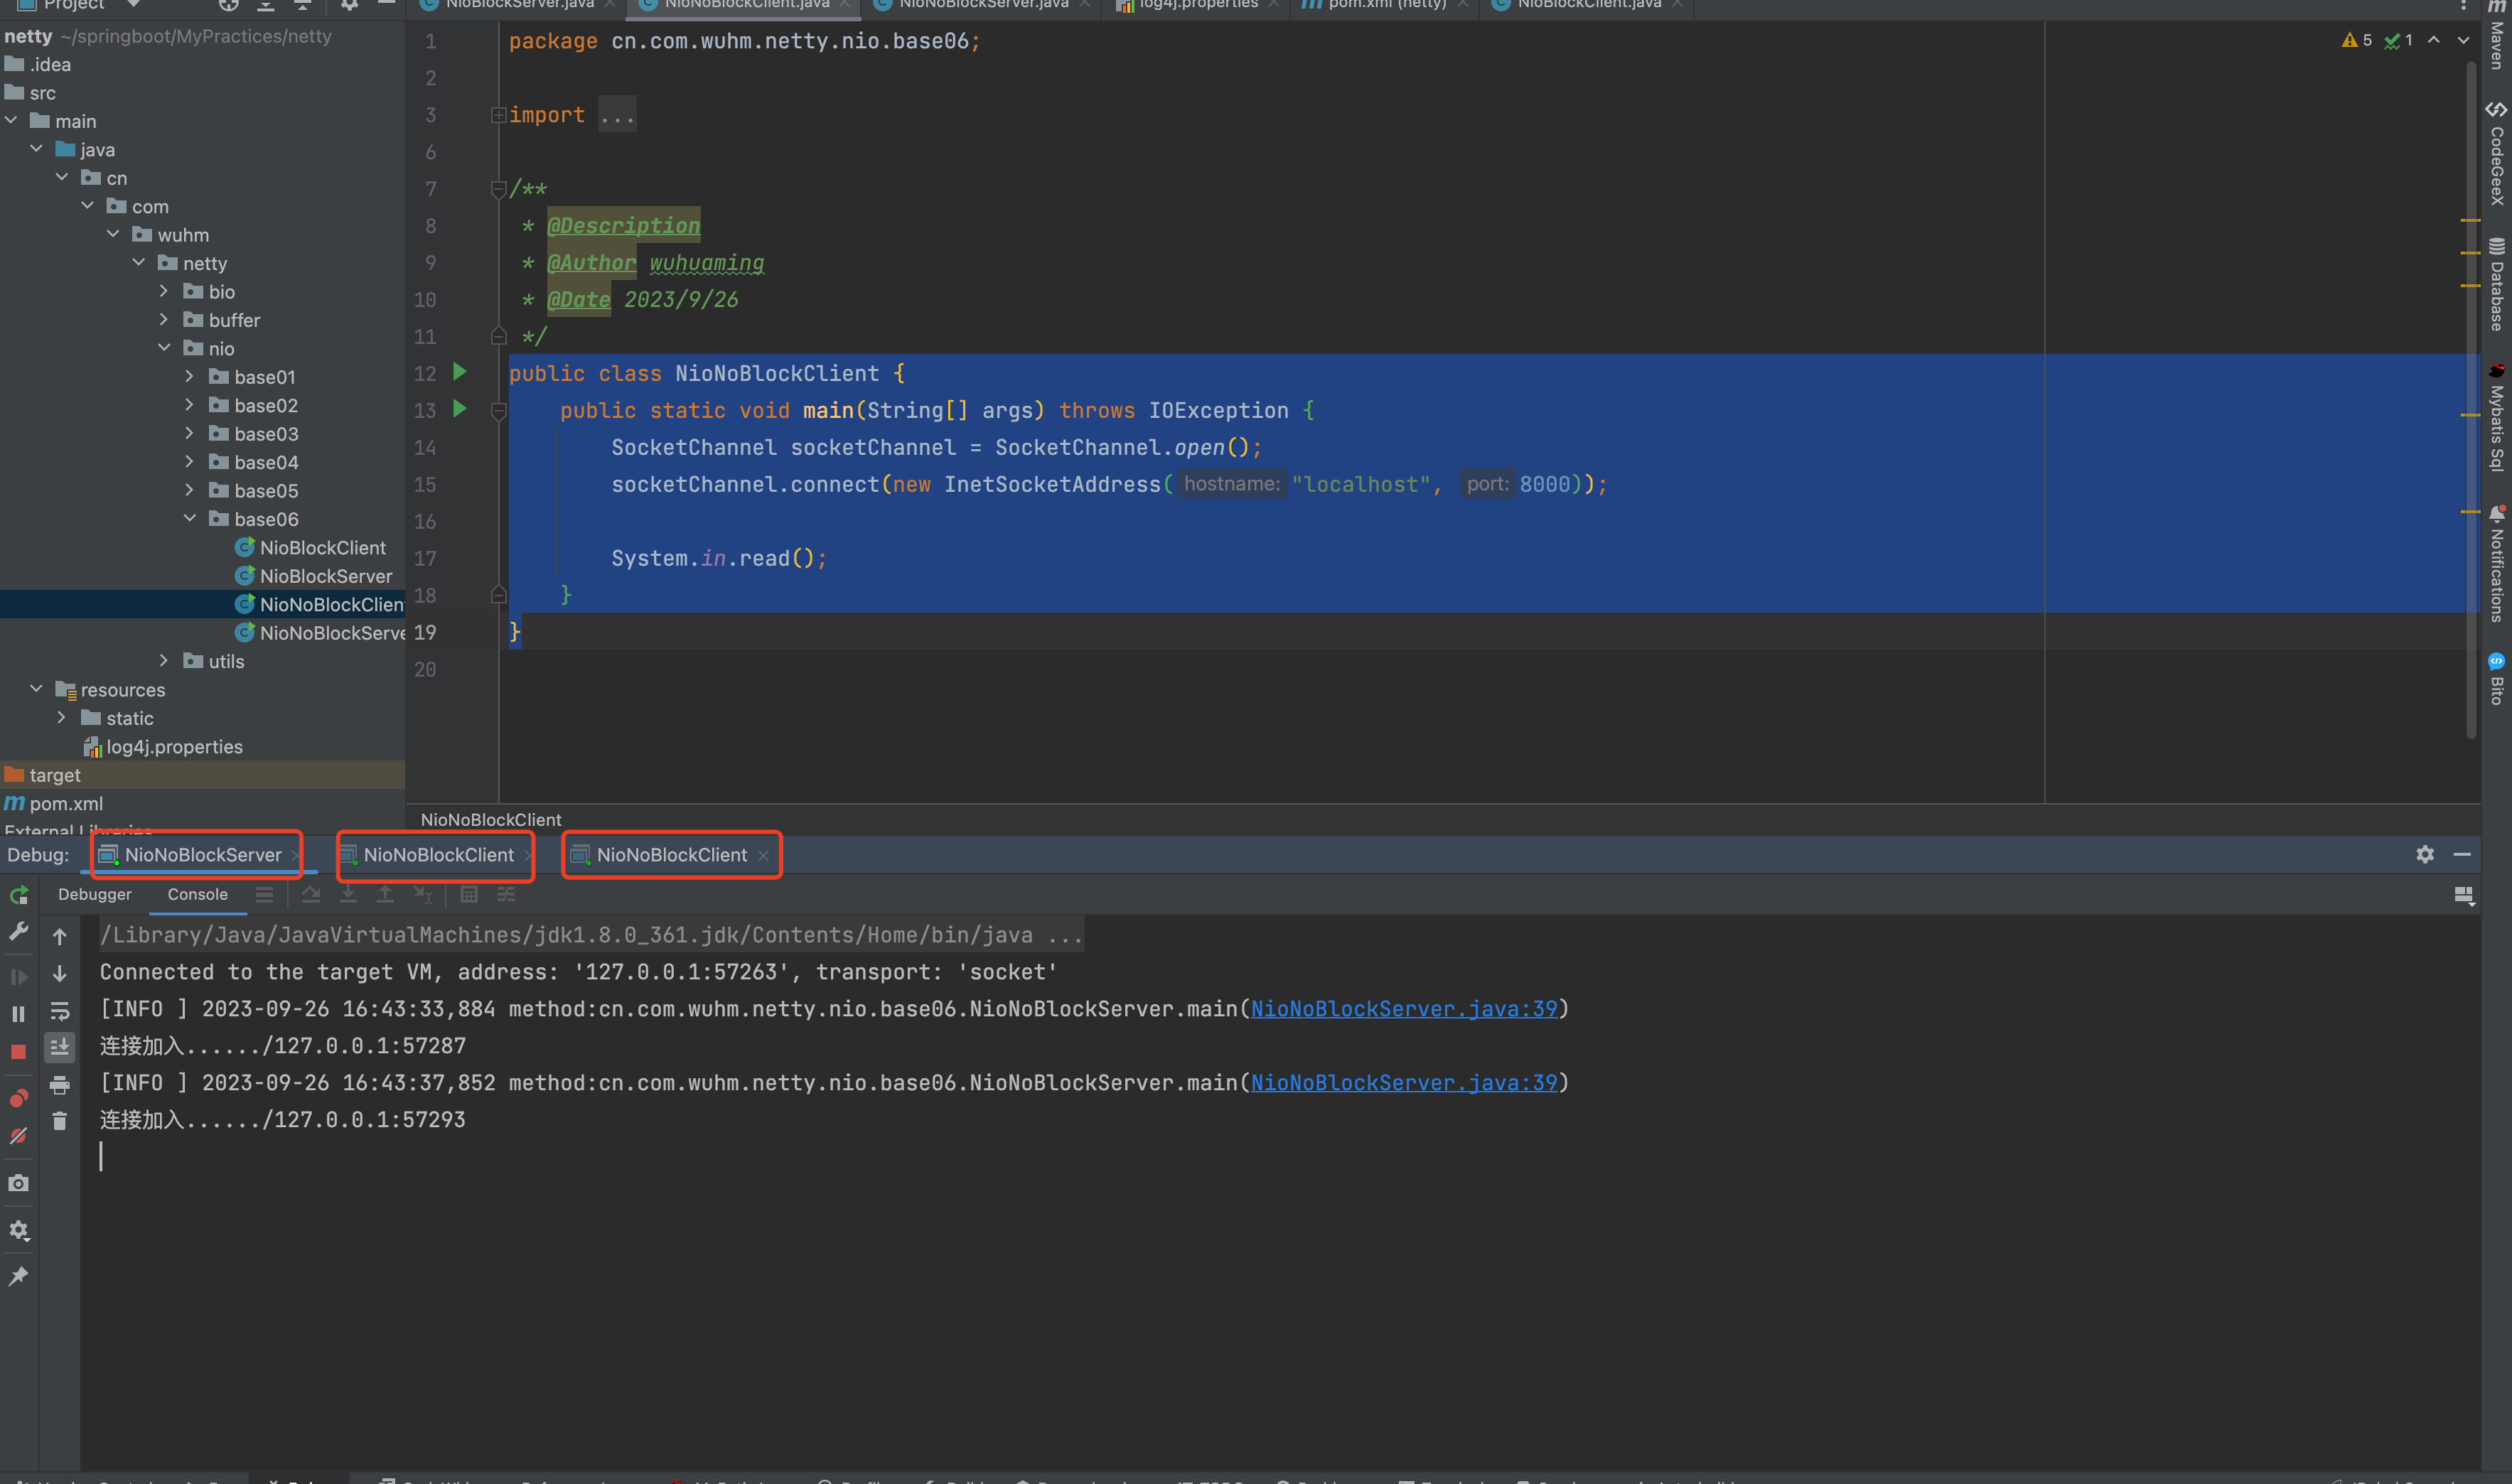
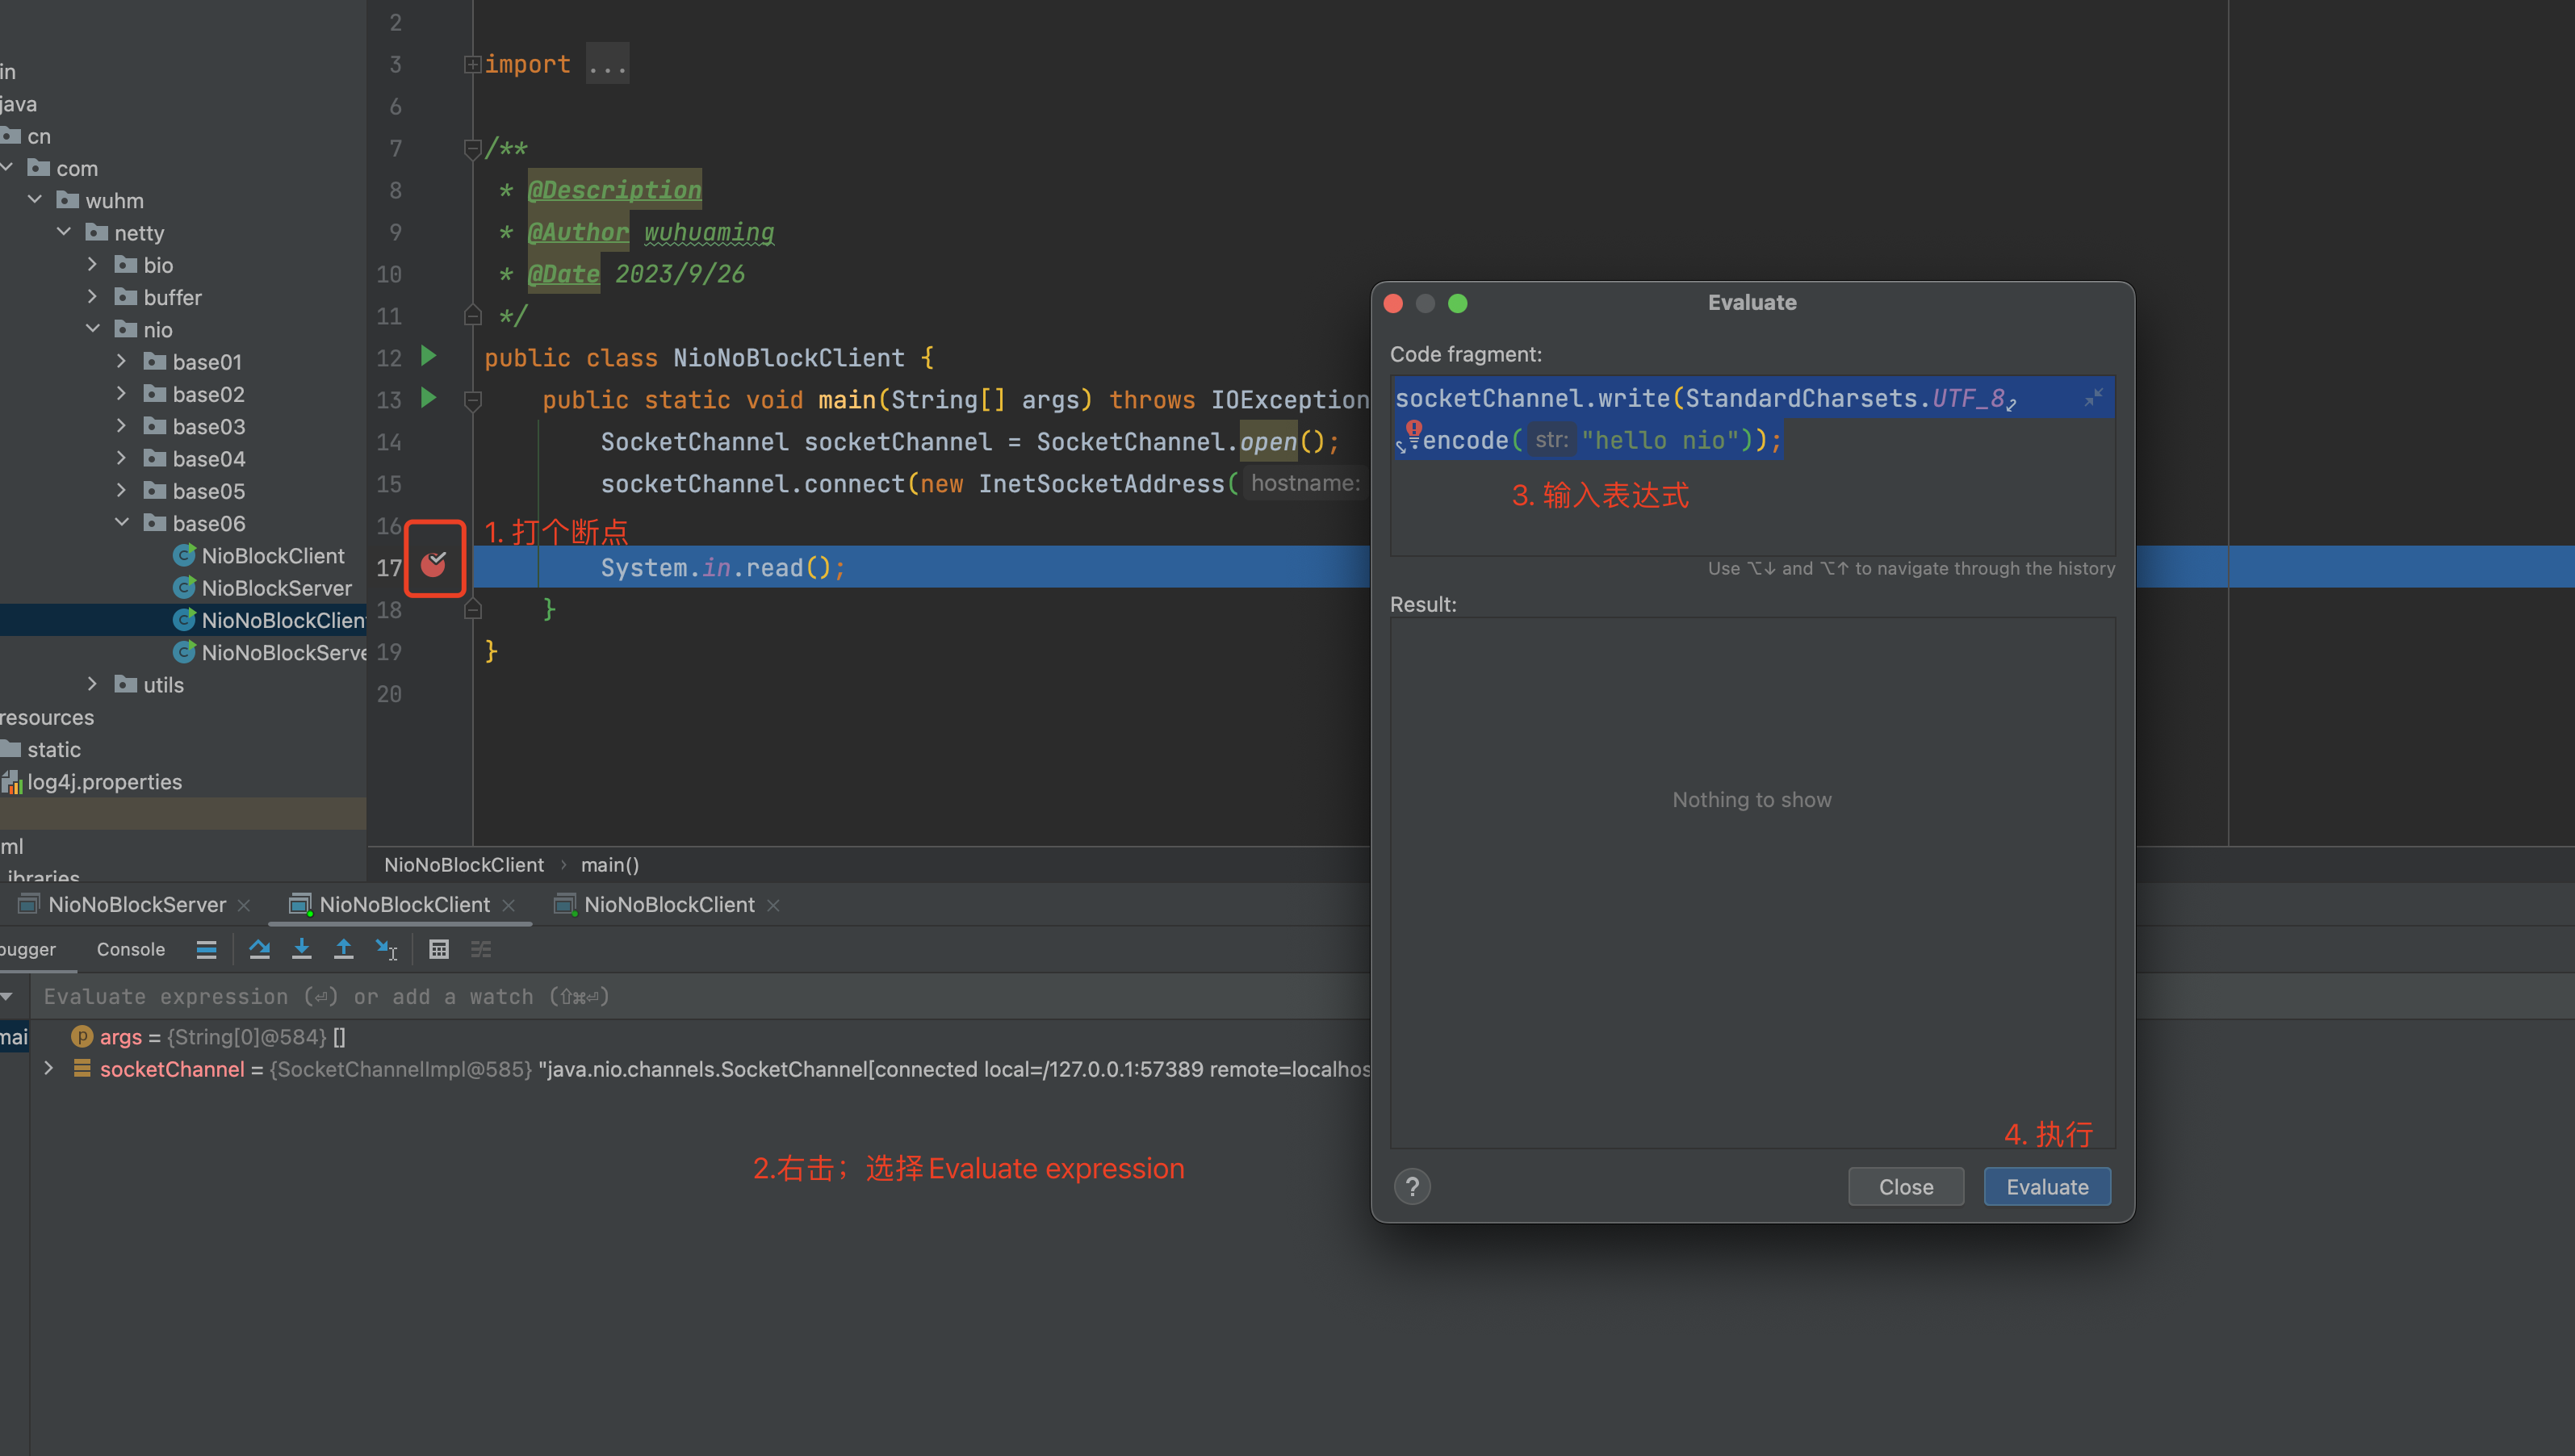
通过debug模式来模拟客户端发送数据:
在客户端的debug页面右击,选择:Evaluate expression
输入:socketChannel.write(StandardCharsets.*UTF_8*.encode("hello nio"));
server控制台输出日志:
[INFO ] 2023-09-26 16:50:19,242 method:cn.com.wuhm.netty.nio.base06.NioNoBlockServer.main(NioNoBlockServer.java:39)
连接加入....../127.0.0.1:57574
[INFO ] 2023-09-26 16:50:39,762 method:cn.com.wuhm.netty.nio.base06.NioNoBlockServer.main(NioNoBlockServer.java:39)
连接加入....../127.0.0.1:57589
[DEBUG] 2023-09-26 16:51:30,812 method:io.netty.util.internal.logging.InternalLoggerFactory.useSlf4JLoggerFactory(InternalLoggerFactory.java:63)
Using SLF4J as the default logging framework
+--------+-------------------- all ------------------------+----------------+
position: [0], limit: [9]
         +-------------------------------------------------+
         |  0  1  2  3  4  5  6  7  8  9  a  b  c  d  e  f |
+--------+-------------------------------------------------+----------------+
|00000000| 68 65 6c 6c 6f 20 6e 69 6f 00 00 00 00 00 00 00 |hello nio.......|
+--------+-------------------------------------------------+----------------+
[INFO ] 2023-09-26 16:51:30,824 method:cn.com.wuhm.netty.nio.base06.NioNoBlockServer.main(NioNoBlockServer.java:56)
read after......
使用selector管理事件
server
@Slf4j
public class SelectorServer {

    public static void main(String[] args) throws IOException {
        // 1. 获取selector
        Selector selector = Selector.open();

        // 创建一个buffer
        ByteBuffer byteBuffer = ByteBuffer.allocate(16);
        // 2. 创建一个服务
        ServerSocketChannel serverSocketChannel = ServerSocketChannel.open();
        // 设置为非阻塞
        serverSocketChannel.configureBlocking(false);
        // 3. 将 serverSocketChannel 注册到selector上, selectionKey: 事件发生后可以知道是什么事件,是哪个channel的事件
        // 0 : 表示不关注任何事件,null 是一个bytebuffer
        SelectionKey selectionKey = serverSocketChannel.register(selector, 0, null);
        selectionKey.interestOps(SelectionKey.OP_ACCEPT);

        serverSocketChannel.bind(new InetSocketAddress(8000));

        while(true){
            // select 方法是阻塞的,当有事件发生的时候才运行,如果select有事件发生了,但是一直未处理,它不会阻塞;因此事件发生后,要么处理,要么取消,不能置之不理
            selector.select();
            // 获取所有事件集合
            Set<SelectionKey> selectionKeySet = selector.selectedKeys();
            Iterator<SelectionKey> iterator = selectionKeySet.iterator();
            while (iterator.hasNext()){
                SelectionKey sk = iterator.next();
                // 处理key的时候需要将这个key从 SelectionKeySet集合中删除,因为这个集合里面只会往里面不断地新增加发生的事件,所以需要删除掉
                iterator.remove();
                if(sk.isAcceptable()){// 连接事件
                    ServerSocketChannel socketChannel = (ServerSocketChannel)sk.channel();
                    // 接收客户端的连接
                    SocketChannel channel = socketChannel.accept();
                    // 设置为非阻塞模式
                    channel.configureBlocking(false);
                    SelectionKey socketChannelKey = channel.register(selector, 0, null);
                    // 关注读事件
                    socketChannelKey.interestOps(SelectionKey.OP_READ);
                    log.info("连接建立:" + channel.getRemoteAddress());
                }else if (sk.isReadable()){// 读事件
                    try {
                        SocketChannel channel = (SocketChannel) sk.channel();
                        ByteBuffer byteBuffer1 = ByteBuffer.allocate(16);
                        int read = channel.read(byteBuffer1);
                        if(read == -1){
                            sk.cancel();
                            channel.close();
                        }
                        byteBuffer1.flip();
                        ByteBufferUtil.debugAll(byteBuffer1);
                    }catch (Exception e){
                        e.printStackTrace();
                        sk.cancel();
                    }

                }

            }
        }


    }
}
多工作者模式
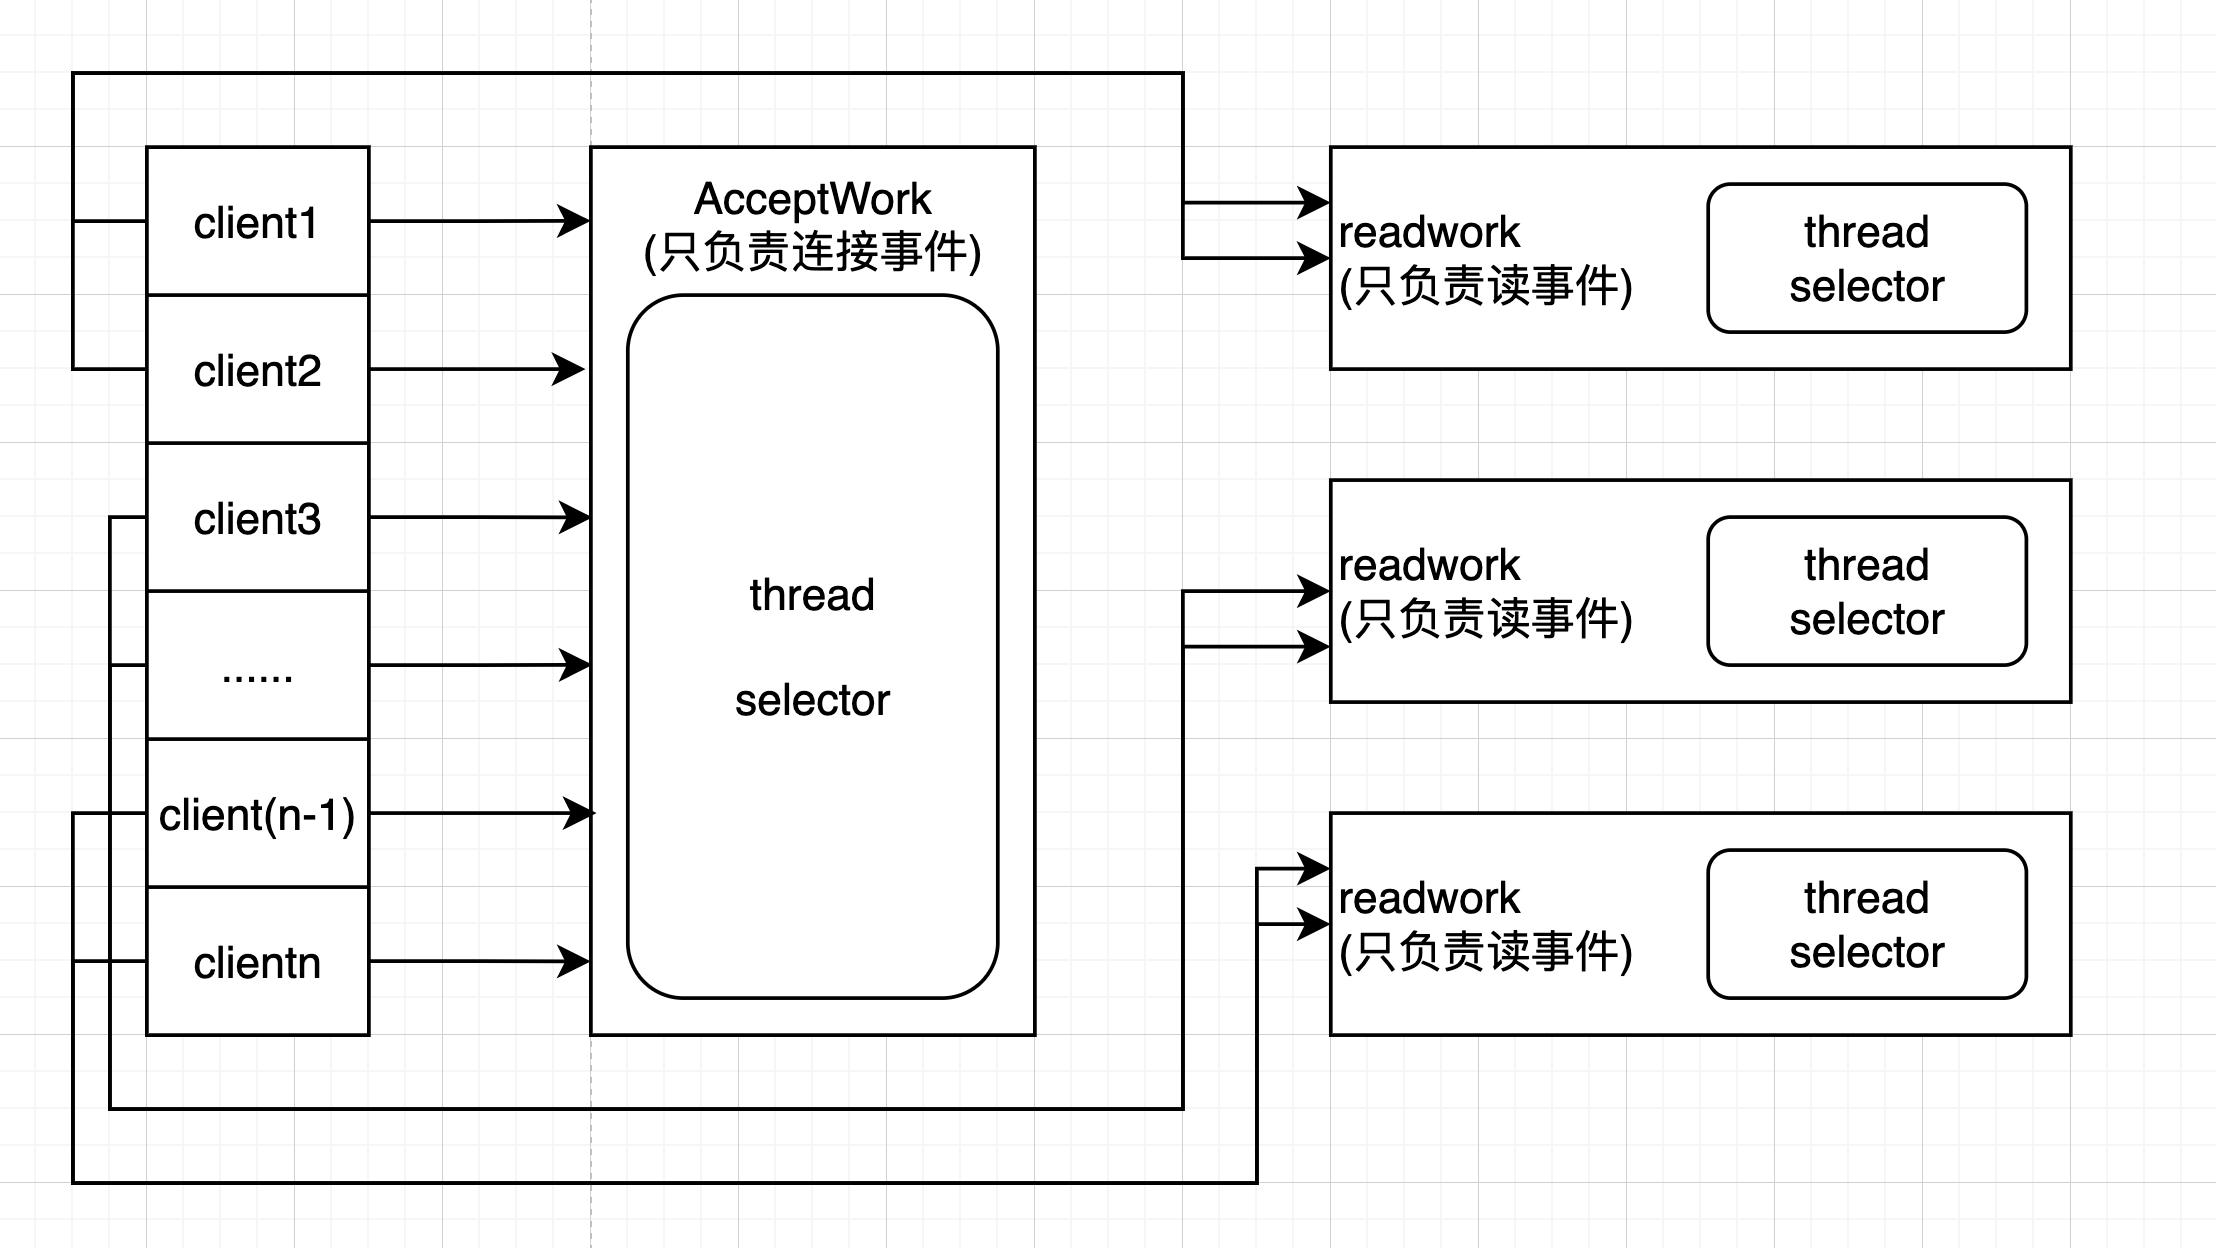
server
@Slf4j
public class MultiThreadServer {

    public static void main(String[] args) {
        Thread.currentThread().setName("acceptWork");
        try {
            ServerSocketChannel scc = ServerSocketChannel.open();
            scc.configureBlocking(false);

            Selector selector = Selector.open();
            scc.register(selector, SelectionKey.OP_ACCEPT);
            scc.bind(new InetSocketAddress(8000));

            Worker[] workers = new Worker[2];
            // 创建work
            for (int i = 0; i < 2; i++) {
                workers[i] = new Worker("readWorker" + i);
            }
            // 初始化注册worker

            AtomicInteger count = new AtomicInteger();
            while(true){
                selector.select();
                Set<SelectionKey> selectionKeySet = selector.selectedKeys();
                Iterator<SelectionKey> iterator = selectionKeySet.iterator();
                while(iterator.hasNext()){
                    SelectionKey selectionKey = iterator.next();
                    iterator.remove();
                    if(selectionKey.isAcceptable()){
                        ServerSocketChannel serverSocketChannel = (ServerSocketChannel)selectionKey.channel();
                        SocketChannel socketChannel = serverSocketChannel.accept();
                        socketChannel.configureBlocking(false);
                        log.debug("新连接建立:");
                        // 关联selector
                        log.debug("register before");
                        // 取模轮询
                        workers[count.getAndIncrement() % workers.length].register(socketChannel);
                        log.debug("register after");
                    }
                }
            }
        }catch (Exception e){
            log.info("error: ", e);
        }

    }

    static class Worker implements Runnable{
        private Thread thread;

        private Selector selector;

        private String name;

        private final ConcurrentLinkedQueue<Runnable> queue = new ConcurrentLinkedQueue<>();

        private volatile boolean initFlag;

        public Worker(String name) {
            this.name = name;
        }

        public void register(SocketChannel socketChannel) throws IOException {
            if(!initFlag) {
                this.thread = new Thread(this, this.name);
                this.thread.start();
                this.selector = Selector.open();
                initFlag = true;
            }
            // 向队列中添加任务,但是这个任务不会立即执行
            queue.add(()->{
                try {
                    socketChannel.register(selector, SelectionKey.OP_READ, ByteBuffer.allocate(16));
                } catch (ClosedChannelException e) {
                    throw new RuntimeException(e);
                }
            });
            // 添加完任务后需要唤醒selector
            selector.wakeup();
        }

        @Override
        public void run() {
            while(true){
                try {
                    selector.select();
                    Runnable runnable = queue.poll();
                    if(runnable != null){
                        runnable.run();
                    }

                    Iterator<SelectionKey> iterator = selector.selectedKeys().iterator();
                    while(iterator.hasNext()){
                        SelectionKey selectionKey = iterator.next();
                        iterator.remove();
                        if(selectionKey.isReadable()){
                            SocketChannel channel = (SocketChannel)selectionKey.channel();
                            ByteBuffer byteBuffer = (ByteBuffer) selectionKey.attachment();
                            log.debug("read before");
                            channel.read(byteBuffer);
                            byteBuffer.flip();
                            ByteBufferUtil.debugAll(byteBuffer);
                            log.debug("read after");
                        }
                    }
                } catch (IOException e) {
                    throw new RuntimeException(e);
                }
            }
        }
    }
}
client
public class MultiThreadClient {
    public static void main(String[] args) {
        try {
            SocketChannel socketChannel = SocketChannel.open();
            socketChannel.connect(new InetSocketAddress("localhost", 8000));
            socketChannel.write(Charset.defaultCharset().encode("hello nio i am is client!!!"));
            System.in.read();
        }catch (Exception e){
            log.info("error: ", e);
        }

    }
}